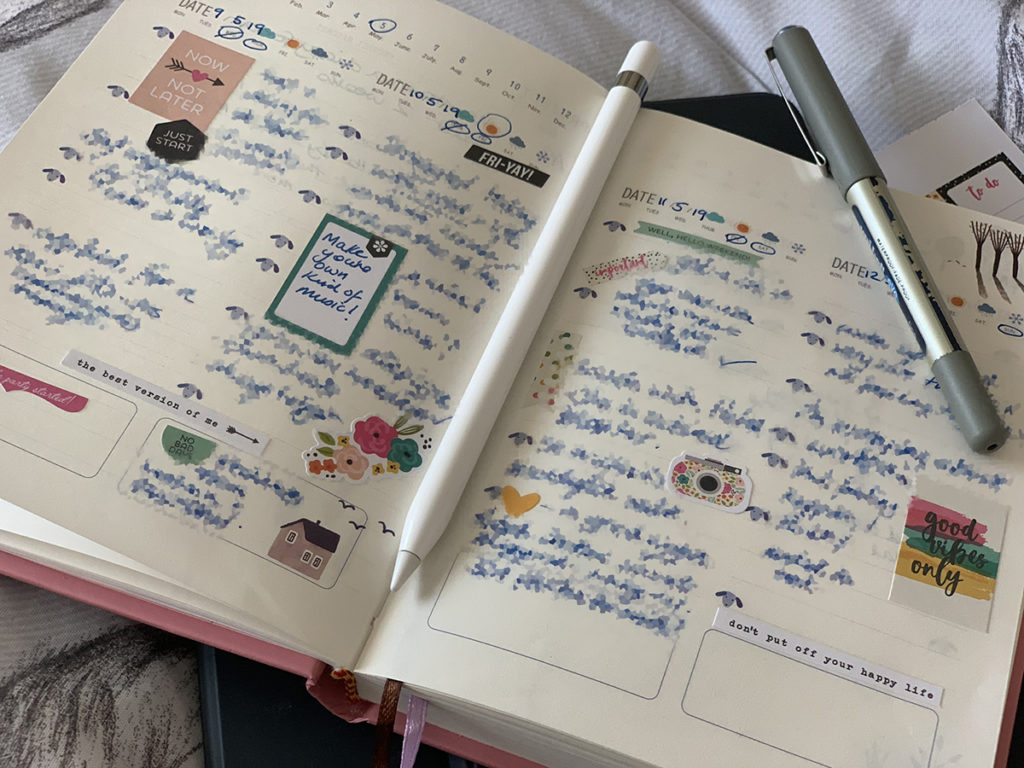
Putting myself in the picture isn’t something I would usually choose to do! Part of the brief was to keep a diary which is something I’ve tried to do before, but have never succeeded in completing a whole year!! This time, I decided to take a different approach and bought myself a planning diary with lots of stickers.
Planning diary kept for this assignment
This actually worked quite well for a couple of months. In stead of writing reams, I was able to just write a line or a phrase and then set about choosing an appropriate sticker. This made the book look pretty and the snippets of information were enough to jog my memory. This was going ok until one day I realised I hadn’t written in it for a week! and there endeth the story of they diary!
I concluded that I really don’t find myself that interesting!
I considered my approach for this project would be ‘self-absented portraiture‘ as I don’t like being in photographs. However, I liked the idea of concealing myself and yet revealing myself through the use of a surrogate object.
In Eva Stenram’s drapes series she deflected the viewers gaze by covering parts of the women’s bodies, creating a scene that leaves the viewer without all of the answers and forces them to explore the image for further clues about the person. Like most people I am complex and multifaceted, but as an introvert draw my energy from within and therefore, don’t always show the ‘full me’ to many people.
I was very drawn to Elinor Carruci’s work which has a much more intimate feel. She is able to capture very graphic moments of life in a low light style using members of her family and herself. I really like this approach but didn’t feel that this would work for this project.
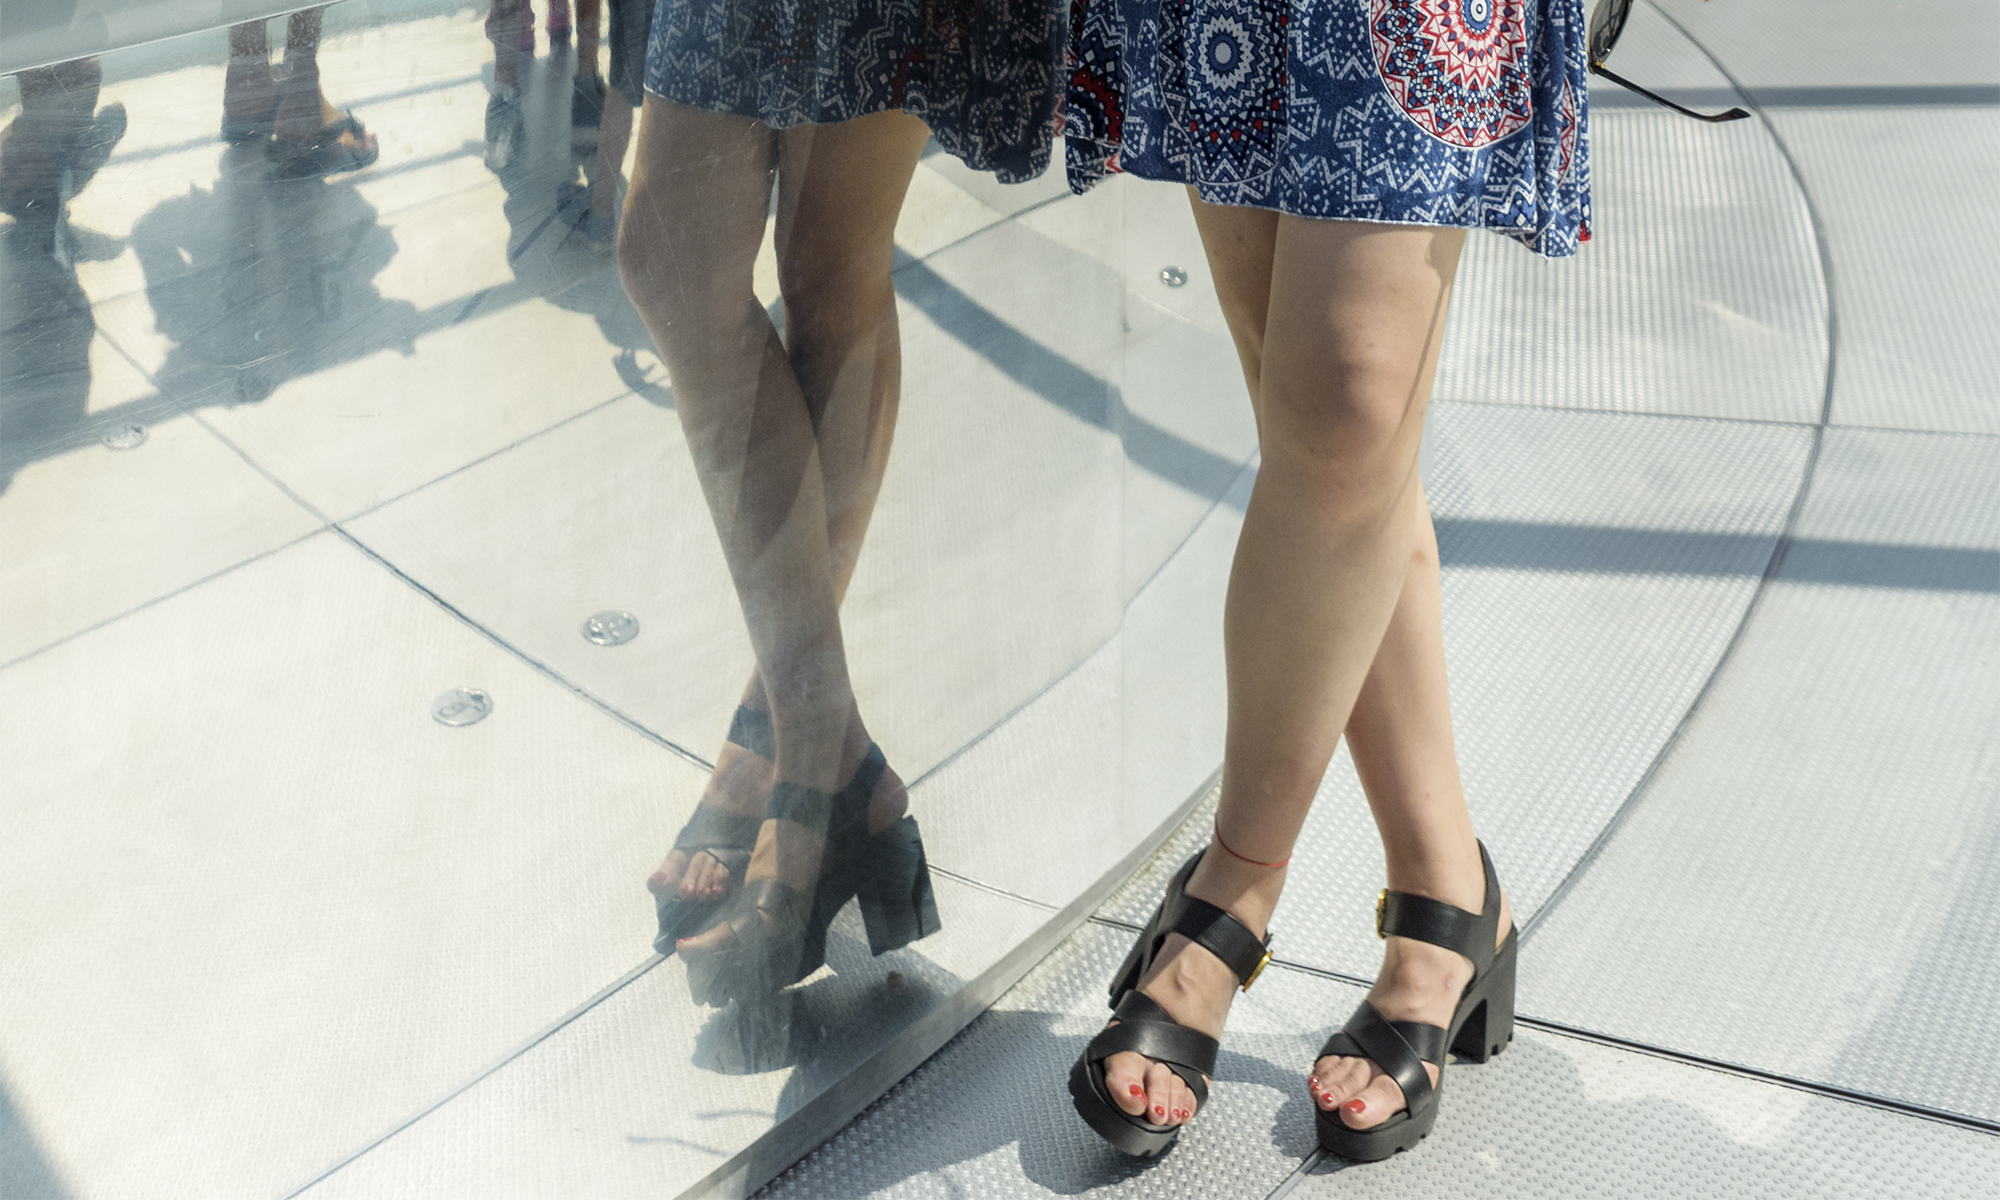
I have chosen to depict myself through a surrogate; my shoes. My aim is to give a glimpse of myself whilst giving the viewer the opportunity to explore the image for more clues. I have used natural daytime light to capture this set, so by that token focused only on my daytime activities.
In researching people using shoes in this way, I couldn’t find many, if any, examples. The majority of photographs of shoes are taken in order to sell them. Therefore, I wanted to make ‘real’ life photos with shoes that are worn in and being used. In some of the images the shoes are the primary focus of the picture, whereas in others, they are incidental in the image. In a few of the images, you are seeing the world from my point of view. On reflection, I think this is a good analogy of me.
We seem, these days, to think we know people because of the images they post on social media, this gave rise to the invent of the selfie and a trend of people posting hundreds of images of their face. But how much does this actually tell us about them?
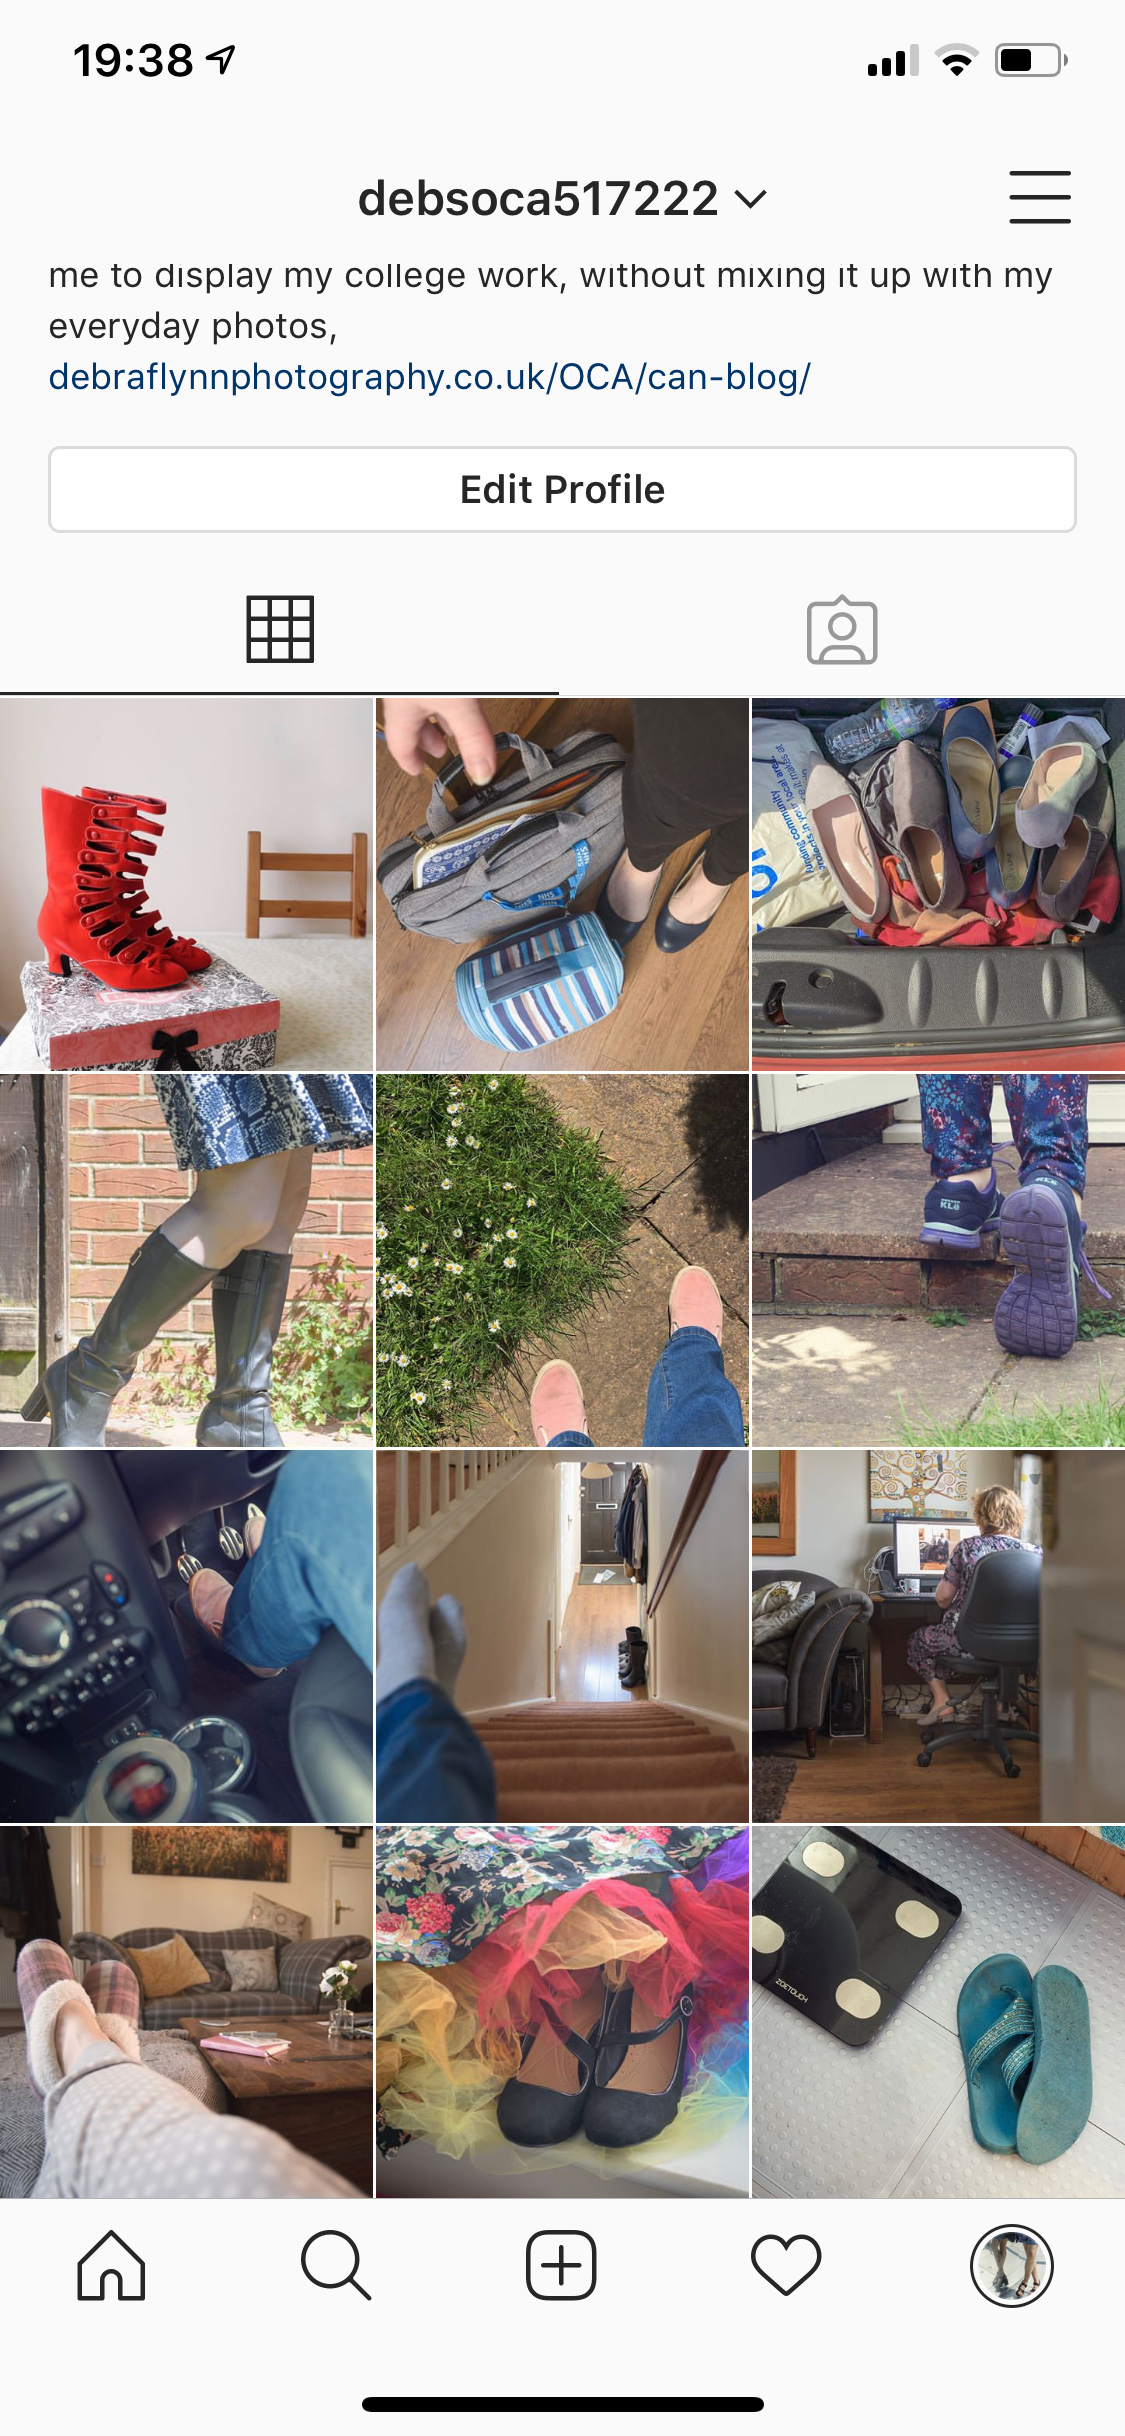
I have chosen to present these images on Instagram because this is one of the most commonly used apps for sharing self-portraits. There are 12 images in this set, because this is the number of pictures you can see in a grid form on your phone when you click on someone’s profile. This is also why I picked the square format.
Below is a screenshot and a link to my Instagram page. I would like people to view them through this media and comment.
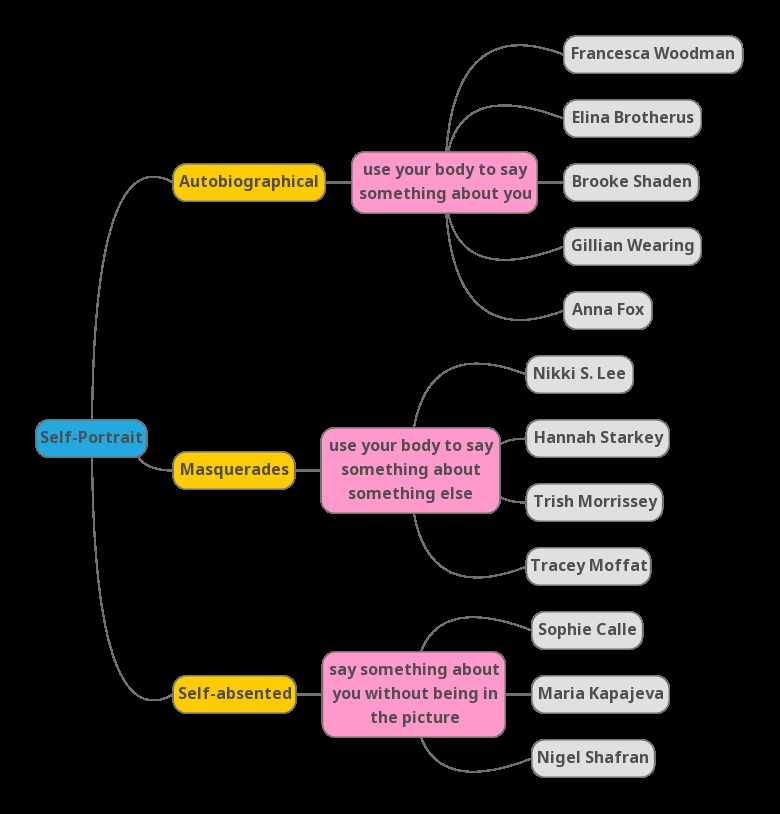
Self portrait mind map of Part 3 – putting yourself in the picture
Having read through Part 3 – Putting yourself in the picture and researching the artists suggested and more, I have come to the conclusion that, I certainly don’t want to be naked in any images!, I don’t really have anything to bang a drum about and therefore, I am pretty sure my assignment will be self-absented set.
I would also like to explore the theme of substitution which was a question that came out of my last assignment, where I substituted a wooden hand for a real one.
I would also like to link this work to instagram. It seems that everyone uploads images of themselves (selfies} to instagram these days, coupled with a description of where they are, what they are doing. This is coupled with #lotsoflinks, #funnyquotes, #likegrabbingheadlines. Getting likes is all that matters!!
This is a screen shot of my current instagram account as seen on my iphone. Most people see a grid of 3 x 3 or 3 x 4 images at a time, so I will aim for 12 photos to complete this set.
I tend to use my account to show images I’ve taken, either for clients or for myself. Occasionally I add photos of me and my grandchildren, but try very hard not to post ‘crap’ to it, as I want to showcase myself as an artist (is there even such a thing!!)
I have been keeping my diary now for 8 days. I HAVE filled it in every day. This a major achievement for me. I am using a planning diary, rather than a regular journal. This seems to suit me better and I’ve found that I LOVE, LOVE, LOVE, stickers! they break up the writing and I find the small snippets much more interesting that lots of prose. It is enough to trigger the memories.
It’s a note for learning here too. I really struggle to concentrate with pages and pages of prose. I have to read reports for work, and I always have to get a cup of tea and often get up and go for a walk, so I can re-concentrate several times during the course of reading them. I prefer short bursts of text interspersed with images or graphics. Conversely though, I’m pretty good at writing reports!
My subject for the assignment:
I considered picking up the work I tried out after reading Francesca Woodman’s work, which was exploring the idea of using long exposure to be in a space and then not, but decided it was a bit boring and it’s essentially one photographic technique done in a few different ways. I have decided to complete my initial thoughts of self-absented self-portraiture based on substitution. I am going to tell viewers about myself by using my SHOES.
The first thing to say is that I again had a FaceTime conversation with Les, my tutor which I have come to really enjoy and find it so enthusing to be able to discuss and debate my ideas. Far from finding it daunting and worrying about any criticism I have learned that the conversation is really stimulating my thoughts and leading me to research places and people, I wouldn’t have found on my own. I so wish I’d started out doing this, because actually having those discussions really does help improve my work.
I also made the notes this time and submitted them for Les to amend and add references about photographers and artists we’d talked about. I’ll mention them later.
I think I ended up with more questions than answers from this assignment, but I don’t think that is a bad thing, quite the contrary. In all aspects of this assignment, I have had to discuss my objectives with people. From those that gave me items, to my husband who helped manage the process and to showing the final images to my tutor and others. If feels like a real collaboration and really helped me engage fully with the brief.
I am conscious that I mustn’t reflect and reminisce too much as I still have quite a bit of the course to complete.
I have set myself a goal to research each of the photographers, authors and artists that Les and Moira mentioned during the conversation and reflect on their link to my work for the final submission. I won’t however, attempt incorporate their ideas into Assignment 2. In stead, I think it will show better progression in my work if I incorporate it into subsequent areas of the course.
Having lost his mother, with whom he had lived most of his life, he goes looking for her among old photographs; time and again the face he finds is not quite hers, even if objectively she looks like herself. At last, he discovers her true likeness, the “air” that he remembers, in a picture of Henriette aged five, taken in a winter garden in 1898. (In the journal entry that recounts this discovery, Barthes simply notes: “Je pleure.”) In narrative terms, it’s an astonishing moment, comparable to the onrush of memories as madeleine meets teacup in Proust, or the scene in Citizen Kane when the maddened Kane first grasps the snow globe, emblem of all he has left behind. Barthes, however, is a temperamentally discreet narrator, so never shows us the photograph: “It exists only for me. For you, it would be nothing but an indifferent picture.”
“Camera Lucida is a short book, but with the winter garden photograph it begins all over again. Suddenly every photograph is for Barthes a memorial; the very essence of the medium is its spectral conjuring of death-in-life. Contemplating a portrait by Alexander Gardner of the condemned Lewis Payne – sentenced to death for the attempted murder of US Secretary of State WH Seward in 1865 – Barthes sees only this fearful temporal paradox: “He is dead and he is going to die.” And his book starts to sound weirdly premonitory: here is Barthes surrounded by his glum little icons, fantasising his own “total, undialectical death”.
In this article, I believe the author is saying that ‘optical unconcious’ is a viewer’s unconcious reaction to stimuli in an image that is unseen to them. Thereby, a shape or a colour or even the way someone smiles could trigger a reaction that other would not register, i.e. the unintended consequence of the image?
When you can not see what your are touching, your mind fills in the blanks with images and feelings from your subconscious. These are unique to you because your life experiences and encounters will be what your mind recalls to make sense of what you are experiencing. Walter Benjamin’s theory of ‘optical unconsciousness’ advocated that images contain unseen elements that trigger your unconscious and affect how a viewer sees the image. Therefore, if you cannot consciously see an item is the resulting image the unseen unconsciousness?
This set of images explores the depiction of objects that you have never seen. Each item was chosen by a different individual so that I could not be sure what it was. I have made these images based only on having been able to feel the item whilst blindfolded. The images are my visualisations of the experiences and feelings triggered by touching the and the subconscious associations that it brought to my mind. By this I hope to have unlocked the ‘optical unconscious’, making it conscious.
Although, the actual items have been photographed by an assistant, I have chosen not to see them or present them with this work. Mindful of Roland Bathes ‘winter garden photograph’ which he never showed the viewer because he felt the essence of his mother that he had been searching for, would not be evident to the viewer, I have decided that revealing the actual item may detract from the image presented. My aim is to represent the feelings I experienced, not the item itself. I have, however, provided a description of the feelings and visualisations that I had whilst handling the objects. I have tried to use a ‘relay’ style in the hope that the viewer will engage with each image in their own way.
For a detailed description of the methodology used and technical information about how each of the images was created see below.
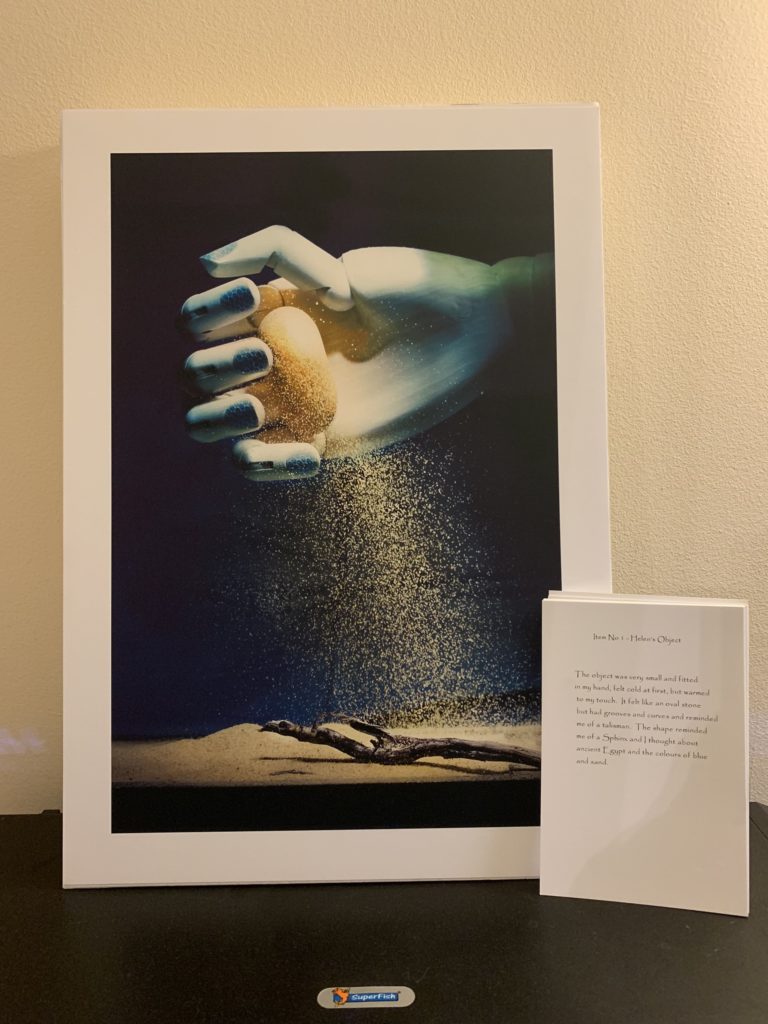
Item 1 – Helen’s Object
The object was very small and fitted in my hand, felt cold at first, but warmed to my touch. It felt like an oval stone but had grooves and curves and reminded me of a talisman. The shape reminded me of a Sphinx and I thought about ancient Egypt and the colours of blue and sand.
to see my blog about the production of this image click here
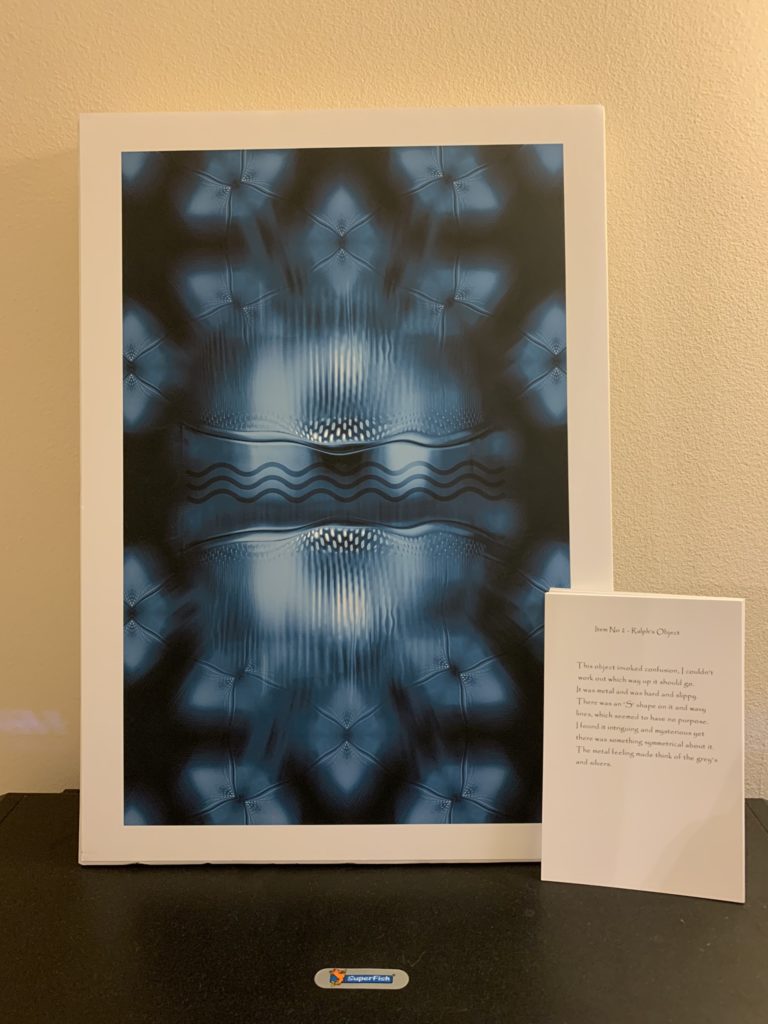
Item 2 – Ralph’s Object
This object invoked confusion, I couldn’t work out which way up it should go. It was metal and was hard and slippy. There was an ‘S’ shape on it and wavy lines, which seemed to have no purpose. I found it intriguing and mysterious yet there was something symmetrical about it. The metal feeling made think of the grey’s and silvers.
Item 2
to see my blog about the production of this image click here
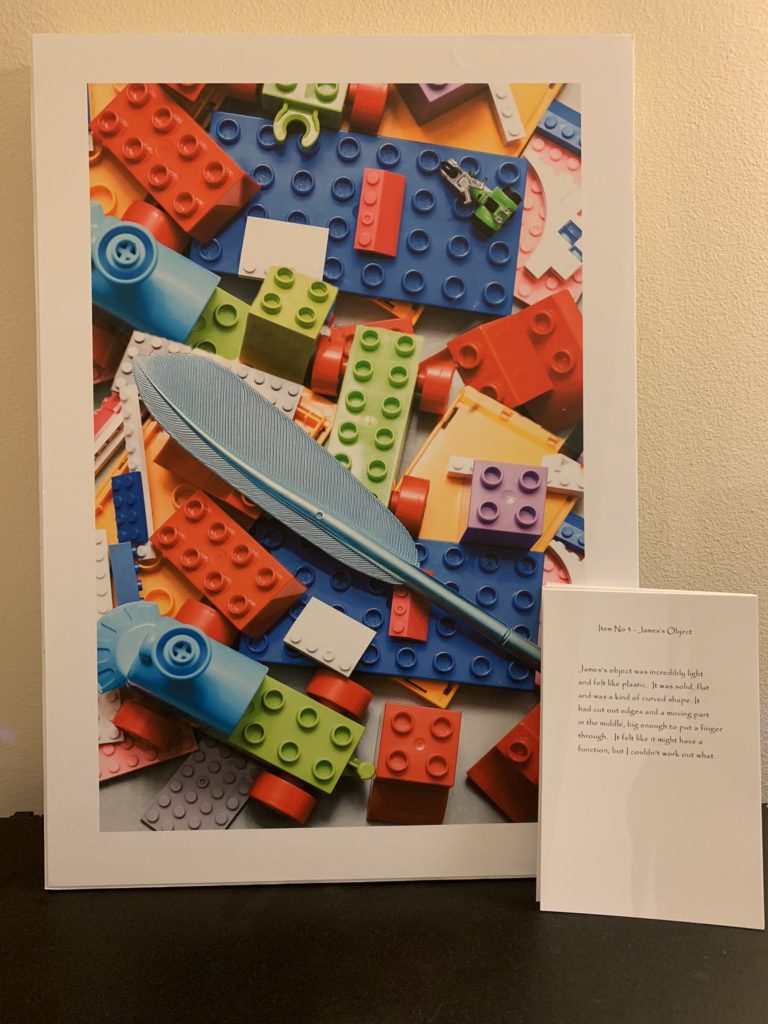
Item 3 – James’s Object
James’s object was incredibly light and felt like plastic. It was solid, flat and was a kind of curved shape. It had cut out edges and a moving part in the middle, big enough to put a finger through. It felt like it might have a function, but I couldn’t work out what.
Item 3
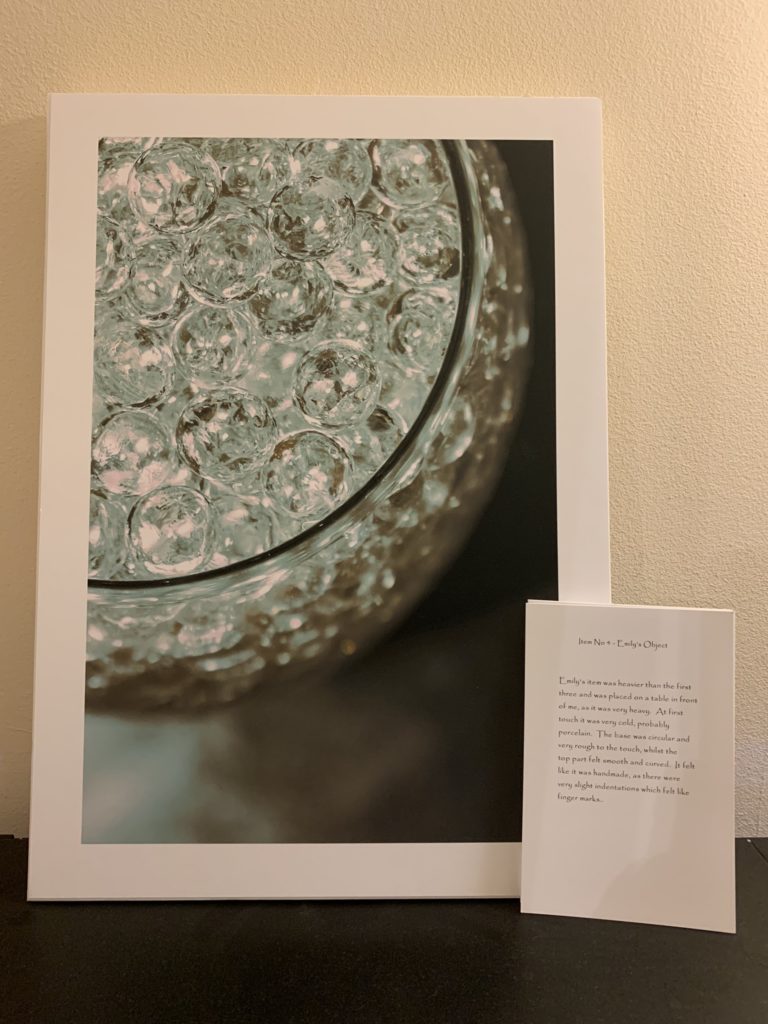
Item 4 – Emily’s Object
Emily’s item was heavier than the first three and was placed on a table in front of me, as it was very heavy. At first touch it was very cold, probably porcelain. The base was circular and very rough to the touch, whilst the top part felt smooth and curved. It felt like it was handmade, as there were very slight indentations which felt like finger marks.
Item 4
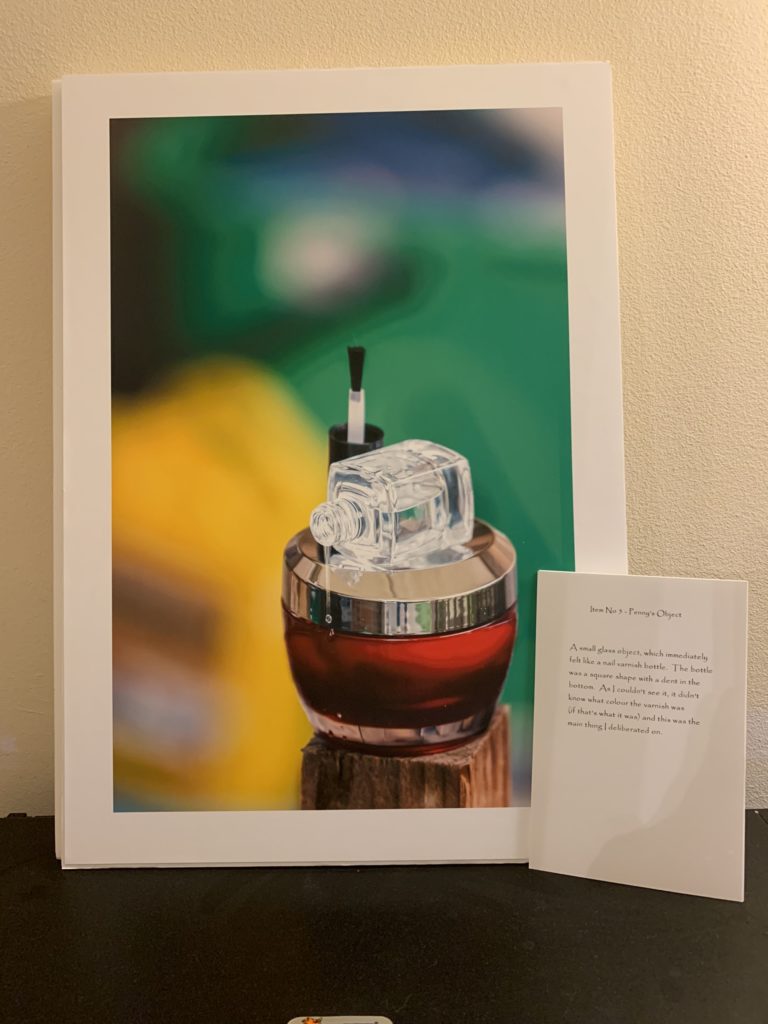
Item 5 – Penny’s Object
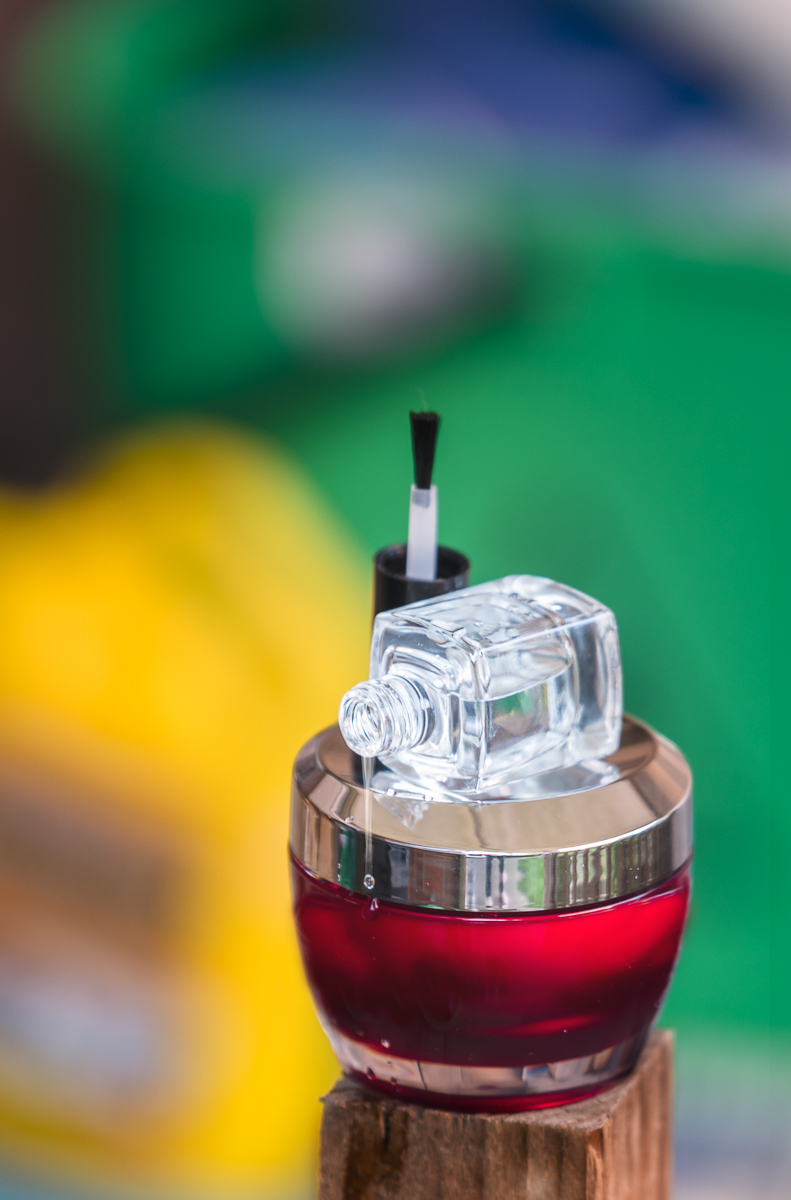
A small glass object, which immediately felt like a nail varnish bottle. The bottle was a square shape with a dent in the bottom. As I couldn’t see it, it didn’t know what colour the varnish was (if that’s what it was) and this was the main thing I deliberated on.
Item 5
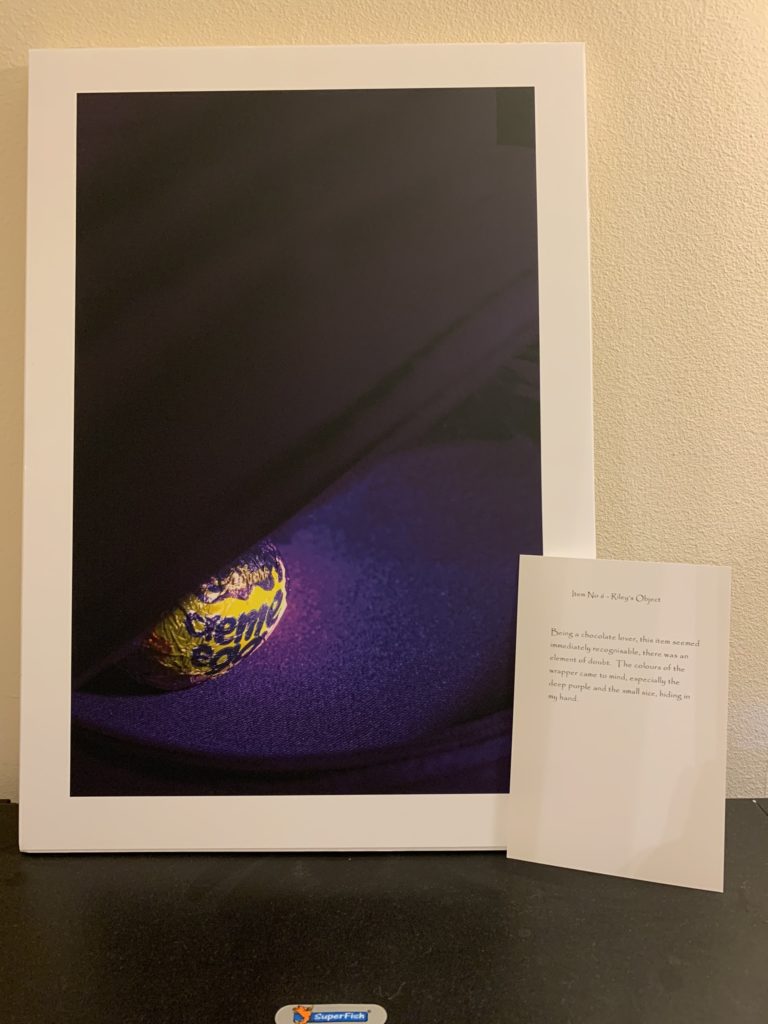
Item 6 – Riley’s Object
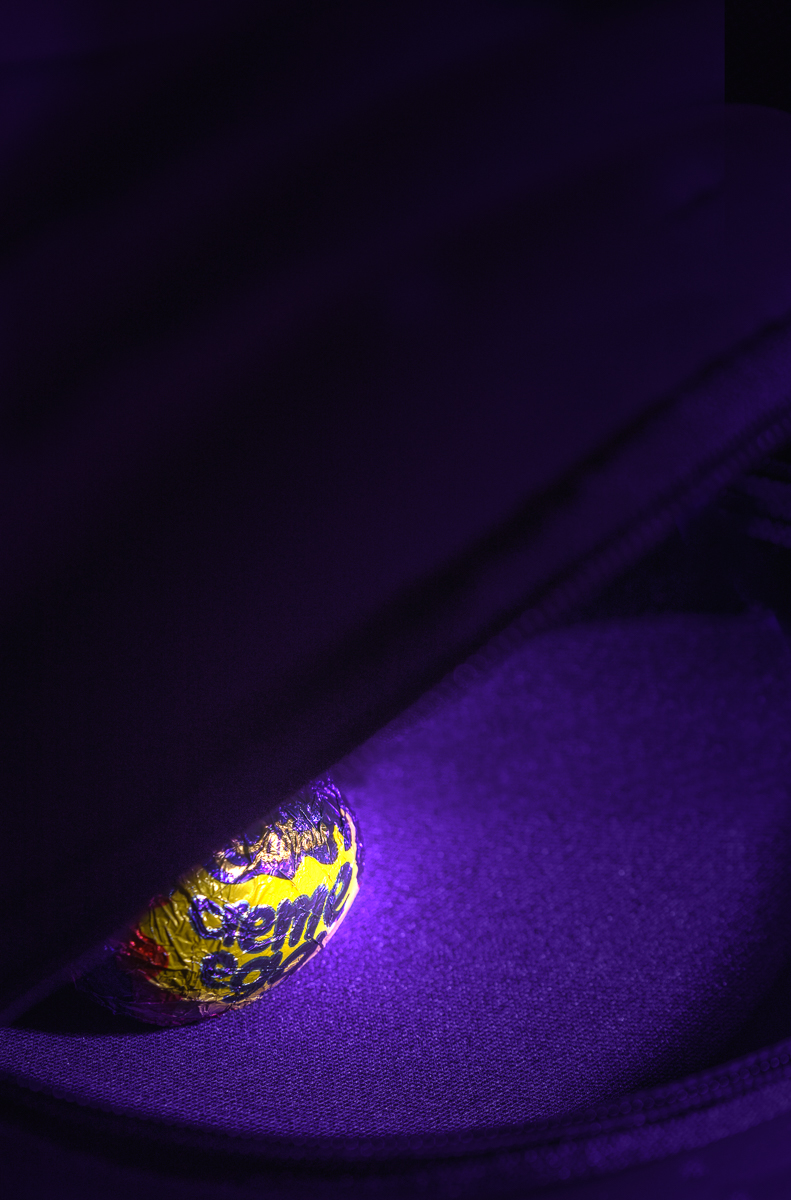
Being a chocolate lover, this item seemed immediately recognisable, there was an element of doubt. The colours of the wrapper came to mind, especially the deep purple and the small size, hiding in my hand.
Item 6
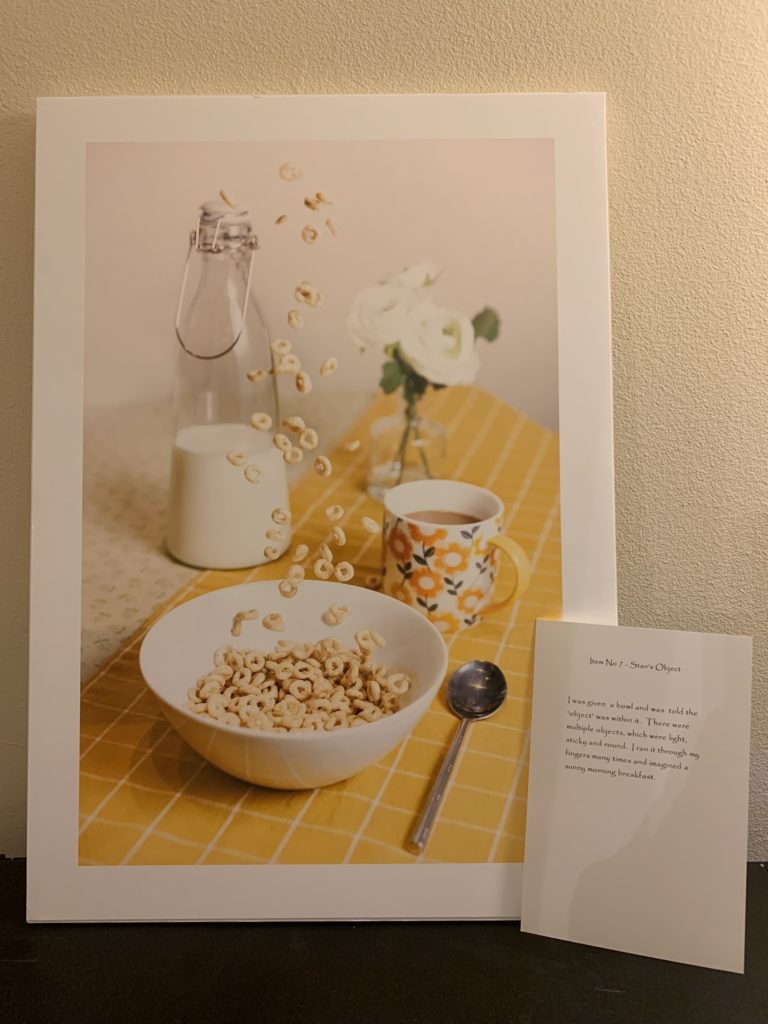
Item 7 – Stan’s Object
I was given a bowl and was told the ‘object’ was within it. There were multiple objects, which were light, sticky and round. I ran it through my fingers many times and imagined a sunny morning breakfast.
Item 7
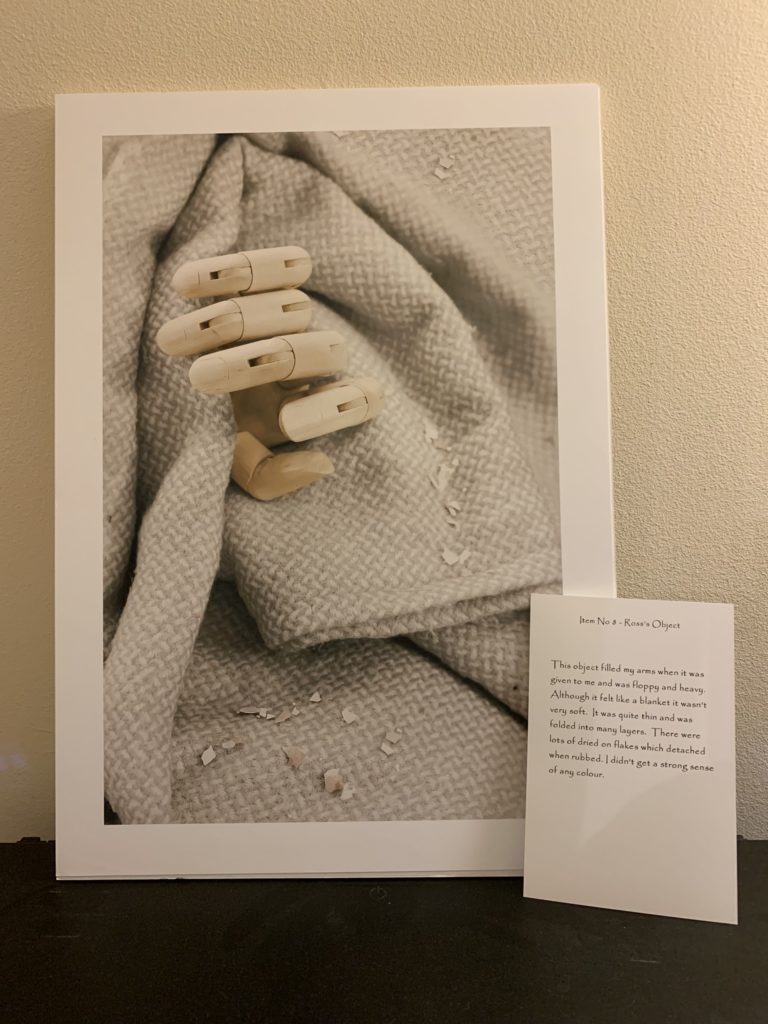
Item 8 – Ross’s Object
This object filled my arms when it was given to me and was floppy and heavy. Although it felt like a blanket it wasn’t very soft. It was quite thin and was folded into many layers. There were lots of dried on flakes which detached when rubbed. I didn’t get a strong sense of any colour.
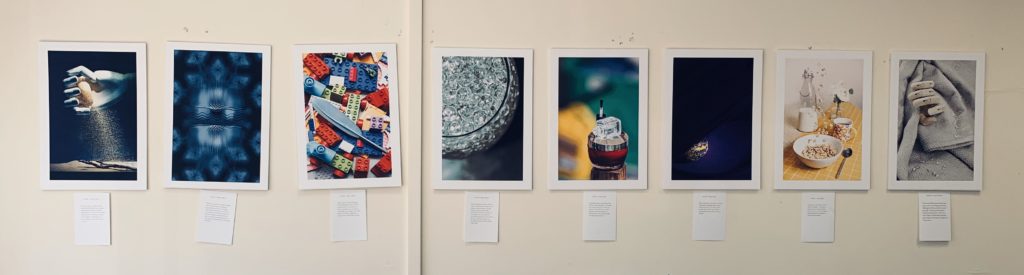
The Set
Item 1
Item 2
Item 3
Item 4
Item 5
Item 6
Item 7
Item 8
All images were made in chronological order.
Methodology and Technical Information
The brief:
Photographing the unseen Start by doing some
reflecting in your learning log. What kinds of subjects might be seen as
un-photographable? How might you go about portraying them using photography?
List a few examples of things you’re experiencing now or have recently been
thinking about. This doesn’t have to be too in-depth or revealing, but it can
be if you want. Equally, it might be something as apparently trivial as how
you’re going to fit everything into your busy day. At first you may come up
with literal examples, but the more you think about them the more those ideas
will develop into specific and more original ones. Make a list of at least
seven ideas. Try and keep to things you have a personal interest in or
curiosity about. Keep a notebook with you at all times and make notes when
ideas strike you as interesting. (This is good practice for all stages of the
degree and beyond. Ideas books are something to be revisited time and again for
ideas and hints for the photographer you’re becoming.) Now implement one of
your ideas. Aim for a tightly edited and visually consistent series of 7–10
images.
Having made notes about what kinds of subjects might be seen as un-photographable , I came to the conclusion that many of the things I listed were about how humans internally experience things through their senses. I wanted to rule out sight as this is the photographer’s medium and therefore decided on capturing the experience you have when you can’t see something. My detailed thinking is outlined in the reflective blog below:
After developing this idea, I wrote a briefing for the people I was going to ask to participate outlining my idea and what I wanted them to do. Having decided that I didn’t want to see any of the items until the set was finished, I enlisted help from my husband, to record and keep images of the actual items, so that I can see them at the end. (at the time of writing I still haven’t seen them, as I want to get my tutor feedback before finishing the project).
see the briefing and methodology in the post below:
The first item was used as an experiment, but the methodology to gain the images was followed and worked well. Therefore, it was used for all of the subsequent objects as well.
Detailed notes were written up for the first two items, they can be seen below:
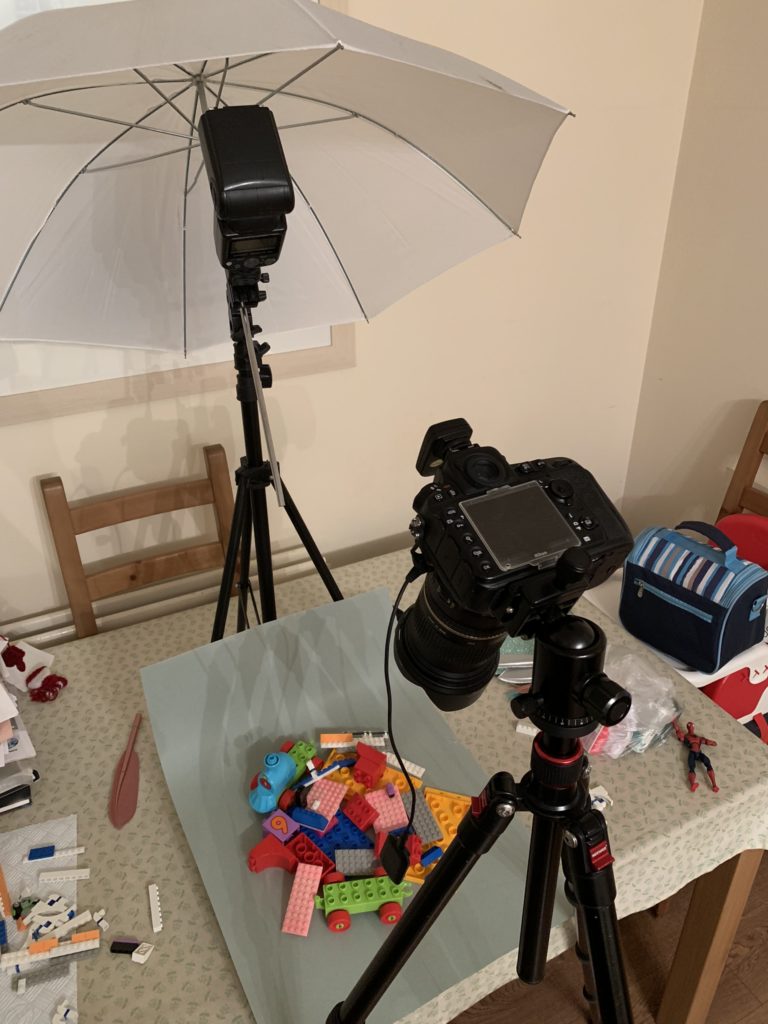
After this I felt that I understood my process and was able to complete the other items without the need for such detailed reports. However, I’v taken some images of set up used. One of the things I wanted to achieve with this set was to do as much in camera as I could.
set ups for Items 3 & 4
Each image was finished before going on to the next one as I felt that I wanted each piece to stand alone and not be influenced the others.
Presentation
example of how I would like to exhibit this set of images.
My expectation of this project was that my images would be very different because of the different nature of the items. Therefore, I made a conscious decision to make the images portrait rather than landscape and I wanted to have a poster feel to them. The aim was to help with them becoming a set of images. This impacted on my compositions and methods of making the images.
Each image has been printed on A3 foam board and the words have been printed on a 4×6 card. I would like to display in a exhibition style with the words next to them on the wall. I think these image are best seen in a large format.
There is an opportunity to expand this set by focusing on other senses, such as smell or taste. I would also like to explore how one object is visualised differently by different people. My hypothesis is that everyone would come up with very different images.
I have got gold envelopes in which I was going to present the photos of the actual object in a “and the item is. . . ” style. However, at this time, I am undecided whether they would add value to the images I have made or not and therefore, haven’t yet seen the images myself or presented them with this work.
Reflection:
I have definitely learned a few things on this assignment:
I have some mad cap ideas!
Things take longer when you’re relying on others to help
I like involving others in my projects
I was surprised how interested people were in what I was trying to achieve
Involving others means you have to be able to verbalise what you want to achieve succinctly, which helps in defining your objectives to yourself as well.
It’s ok to take a little longer, if it means you can achieve your goals.
Knowing that I wanted to present the images in a portrait style and print them at A3 really helped me with composition when taking the images.
My previous tutor said ‘capture your bliss’. I’ve found how engaged I am in a project when it’s something I really want to do.
Articulating my thoughts after reading about theories like Walter Benjamin and Shawn Michelle Smith’s is a challenge. Sometimes I experience very deep thoughts about some of these concepts and it’s difficult to get them down in writing.
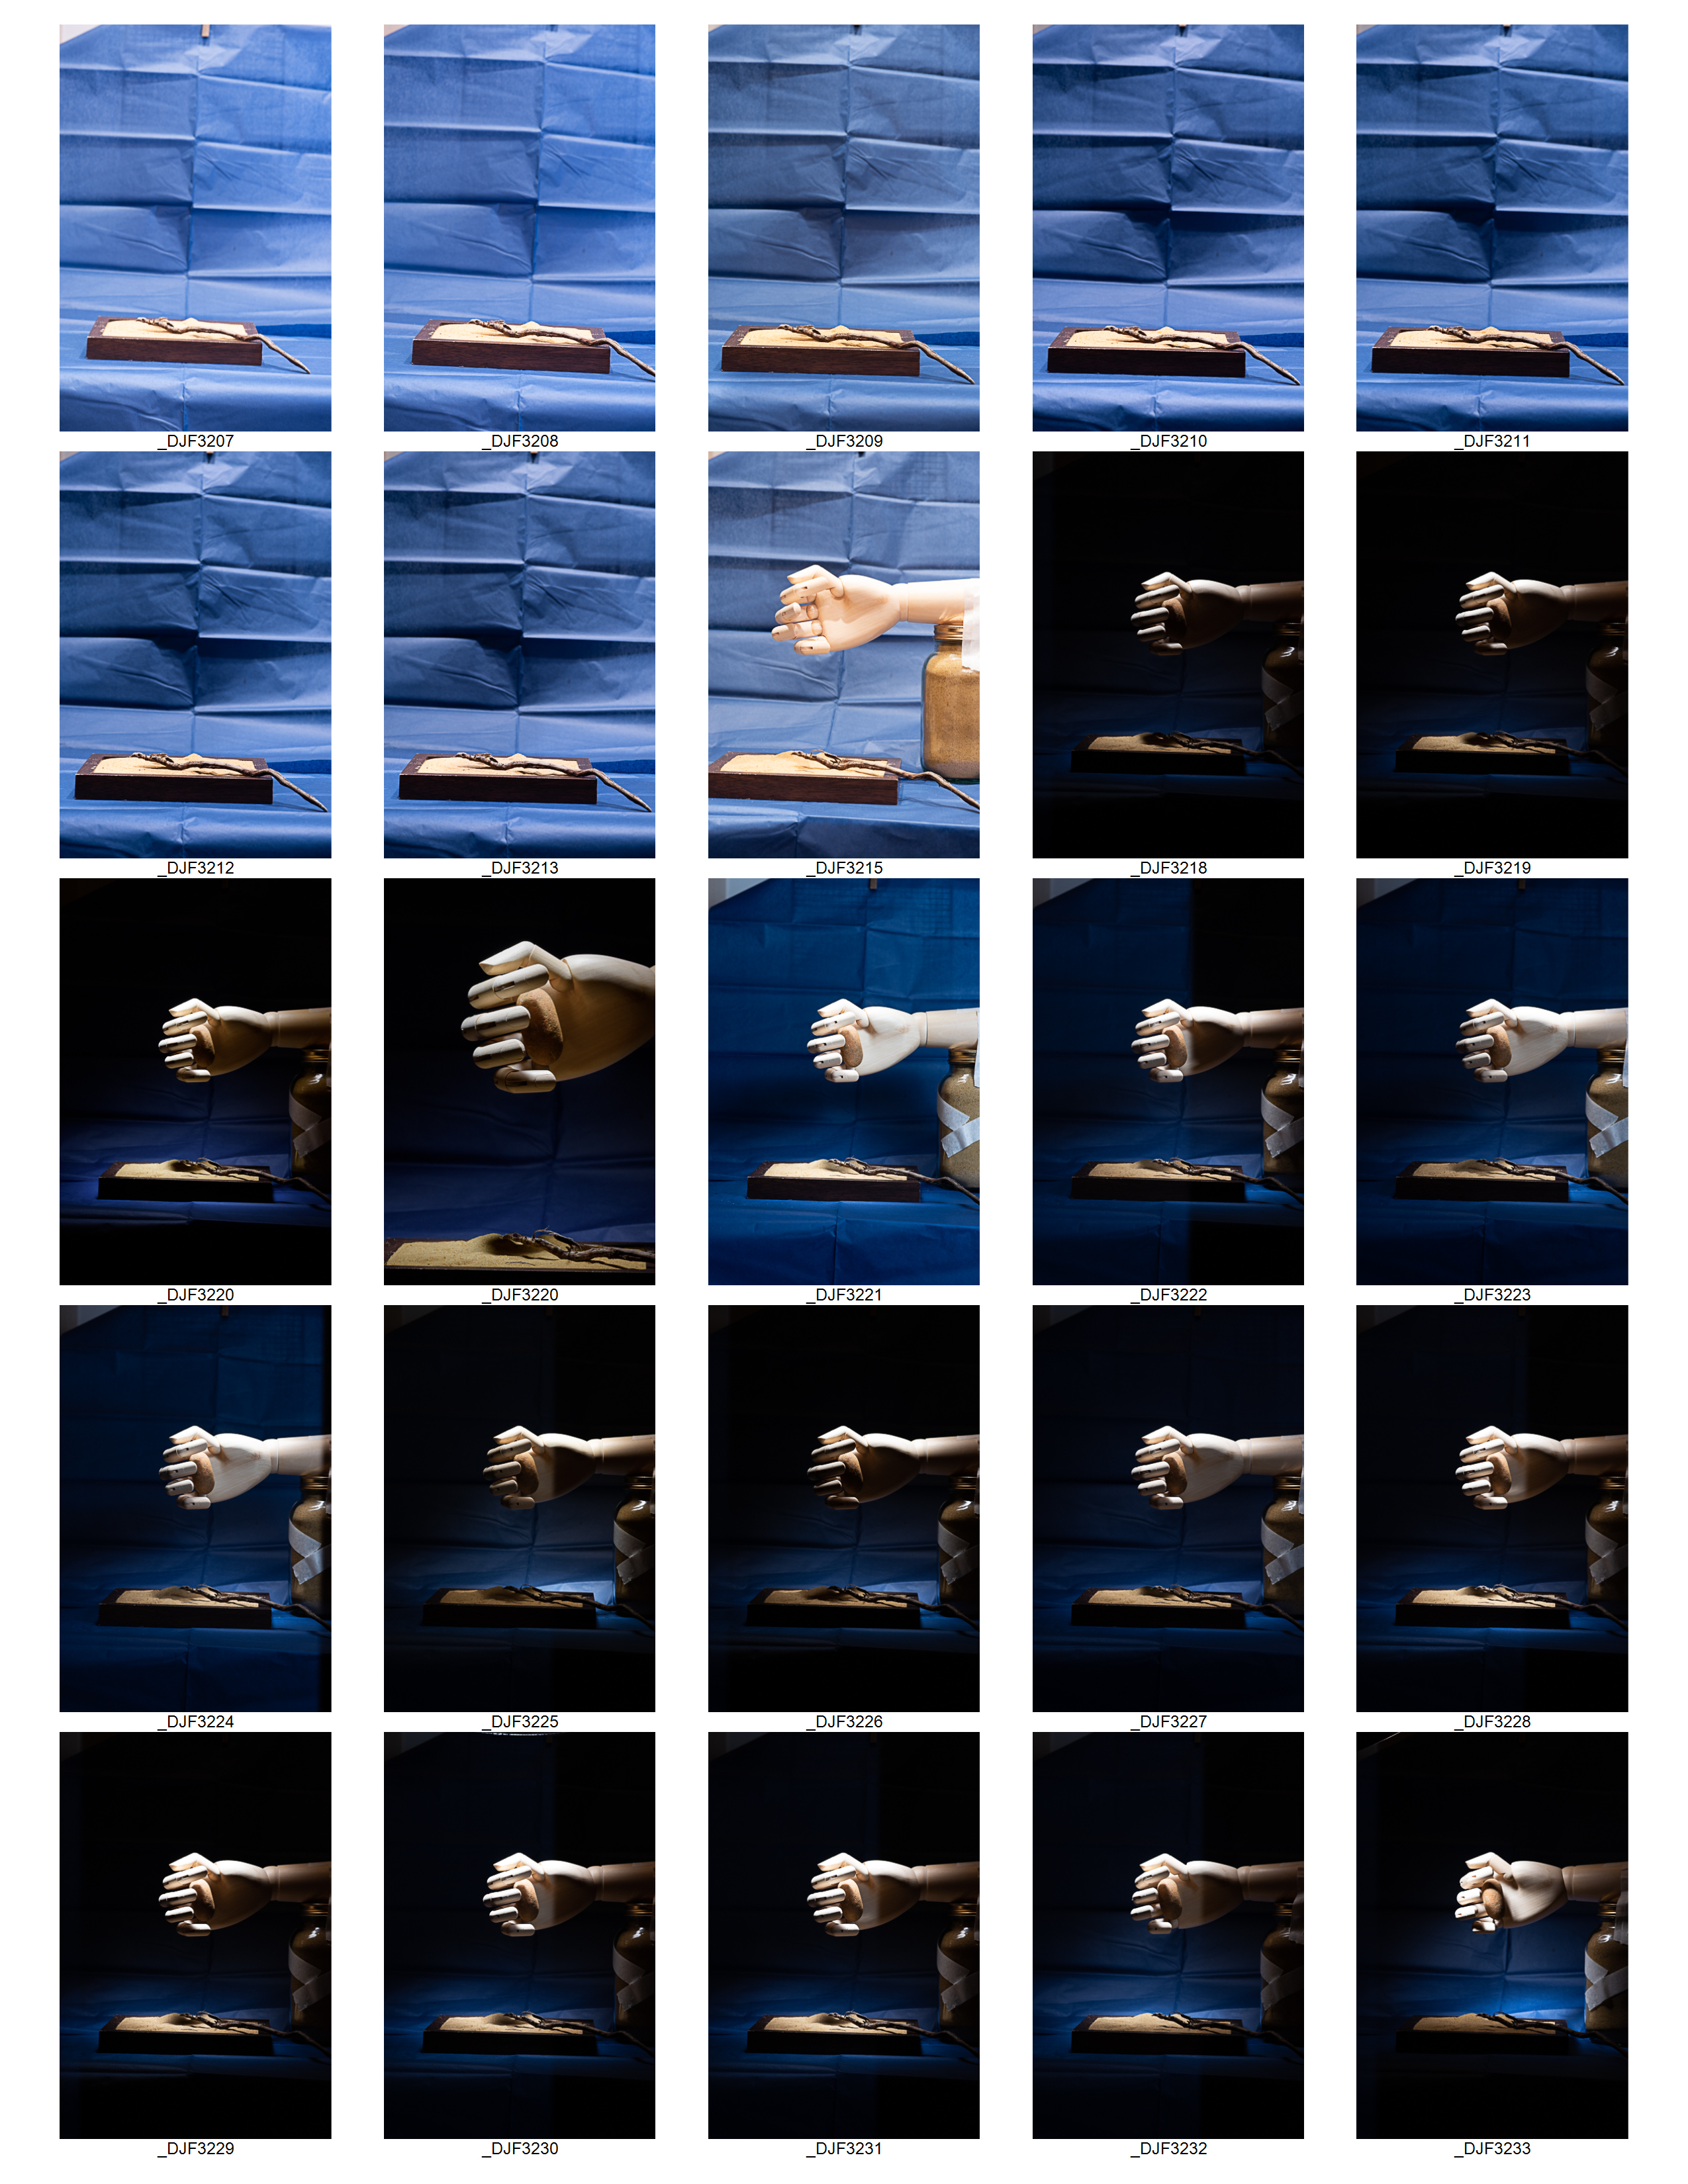
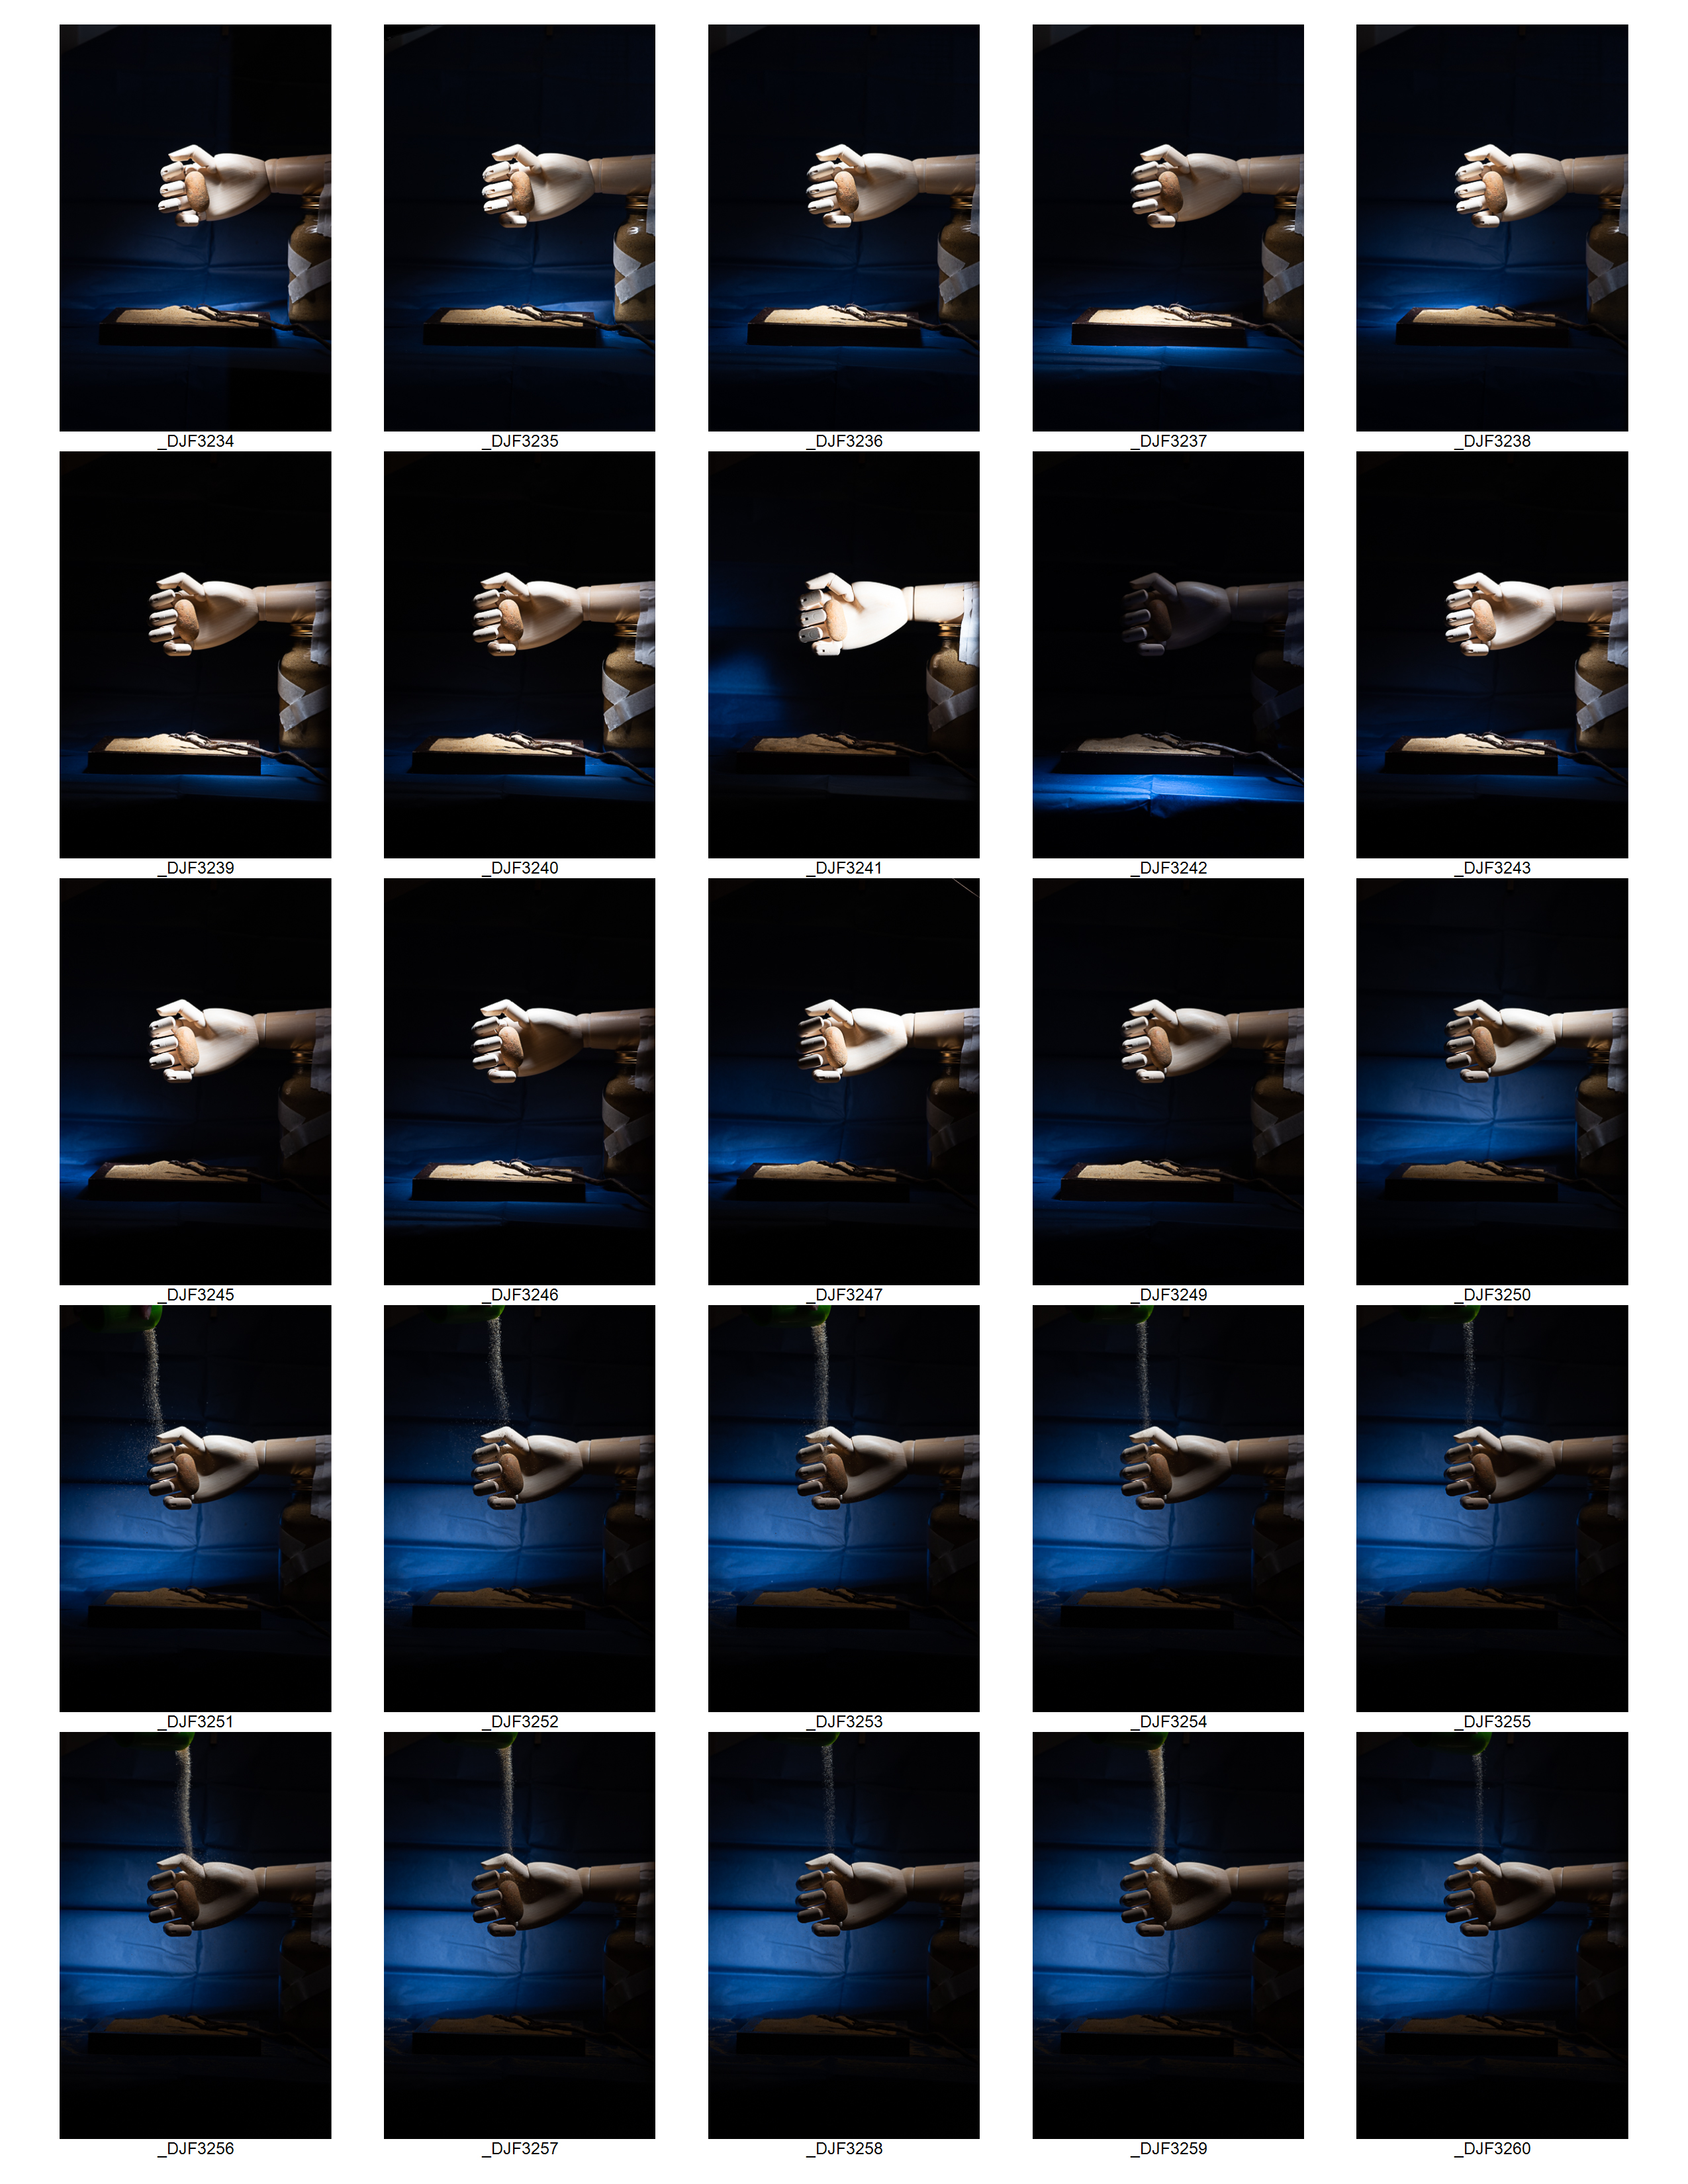
Using the same methodology as for Item 1, I was blindfolded and given the item to hold for 5 mins, and recorded my comments. As previously, I have not yet seen the actual item. These will be viewed once all images are complete.
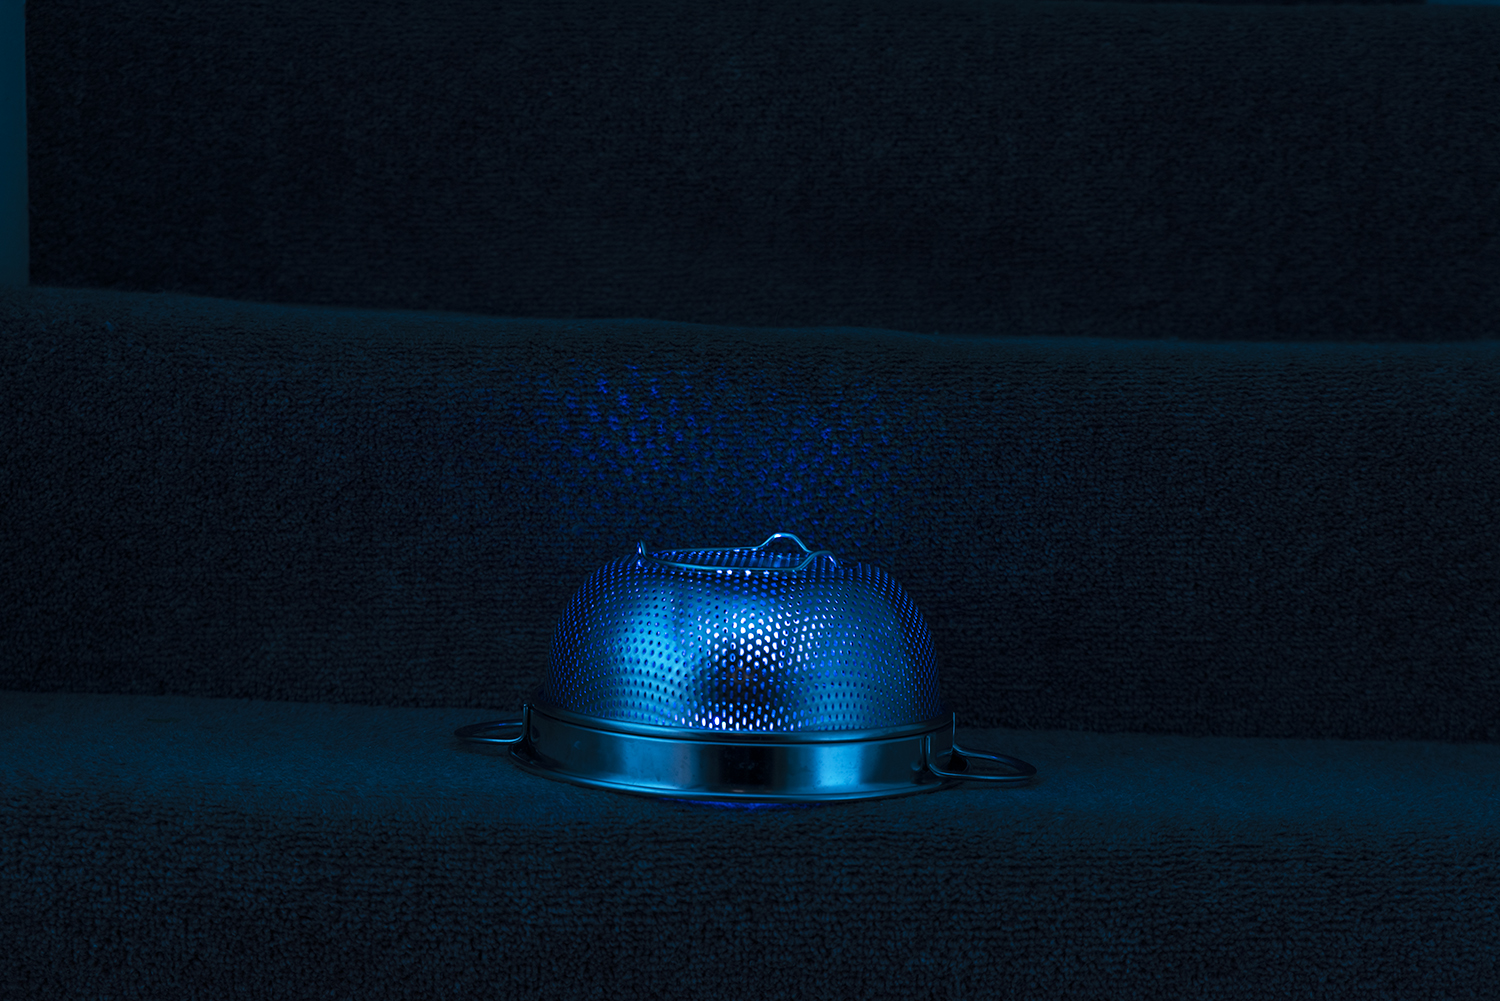
This item although small like the previous item it immediately felt very different. It felt like it was metal, there were two long protrusions and a couple of shorter ones, there was a groove down the middle and I could feel an ‘S’ shape. I really couldn’t make out which way up the object was supposed to go or what it was.
I thought about the kind of image I wanted to make from this item, but struggled to come up with any solid thoughts, I felt very confused and intrigued, but also that the object had some symmetry about it and it was definitely metal.
At first I was going to try and incorporate the hand again, but it just didn’t fit into the ideas I had. I also considered a slide, which I thought would give me the metal groove I was wanting. But eventually, I wanted to capture the confusion and lack of clarity that I had. The idea of a kaleidoscope came into my head so I looked up how to make a kaleidoscope in photoshop.
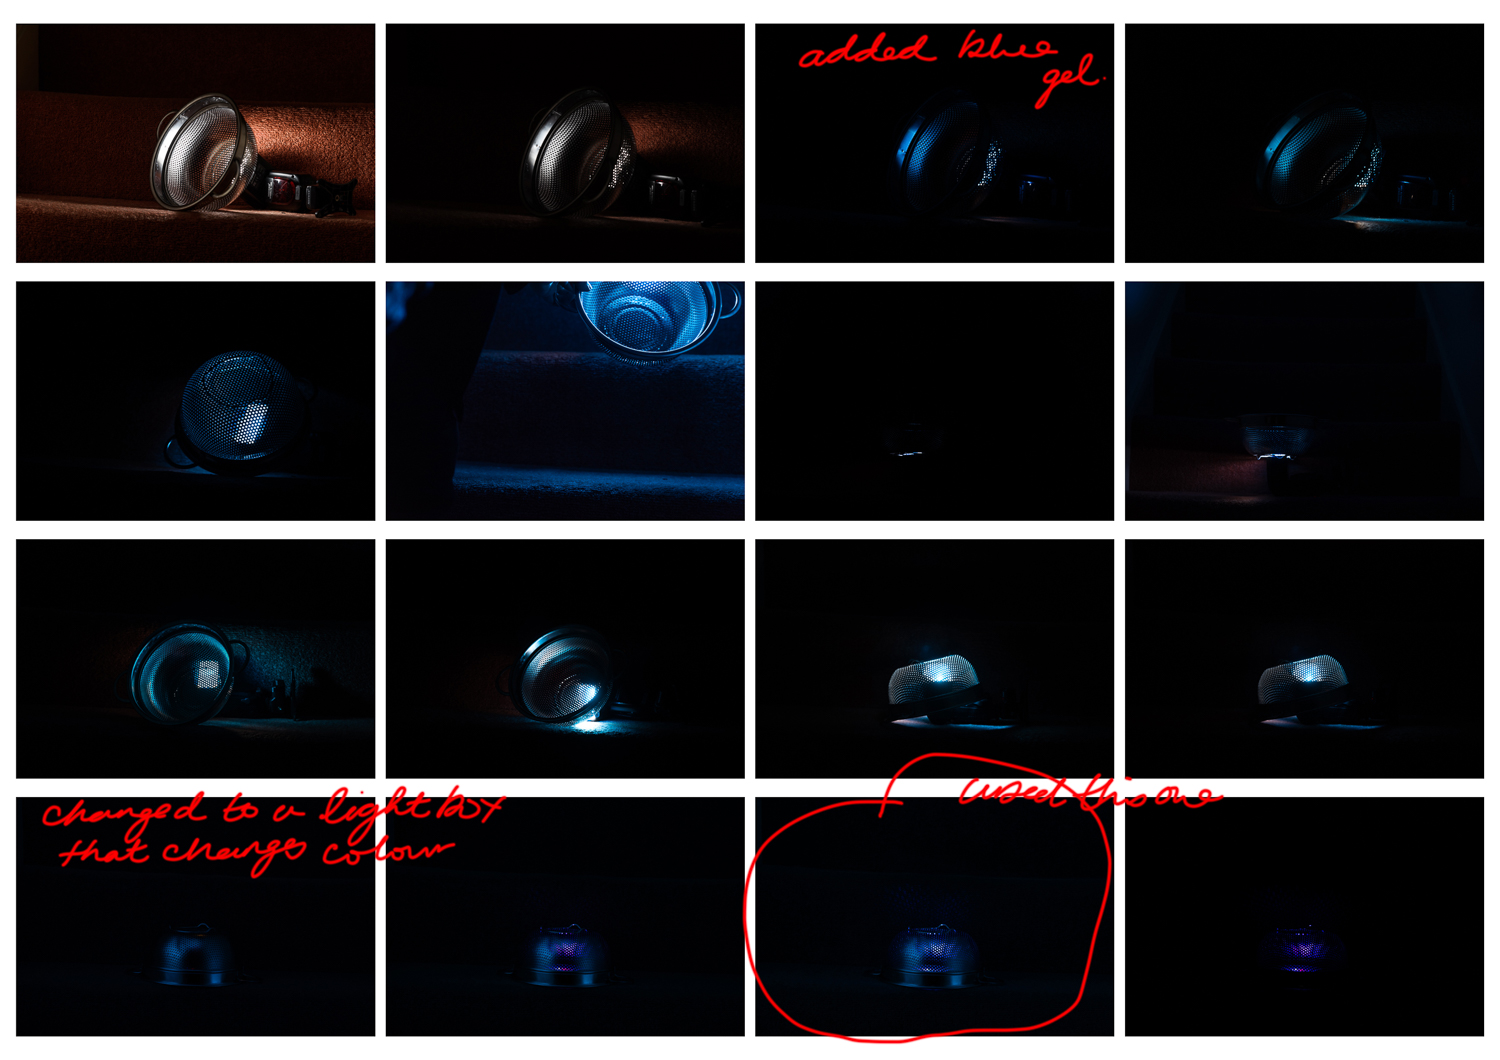
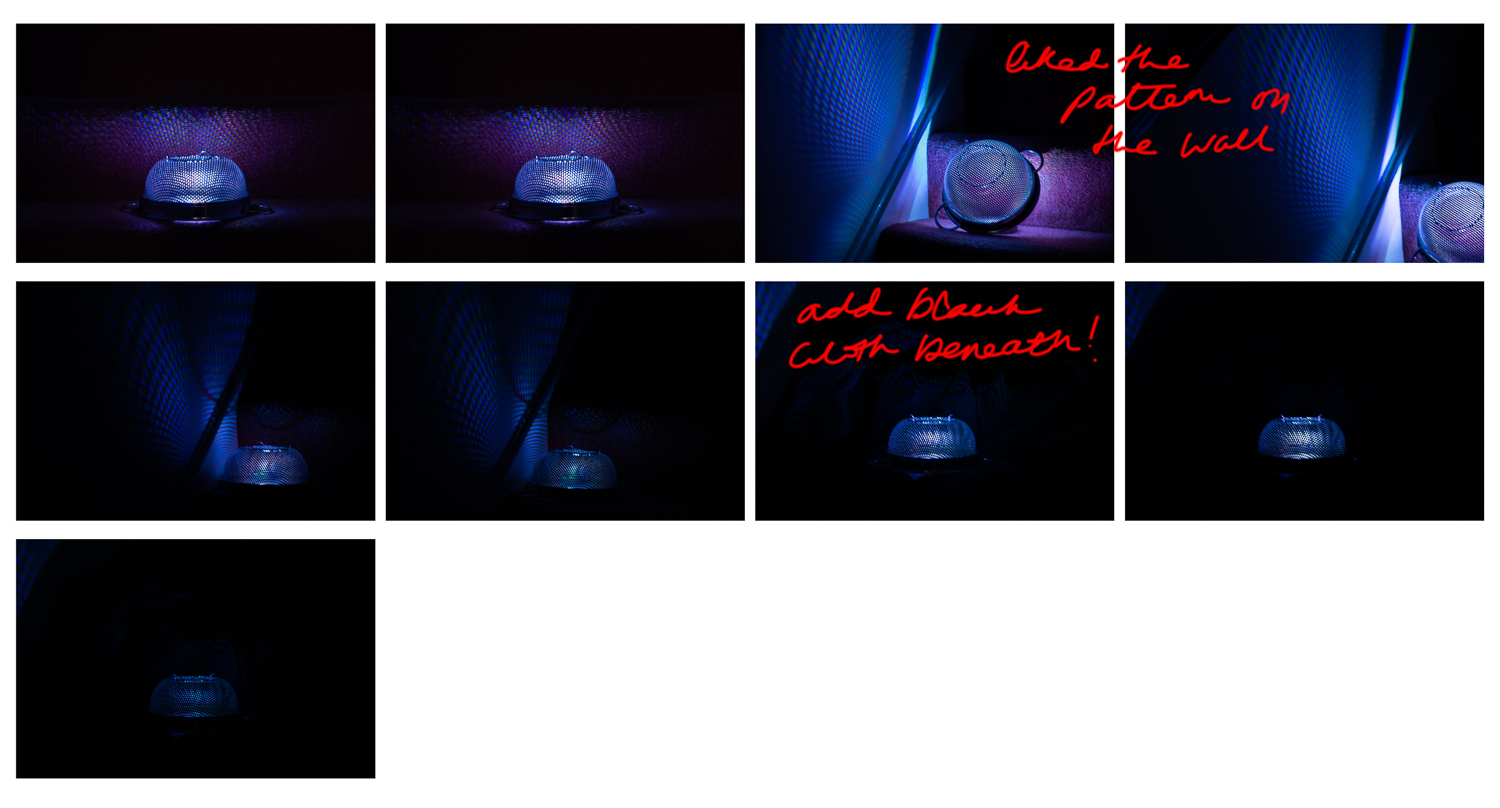
I found this tutorial on the internet: How to create a Kaleidoscope – then needed to take an image to use to create my image. I found a metal colander which had the inside curves I was looking for. I also liked the idea of shining a light through the colandar. I added a blue gel to the speedlight to give a blue light and took a range of images with the colander in different positions. These can be seen in the contact sheets below.
Although the image chose looks quite dark in the contact sheet there was nice light spatter on the carpet above it. I was also drawn to the two ‘feet’ on the top which reminded me of the two protrusions on the item I’d felt.
I used this image to create the kaleidoscope effect as per the tutorial.
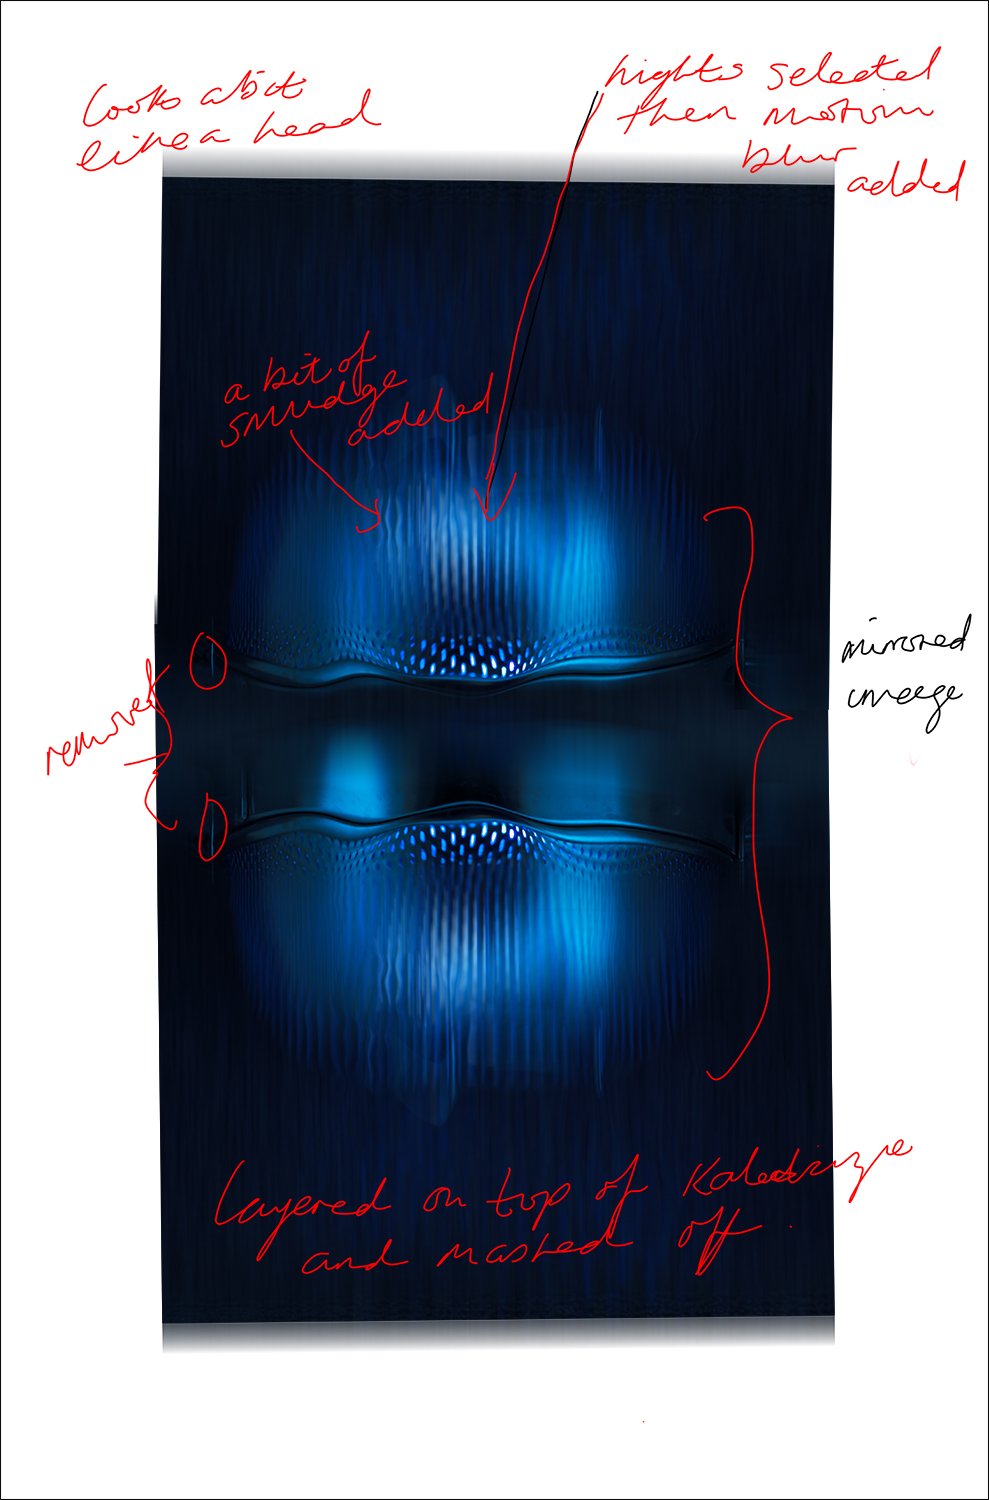
I have annotated below the amendments made to the colander.
This layer was added on top of the kaleidoscope layer and masked to merge them together. The original image was also very blue, so I added a hue and saturation layer to desaturise the colour . I also added some radial blur to the background highlights to give it a softer look. The wavy lines in the centre represent the ‘S’ shape I felt. The image can be view either way up in order to represent the fact that I couldn’t figure out which way round it should be.
Helen is my sister, I gave her the brief and she provided me with the first object and test piece for this series of images.
sitting on the sofa in her lounge, I was blindfolded and then given the object. I remembered I should be recording about half way through my 5 mins, so my husband only started recording on my phone at the end.
I cannot post the pic of me handling the item or the item itself because I haven’t finished the set yet, but I’ll add to the final assignment document.
Copy of my written notes
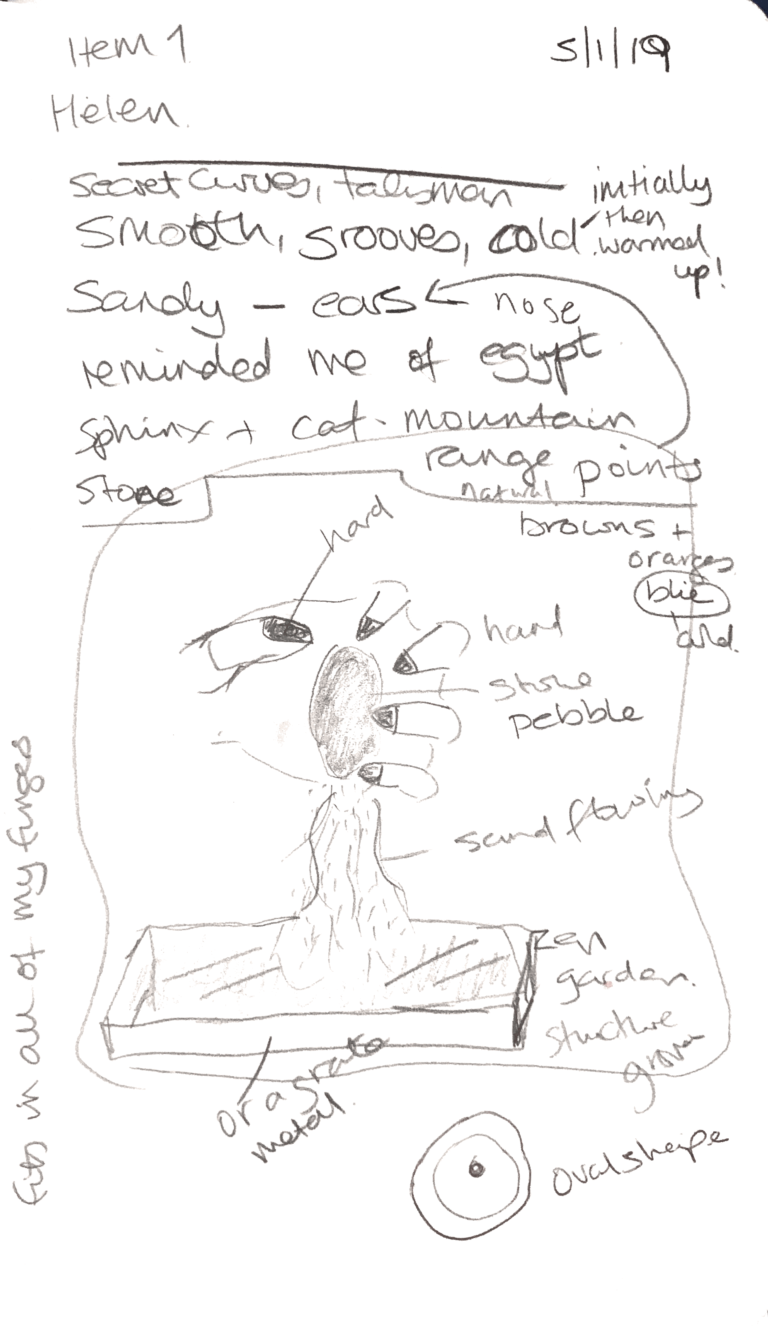
When I first held the object, I was a little underwhelmed, but I found it really interesting to be experiencing it without seeing it. I tried to create a visual image in my head based on what I was feeling. I got quite fixated on the groves in it and that fact that I thought my fingers were creating a little cage around it. I have very small hands, so I think it was a surprise that this object fit in my hand in this way.
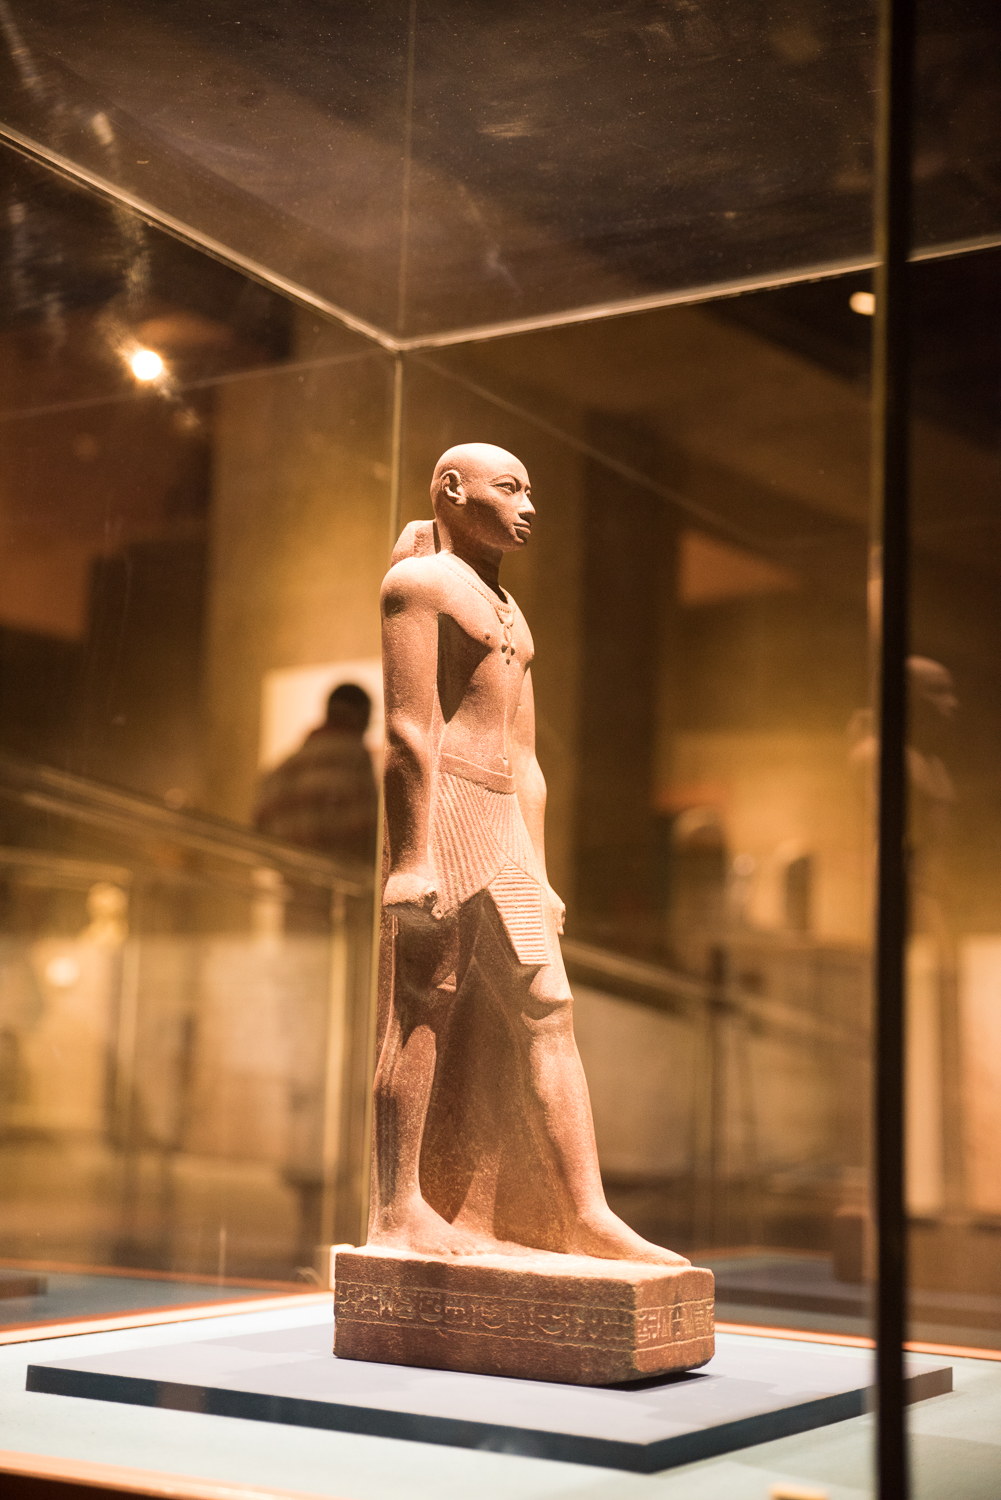
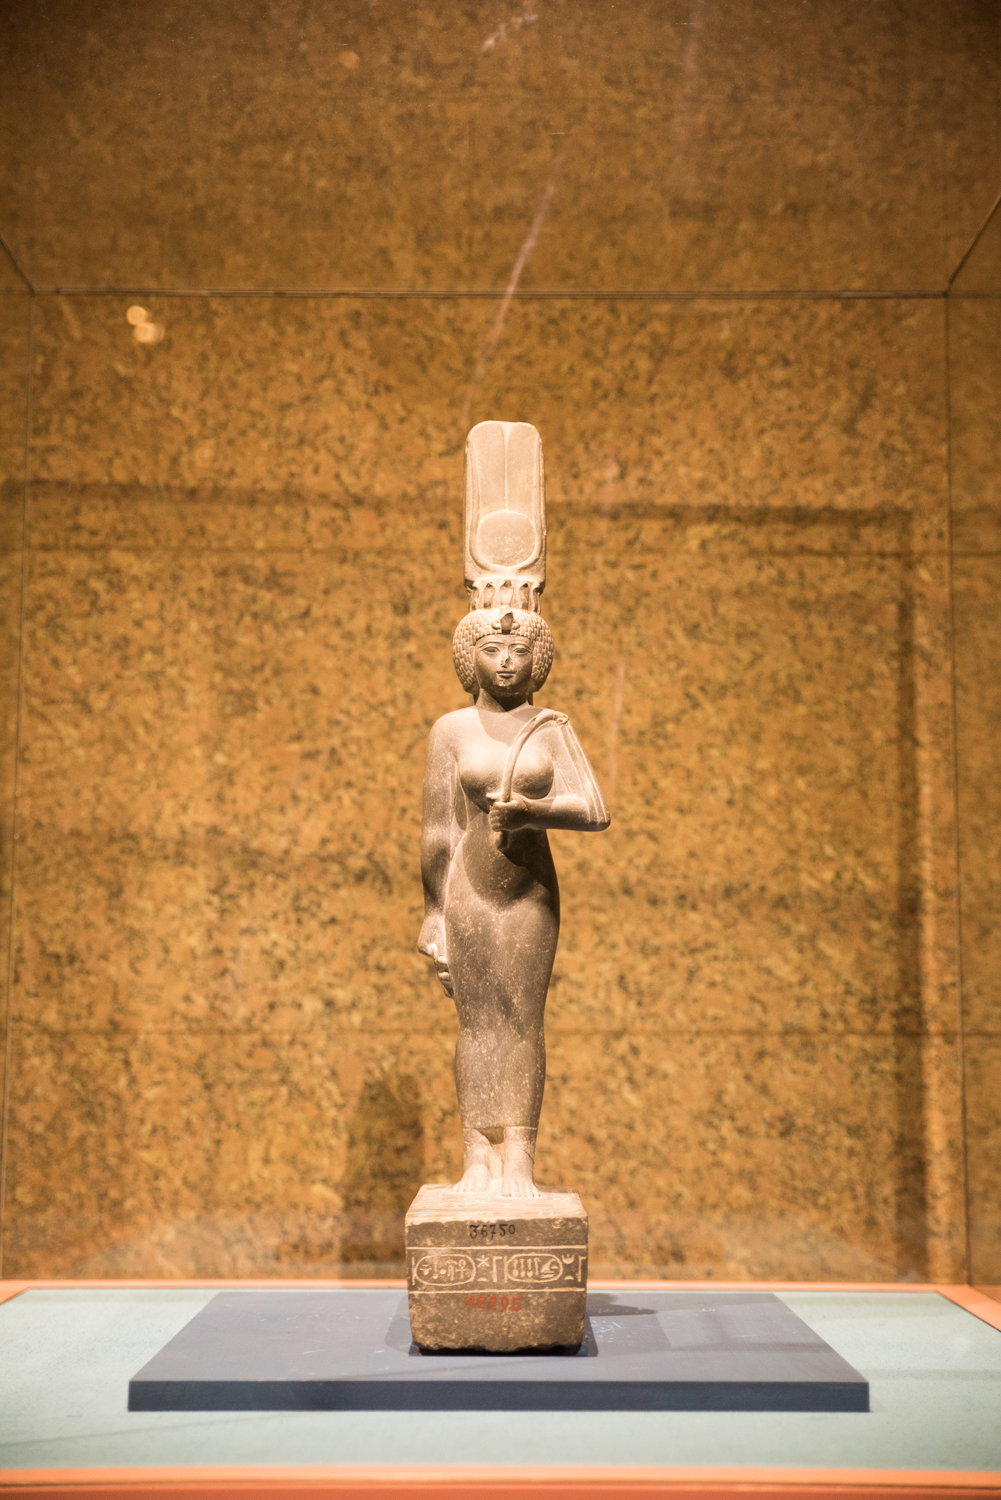
I wasn’t sure I would be able to come up with an image at first, but on the drive home (my husband was driving), things began to start popping in my head and I drew the image above quite soon after. Once it was in my head, I couldn’t / didn’t want to change it. The colours came from the colours in a picture of an idol in a museum I took in Egypt a few years ago. When holding the item, it immediately popped into my head. This was a bit of research done in the middle of the night!!! looking through my old pictures for reference.
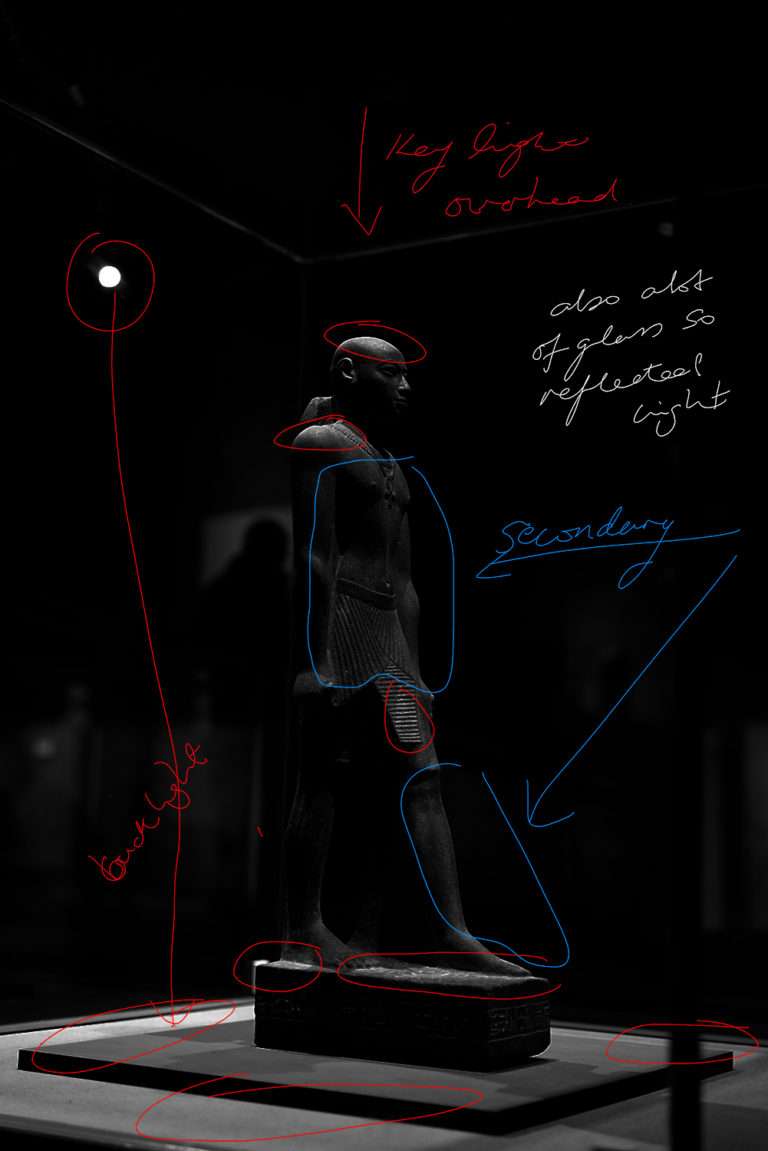
I definitely wanted to emulate the sandy yellows and blues. I used one of the images to look at the lighting:
key lighting came straight down and there was secondary light coming from the front.
Once I had the idea in my head, I started thinking about the technical aspects of the image. I knew I wanted to include a hand and initially I wanted this to be my own. However, I also realised that that would make it quite difficult logistically to take the shot and I wanted to do as much as could in camera.
My props list was:
hand
stone
sand
a container for the sand
blue paper/cloth for the background
lighting (two speedlights, umbrella, honeycomb)
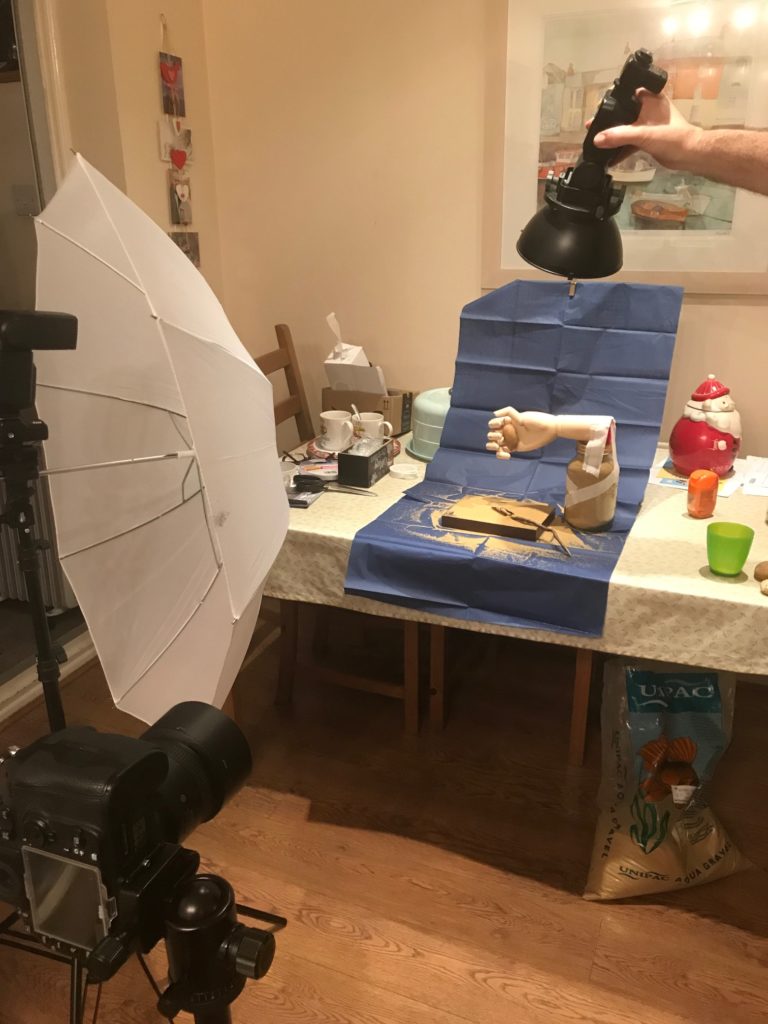
I went to the beach and picked a few stones off the beach I settled on one that was oval in shape and fitted nicely within the palm of the hand. It was also a sandstone colour to fit with my Egyptian sand theme. This ended up being a wooden anatomical model that I could make to look like it was holding the stone in a little cage.
We had some sand and found a dark wooden picture frame to be the base for the sand. I had this idea for a kind of zen garden in the sand, so that I could incorporate the grooves, but this element didn’t really work.
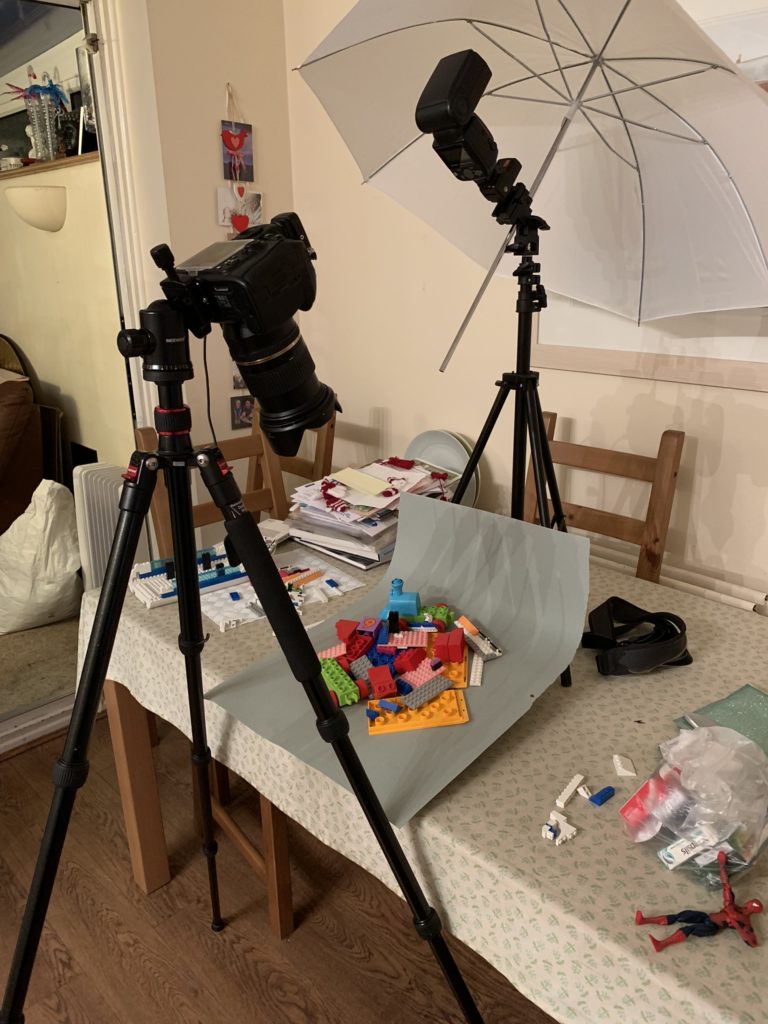
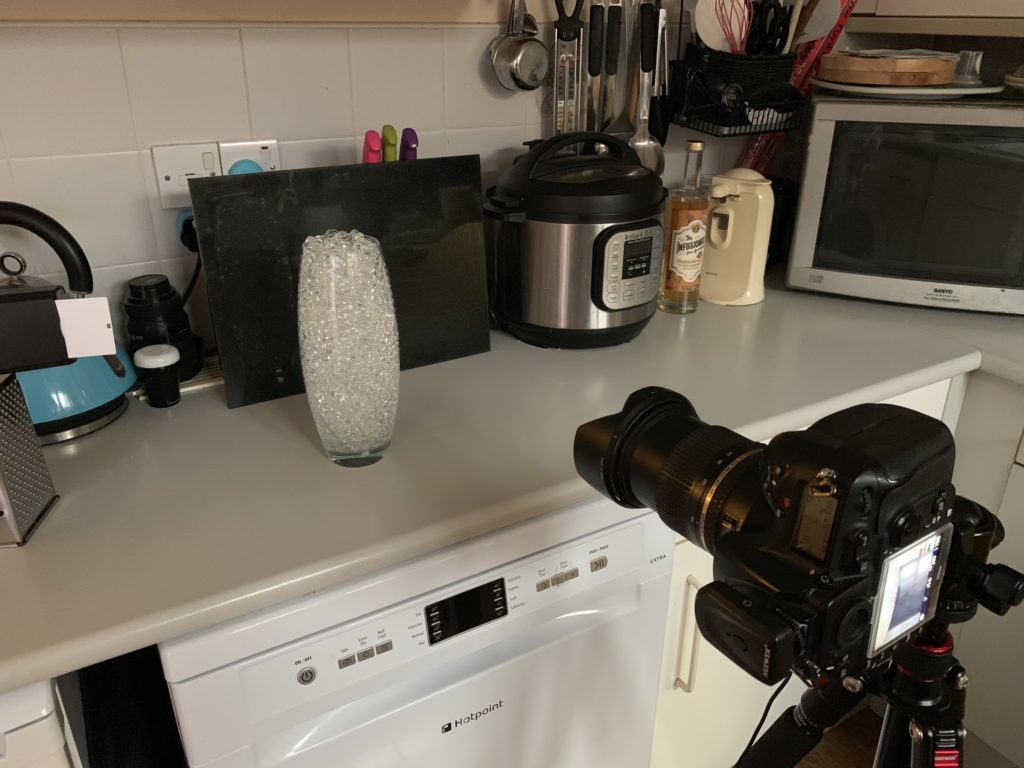
Once all the items were gathered, I set them up on the table in my kitchen with a one shoot through umbrella and a speedlight with a honeycomb dish held directly above this.
The set up and lighting for Image No 1
Technical Information
The images were taken with a Nikon D810 full frame camera with a 85 mm 1.8 lens. Two speedlights were used to provide a key light above the set up with a dish and honeycomb and a secondary light shot through an umbrella.
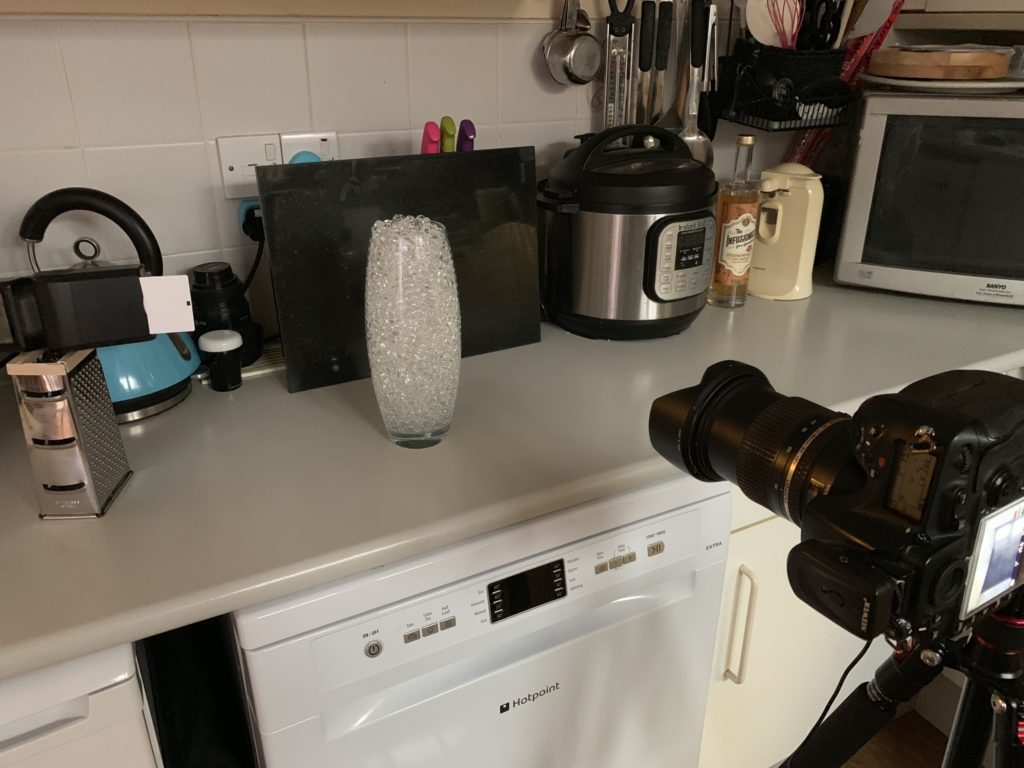
The contact images below demonstrate how the shot was set up and the lighting was adjusted to get the feel desired. It also shows how the set up progressed up until the the sane was poured over the stone.
Editing
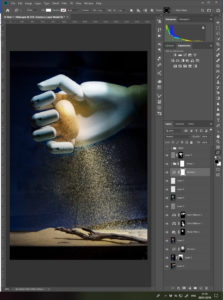
The image chosen was one of the last taken. I chose this one because the sand wasn’t too heavy over the stone.
The image was edited using Adobe Lightroom and Photoshop. The sand above the thumb was removed by merging the image with another image where there was no sand.
printscreen of photoshop file
various tools were used including:
colour balance
curves
photofilters
high pass sharpening
layers and masks
displacement maps
added shapes and blending modes
overlay
I used a curves layer to make the hand look cooler and stone/sand yellower.
The Final Image
Helen’s Item – Image 1
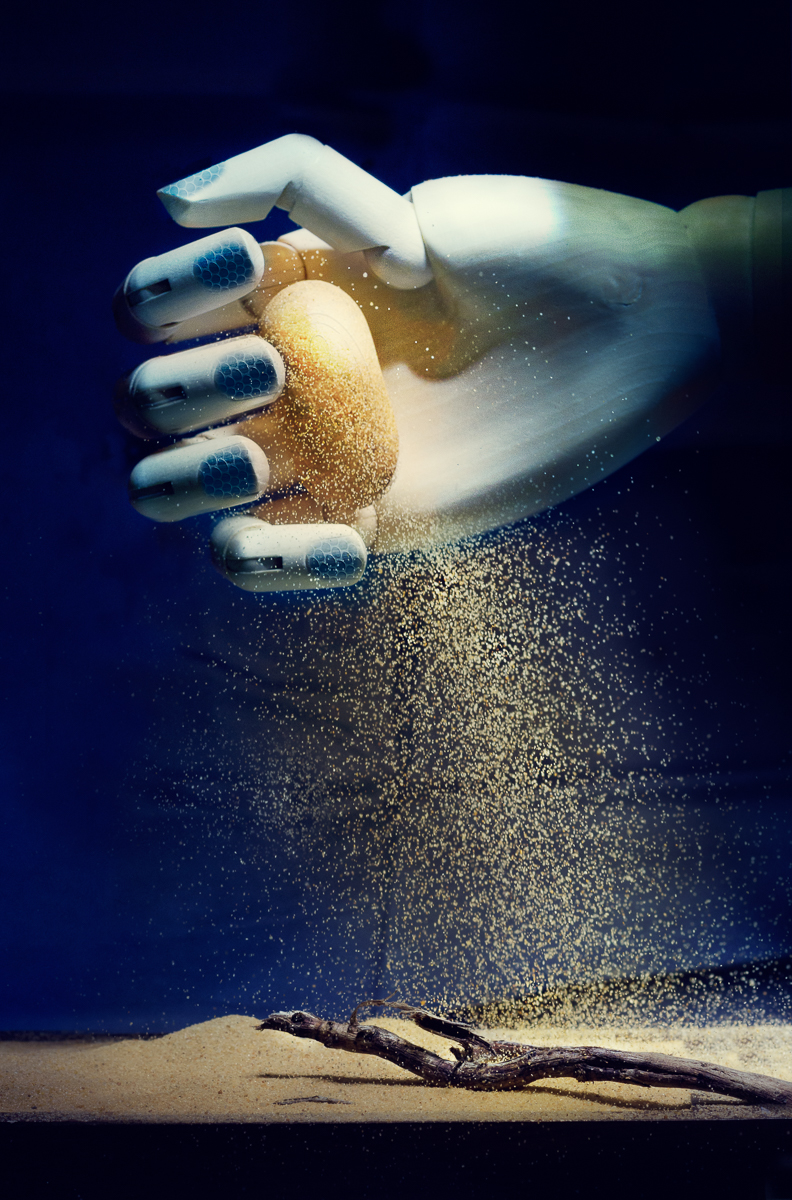
The item was very small and could be completely enclosed in my hands which are themselves small. The object was smooth to touch and cold at first but warmed up as handled. There were distinct grooves carved around the base and a couple of spikes at the top which felt like cats’ ears.
The item reminded me of an Egyptian idol which led to the idea of the sand and the colours. I have added some ‘secret’ grooves to the stone and I added a metal overlay to the nails to emphasise the cold touch. The fingers represent the cage around the stone.
Item 1 – Helen Final Image (so far!)
Reflection
I really enjoyed this and am really looking forward to doing the next item. I have tried to be really strict and finish writing this up before moving on to the next one and I have decided not to view any of the actual items until I have finished them all.
For the next and subsequent items, I will try and make sure that it’s quiet and that I’ve got all of my equipment ready before we start. i.e. get my phone ready to record my comments.
I think I would like all of images to be portrait but of course it may depend on how the next ‘feeling’ session goes and what image I am compelled to make. It will be my aim to print these as A3 paper to be presented alongside images of the items. do I need to make such detailed notes for all of the rest of the images? I will ask my tutor about that.
I have decided to concentrate on the idea of exploring how to photograph how it feels to touch something. The idea is to create an image that is inspired by the item rather than the item itself.
In order to really experience the touch of the item, I feel that I need to eliminate sight from the reality. To that end I am going to work to the following methodology.
I will ask 7 – 10 people to participate in this assignment with me (the thinking behind this is that I will get objects that I don’t know and therefore won’t be influenced by what they look like)
I will be blindfolded and won’t see the item at all
The participant will be asked to take a photo of the item and a photo of me handling it, but won’t let me see the item. They will also write a paragraph about the item, and why they chose it.
I’ll handle the object for no more than 5 mins
I will record my comments during the touching sessions so I can make notes afterwards.
The object will be removed immediately, so I don’t see it.
Following this I will create an image based on my feelings of touching the object, which will include colour, state, feelings etc.
I won’t see any of the objects until after all images are complete. (my husband has agreed to collect the images of the items and me handling them and keep them save until the assignment is finished)
Each image must be finished before attempting the next item (I think this is necessary so that individual images aren’t influenced by other items)
I will use this methodology with the first item as a test, it may need to be amended based on my findings, but this feels like a good place to start
Photographing the unseen Start by doing some reflecting in your learning log. What kinds of subjects might be seen as un-photographable? How might you go about portraying them using photography? List a few examples of things you’re experiencing now or have recently been thinking about. This doesn’t have to be too in-depth or revealing, but it can be if you want. Equally, it might be something as apparently trivial as how you’re going to fit everything into your busy day. At first you may come up with literal examples, but the more you think about them the more those ideas will develop into specific and more original ones. Make a list of at least seven ideas. Try and keep to things you have a personal interest in or curiosity about. Keep a notebook with you at all times and make notes when ideas strike you as interesting. (This is good practice for all stages of the degree and beyond. Ideas books are something to be revisited time and again for ideas and hints for the photographer you’re becoming.) Now implement one of your ideas. Aim for a tightly edited and visually consistent series of 7–10 images.
So here’s the reflecting in my learning log 😉
I was immediately drawn to this one of the two options and did keep my notebook with me at all times. In fact it’s amazing how many times, I woke in the middle of the night and added something to it.
What kinds of subjects might be seen as un-photographable?
Connections (between people or environment) you can place a person within an environment or next to another person, but it’s very difficult actually capture the emotional connection between the two things.
time – you can photograph the effects of time on a person or object but how do you capture time or the concept of time itself.
Memories –
Emotions / feelings
thoughts
touch
dreams
ideologies – religion / politics
sound
absence
love
most of these things are things that are experienced by a person within by your senses.
Fraenkel Gallery 2013 – The unphotographable [accessed 02.01.2019] The Unphotographable, s an interesting article about an ambitious exhibition exploring the history of that which cannot be photographed. A lot of these images are abstracted and distorted, does this imply that to represent something unseen, it has to be unrecognisable. they are said to represent sound, absence and love.
Touch – this is the one that really interests me – I’m really drawn the idea of trying to capture how it feels to touch something. Not photographing the act of touching an item but trying to represent how it feels.
The video I found here about photographers trying to represent food they were eating blindfolded. The results were really different and very interesting.
using your senses to create an image
As photography is a visual medium and I want to create a visual representation of the feeling, it seems logical to remove the visual element of my senses and try to create an image that is inspired by touching something.
My idea is therefore to ask 10 different people to give me an object to touch whilst being blindfolded. I will write a brief and ask people to help me. I will expand on this more in a separate post.
Having taken an age to get into this assignment, I actually got quite hooked by the concept in the end.
I am actually quite pleased with the set of images I’ve produced. They have generated quite a lot of conversation between my family over Christmas and I had a room of about 10 people arguing about which were real and which not.
My biggest reflection comes from the fact that feedback and discussion helped my refine some of the images and think more about how to present them. This is something I will utilise in future assignments. I also reflect on how much I enjoy manipulating images and making something new from what is already there.
and finally, I opened the introduction of “on being a photographer’ by David Hurn and Bill Jay and came across this quote from Abraham Maslow:
The purpose of life is to become actually what we are potentially”
I love this quote and it will be my new year’s resolution!
To see Assignment 1 – Two sides of the Story – click here