Using the same methodology as for Item 1, I was blindfolded and given the item to hold for 5 mins, and recorded my comments. As previously, I have not yet seen the actual item. These will be viewed once all images are complete.
This item although small like the previous item it immediately felt very different. It felt like it was metal, there were two long protrusions and a couple of shorter ones, there was a groove down the middle and I could feel an ‘S’ shape. I really couldn’t make out which way up the object was supposed to go or what it was.
I thought about the kind of image I wanted to make from this item, but struggled to come up with any solid thoughts, I felt very confused and intrigued, but also that the object had some symmetry about it and it was definitely metal.
At first I was going to try and incorporate the hand again, but it just didn’t fit into the ideas I had. I also considered a slide, which I thought would give me the metal groove I was wanting. But eventually, I wanted to capture the confusion and lack of clarity that I had. The idea of a kaleidoscope came into my head so I looked up how to make a kaleidoscope in photoshop.
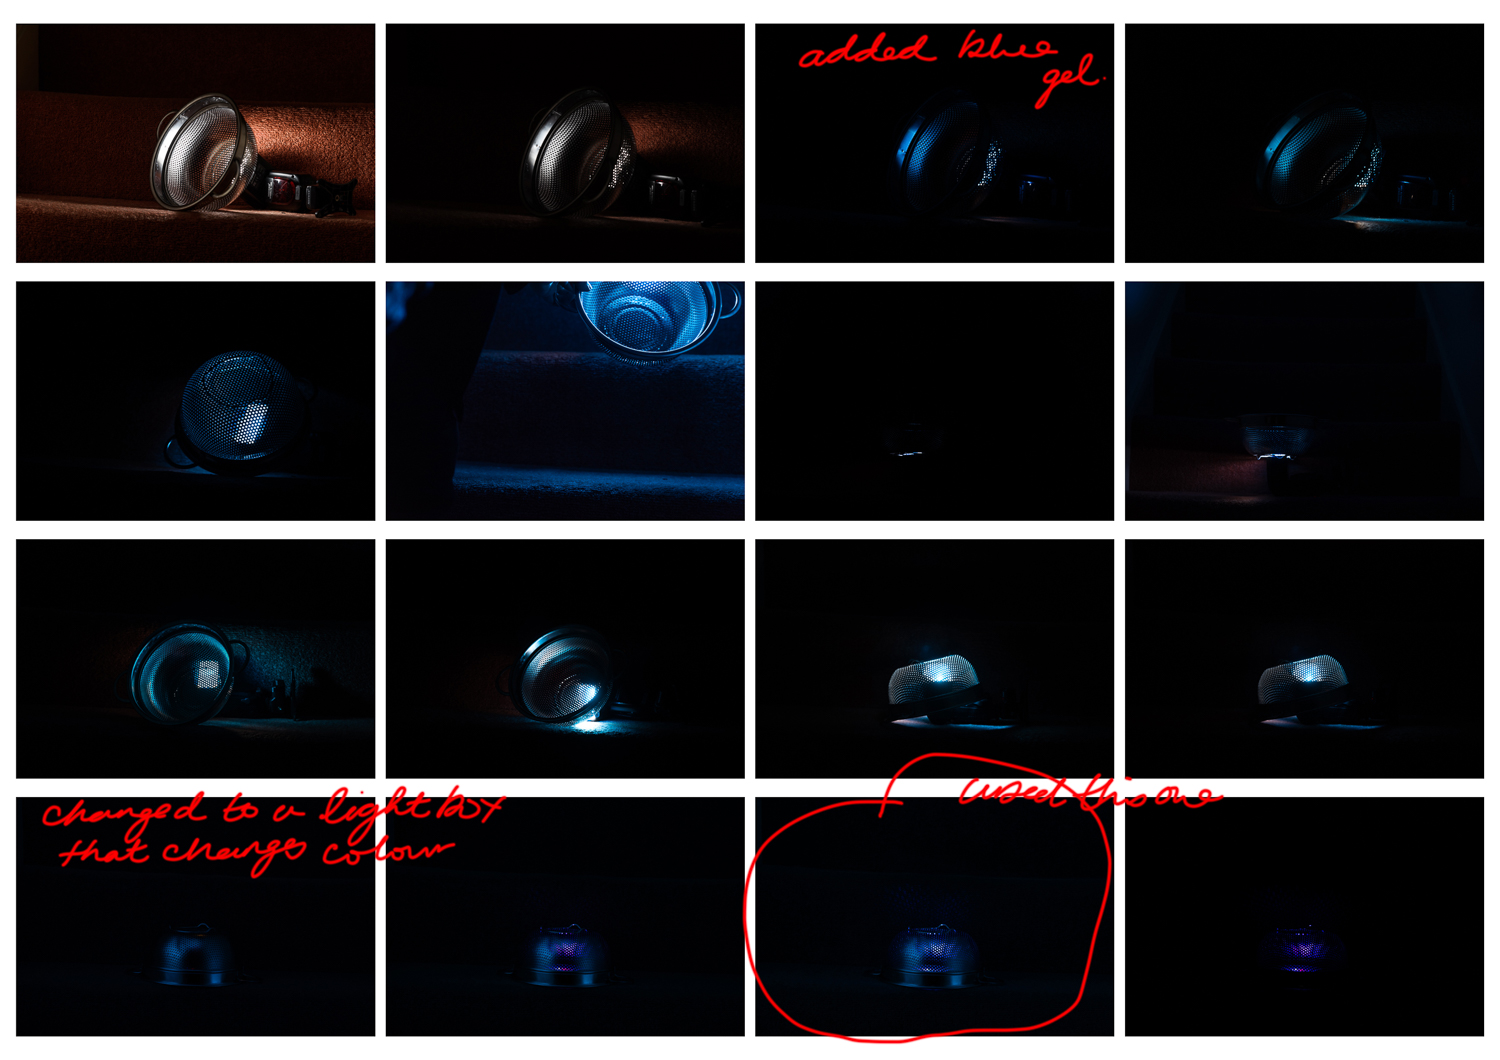
I found this tutorial on the internet: How to create a Kaleidoscope – then needed to take an image to use to create my image. I found a metal colander which had the inside curves I was looking for. I also liked the idea of shining a light through the colandar. I added a blue gel to the speedlight to give a blue light and took a range of images with the colander in different positions. These can be seen in the contact sheets below.
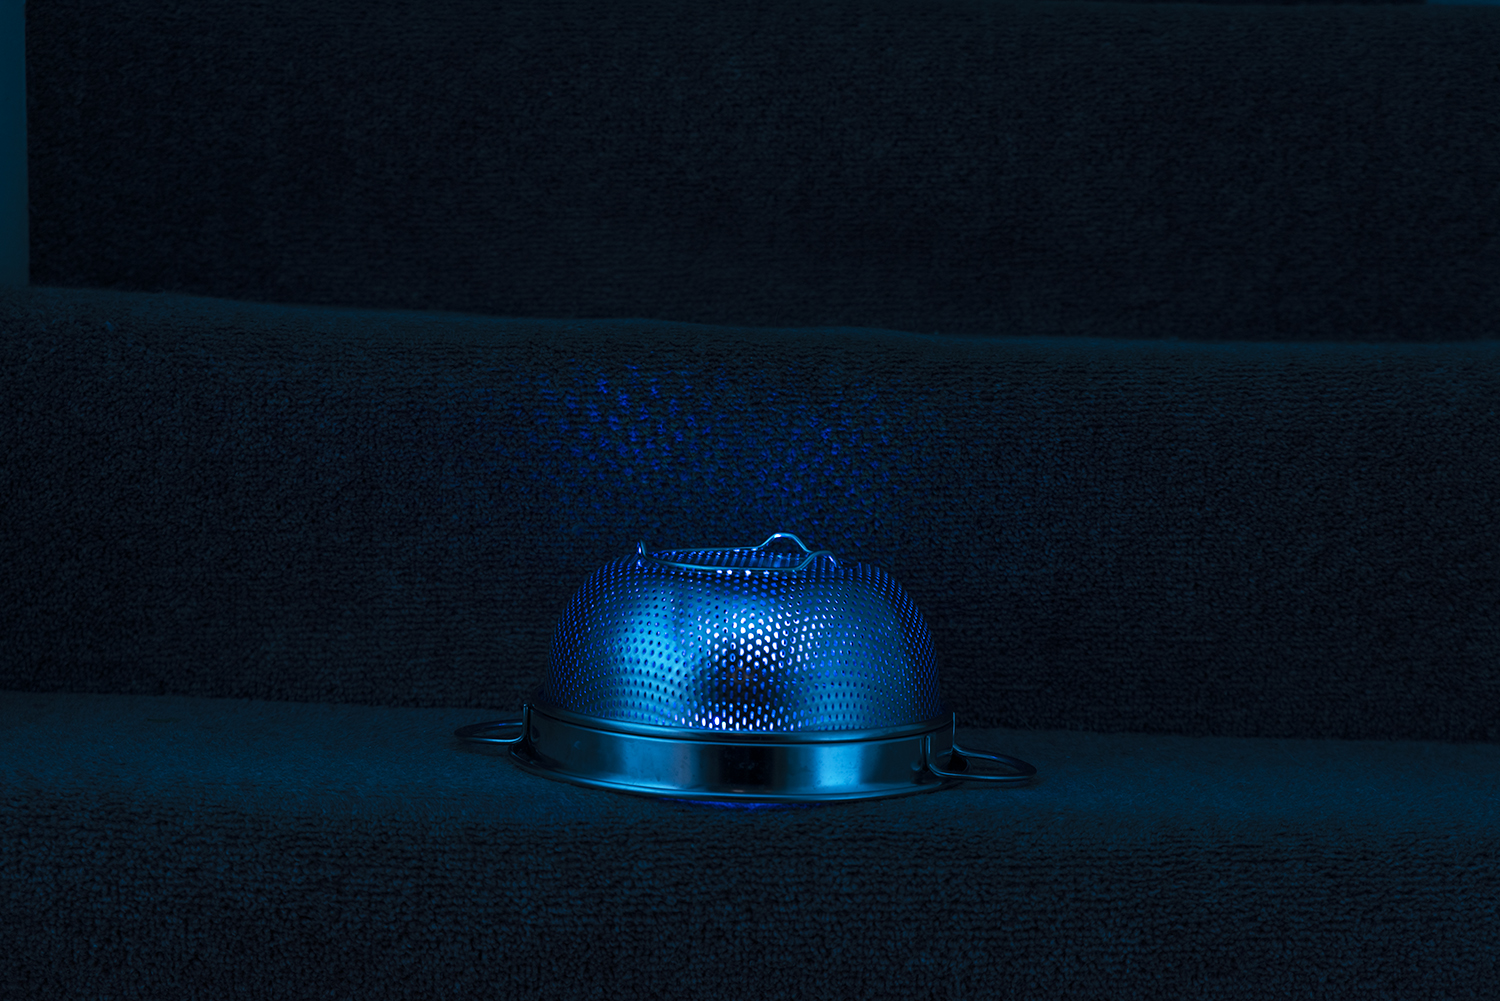
Although the image chose looks quite dark in the contact sheet there was nice light spatter on the carpet above it. I was also drawn to the two ‘feet’ on the top which reminded me of the two protrusions on the item I’d felt.
I used this image to create the kaleidoscope effect as per the tutorial.
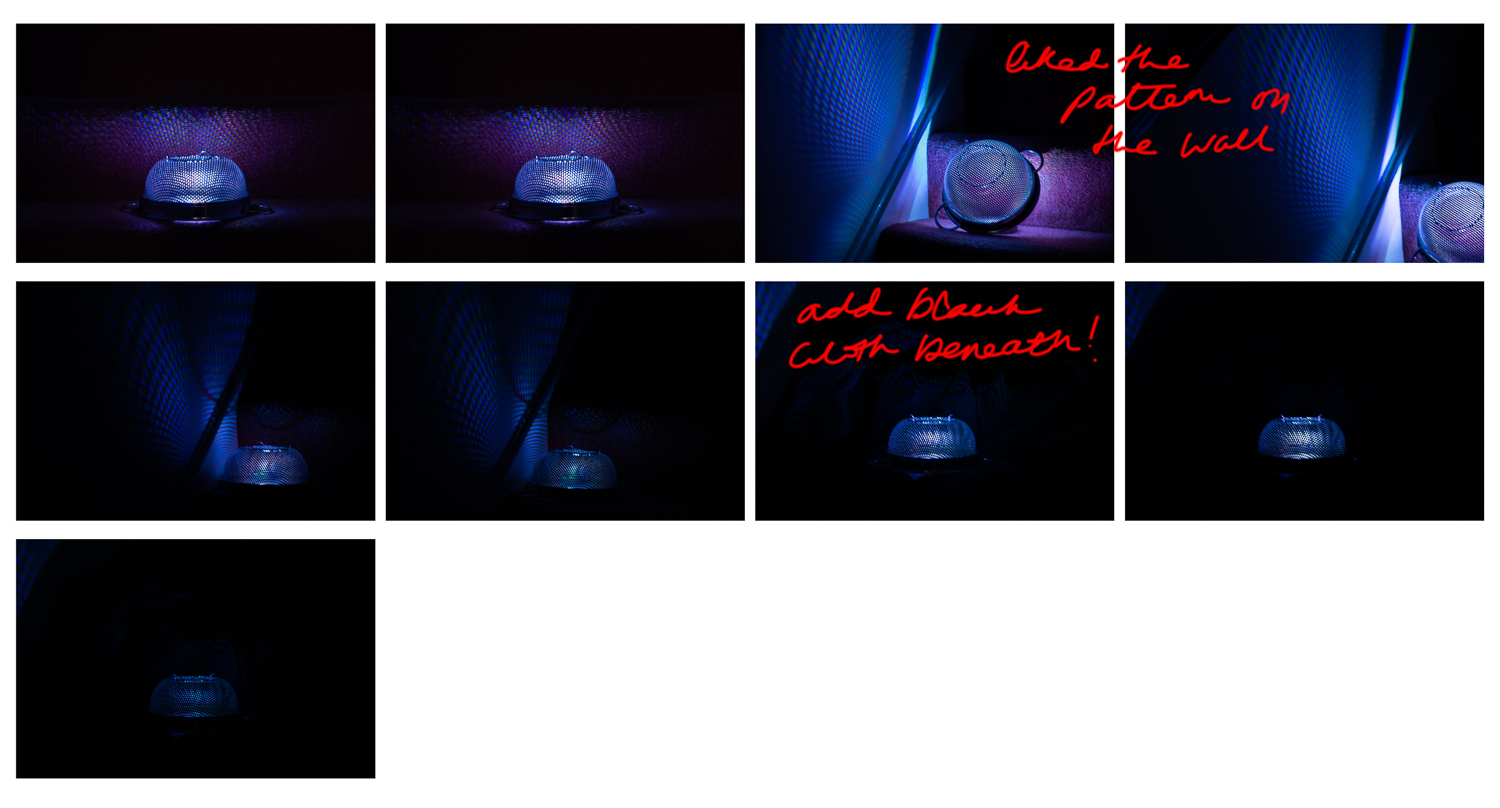
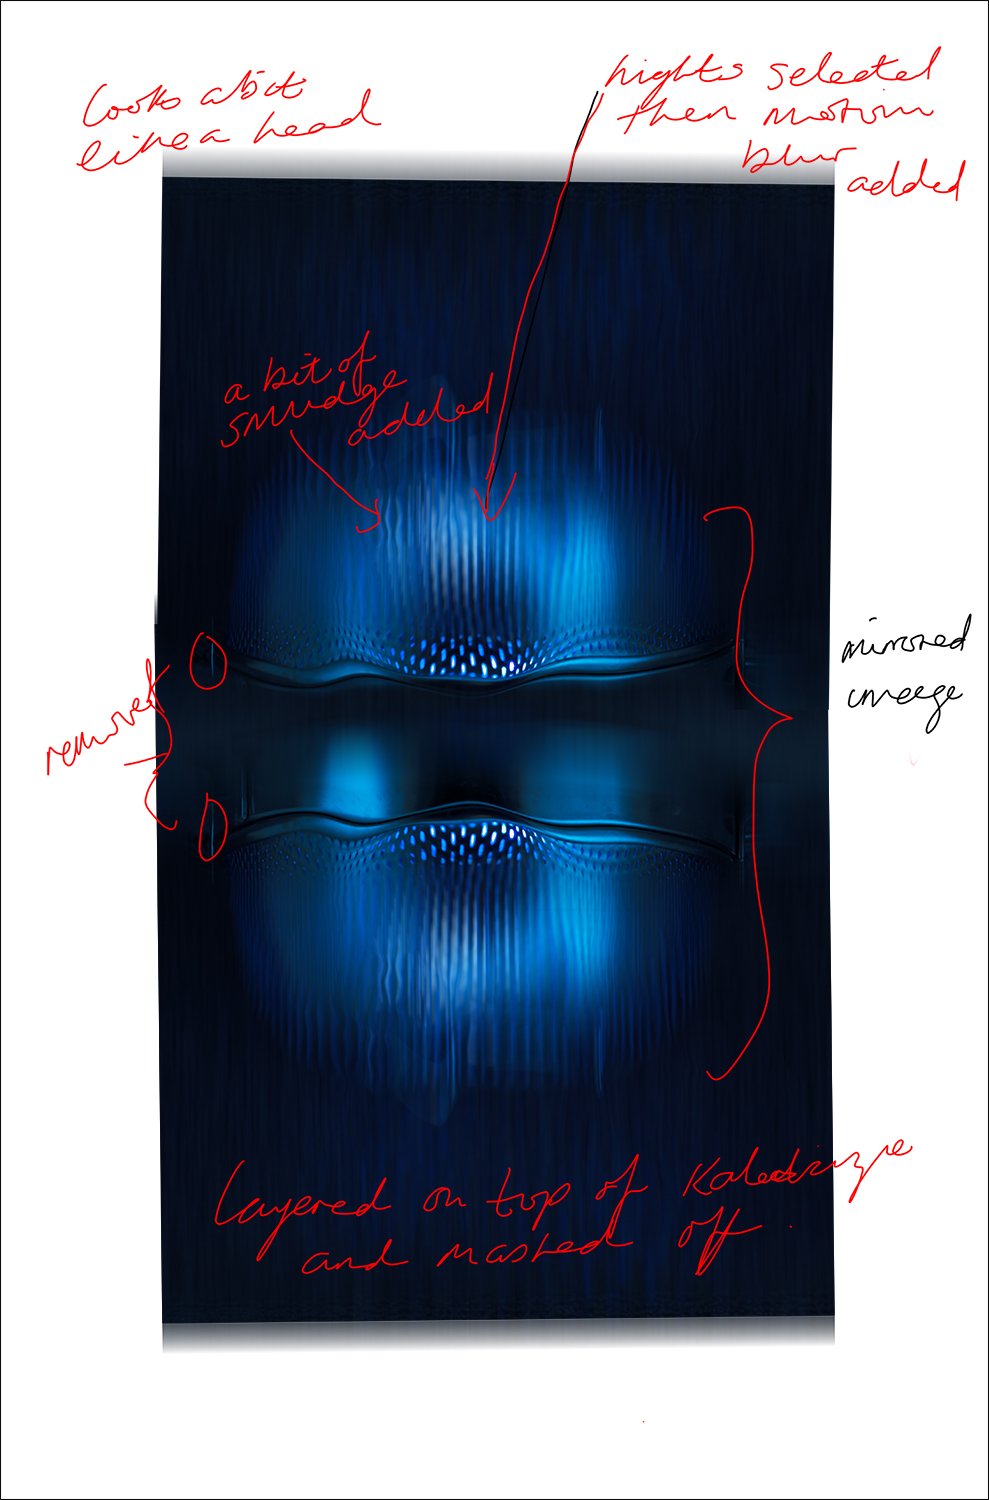
I have annotated below the amendments made to the colander.
This layer was added on top of the kaleidoscope layer and masked to merge them together. The original image was also very blue, so I added a hue and saturation layer to desaturise the colour . I also added some radial blur to the background highlights to give it a softer look. The wavy lines in the centre represent the ‘S’ shape I felt. The image can be view either way up in order to represent the fact that I couldn’t figure out which way round it should be.
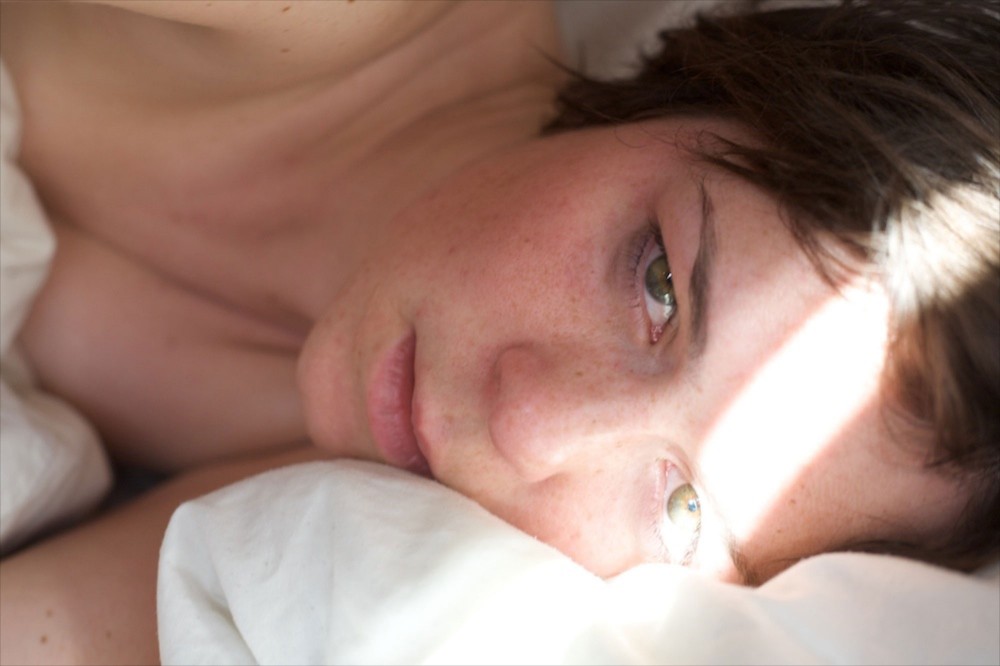
Helen is my sister, I gave her the brief and she provided me with the first object and test piece for this series of images.
sitting on the sofa in her lounge, I was blindfolded and then given the object. I remembered I should be recording about half way through my 5 mins, so my husband only started recording on my phone at the end.
I cannot post the pic of me handling the item or the item itself because I haven’t finished the set yet, but I’ll add to the final assignment document.
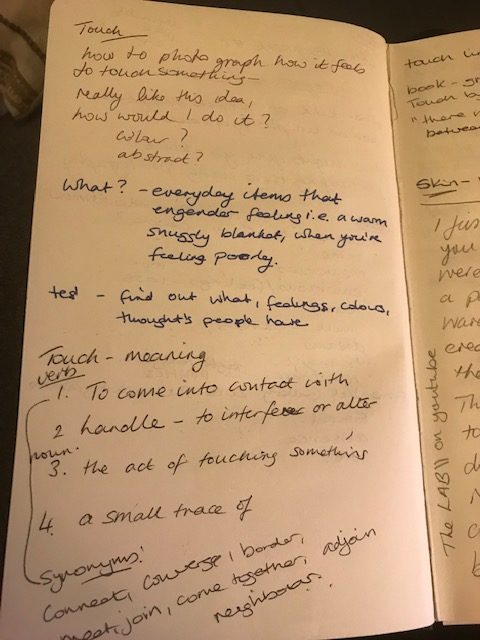
Copy of my written notes
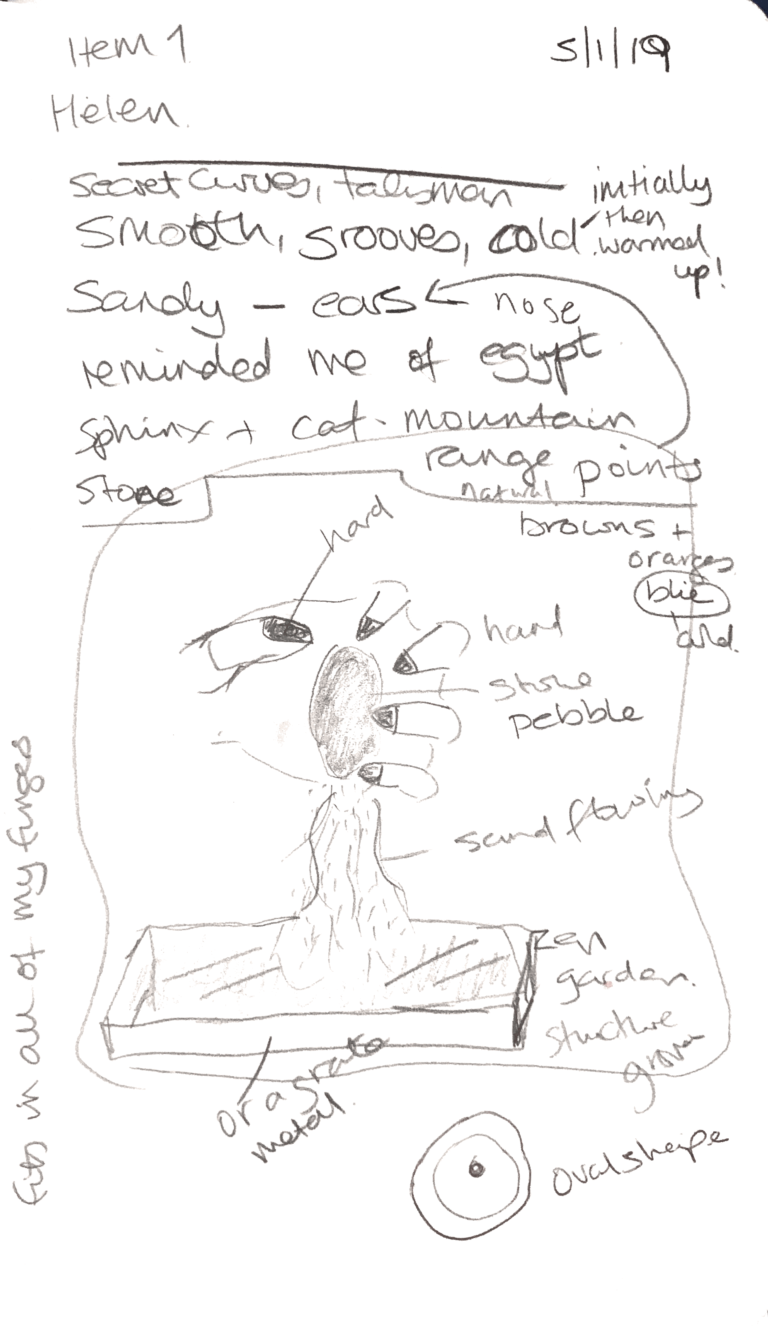
When I first held the object, I was a little underwhelmed, but I found it really interesting to be experiencing it without seeing it. I tried to create a visual image in my head based on what I was feeling. I got quite fixated on the groves in it and that fact that I thought my fingers were creating a little cage around it. I have very small hands, so I think it was a surprise that this object fit in my hand in this way.
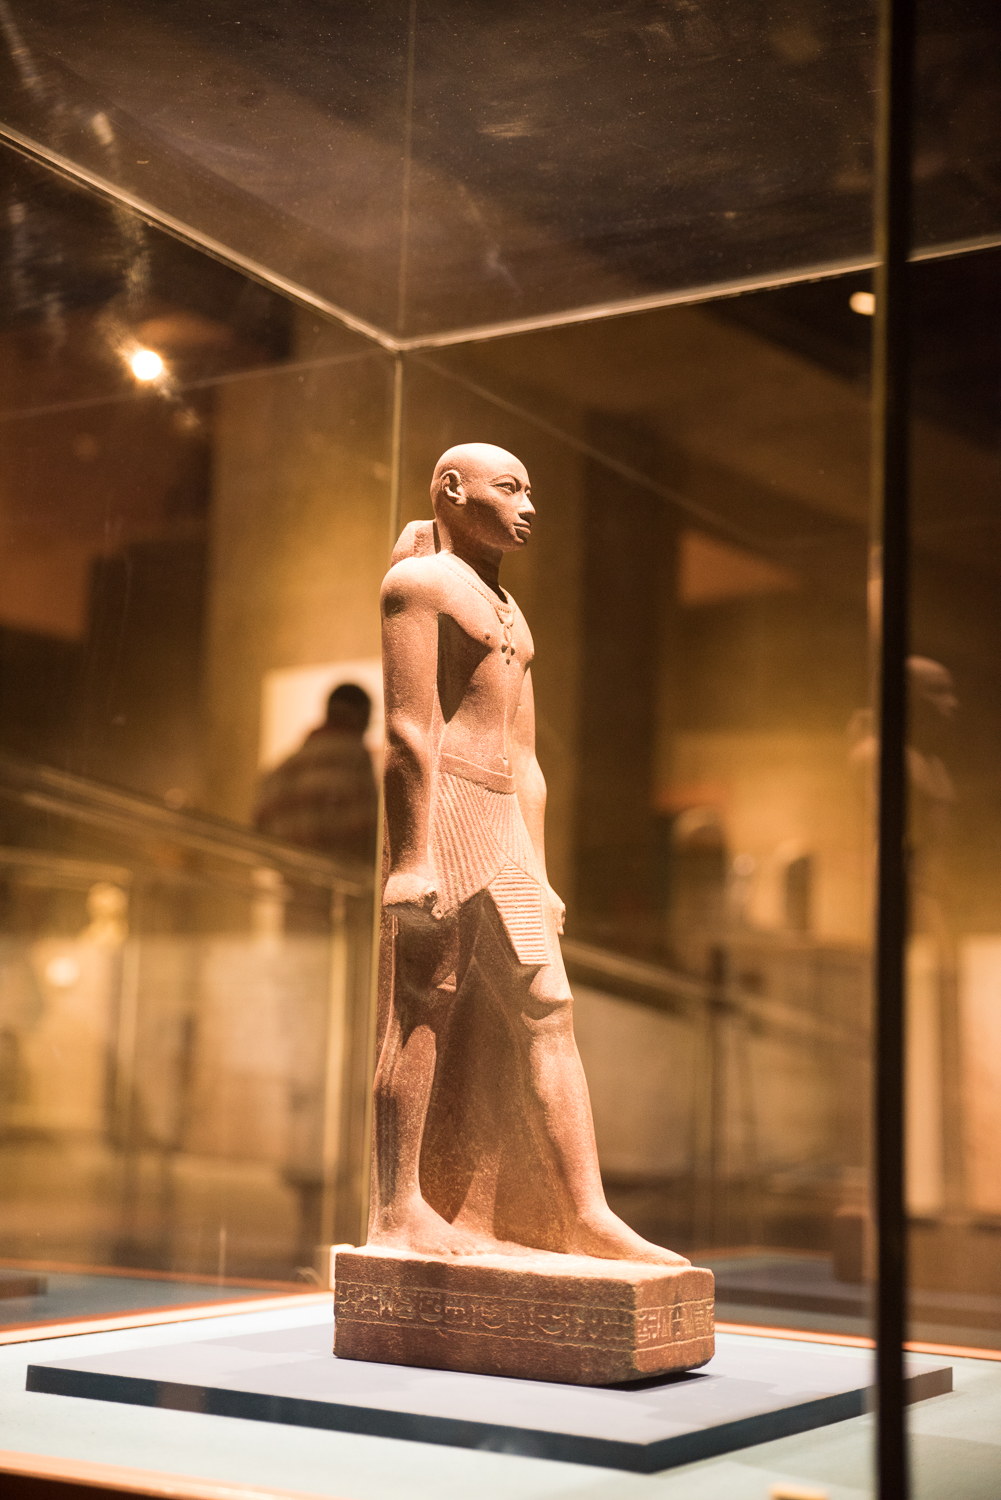
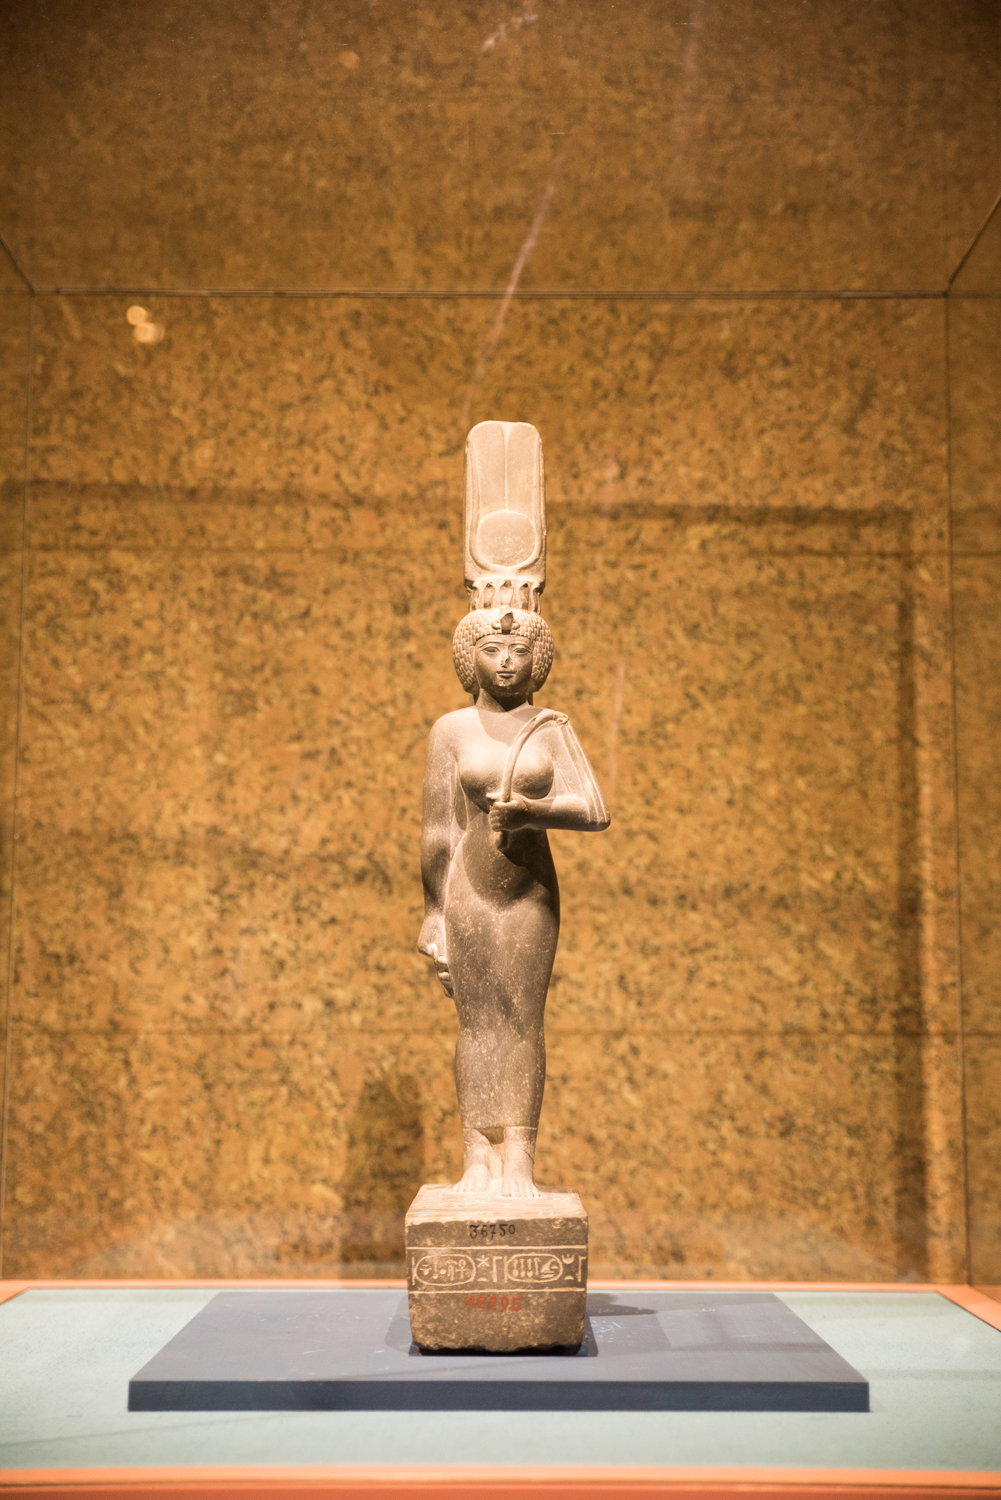
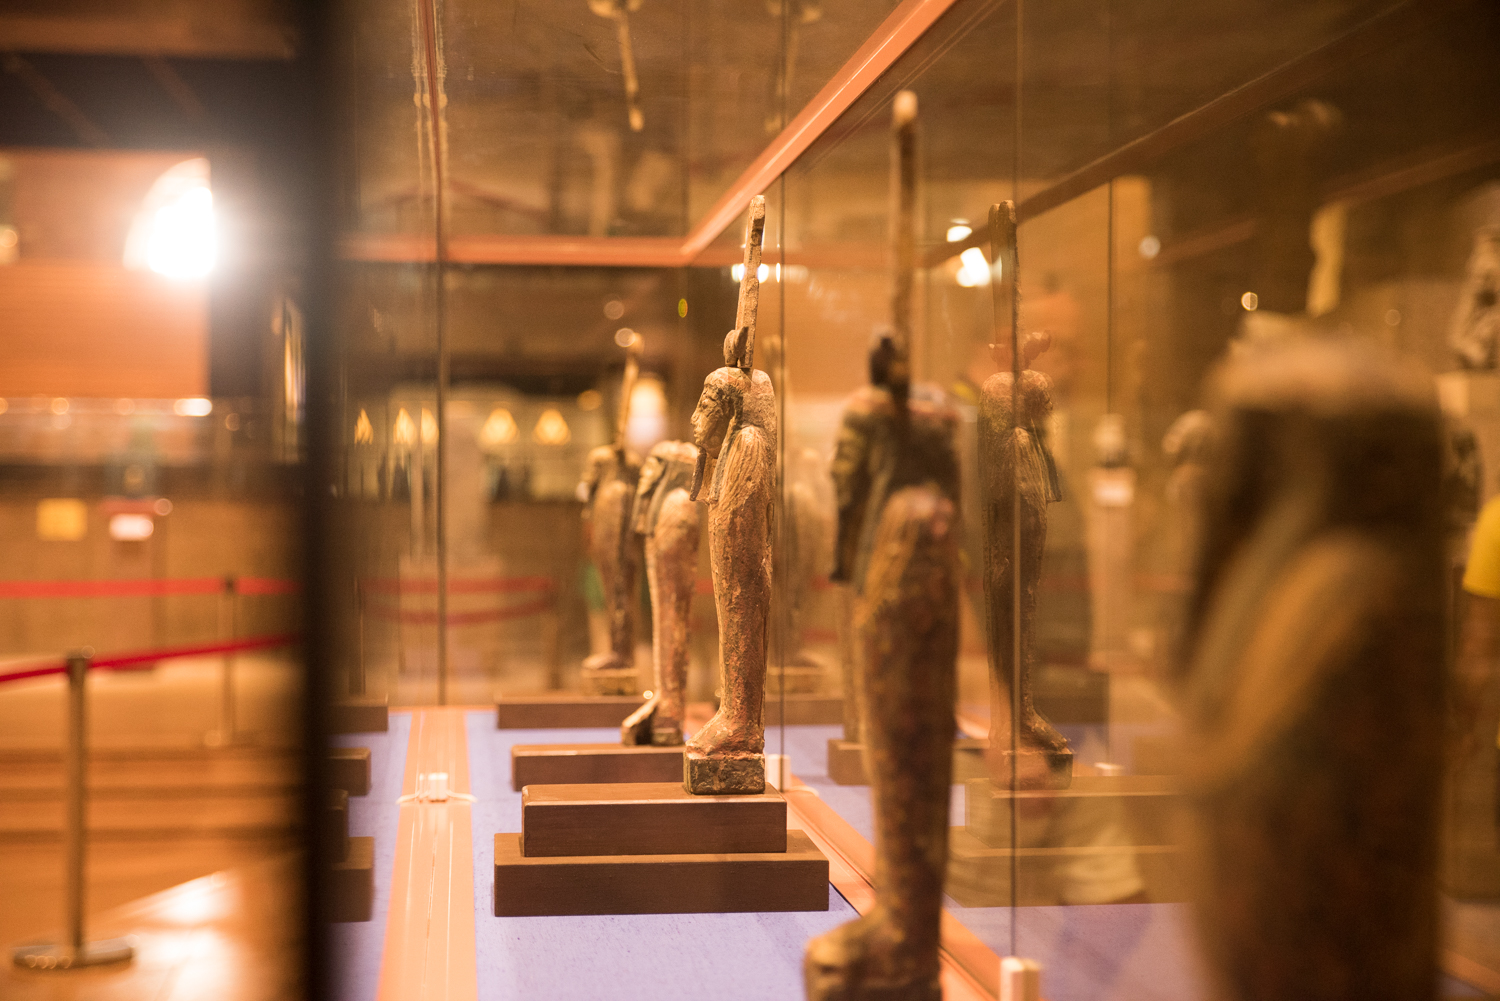
I wasn’t sure I would be able to come up with an image at first, but on the drive home (my husband was driving), things began to start popping in my head and I drew the image above quite soon after. Once it was in my head, I couldn’t / didn’t want to change it. The colours came from the colours in a picture of an idol in a museum I took in Egypt a few years ago. When holding the item, it immediately popped into my head. This was a bit of research done in the middle of the night!!! looking through my old pictures for reference.
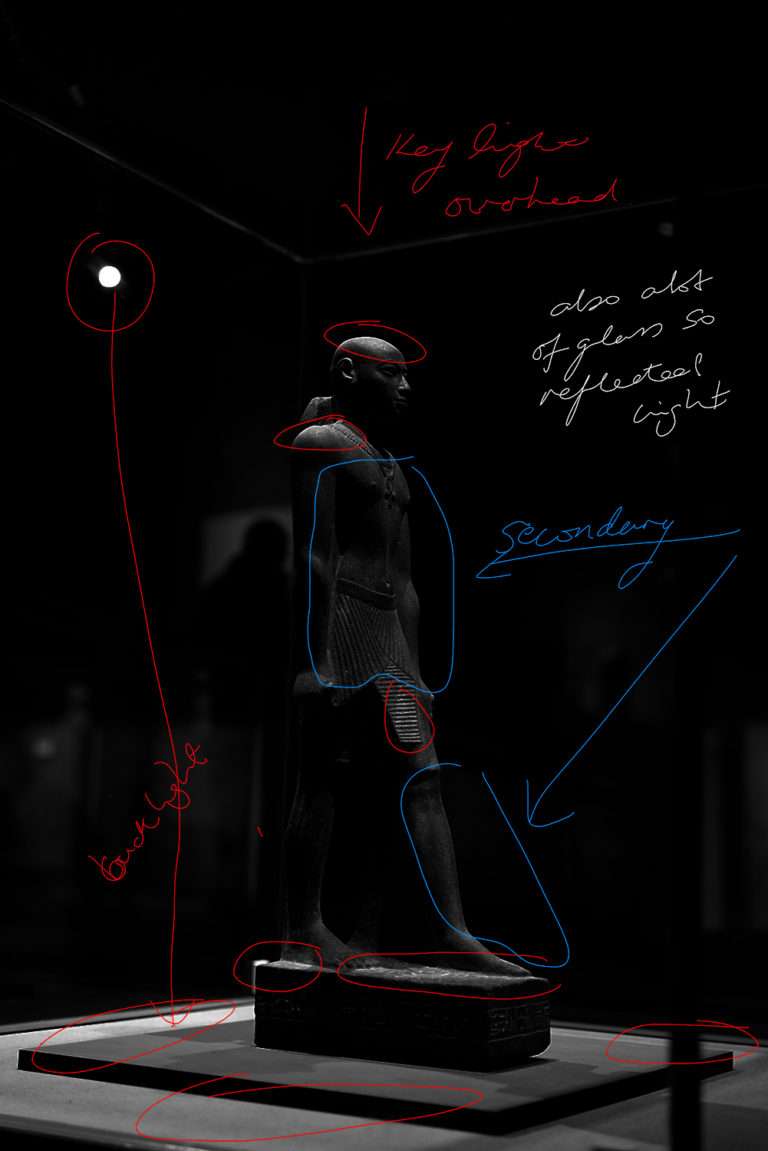
I definitely wanted to emulate the sandy yellows and blues. I used one of the images to look at the lighting:
key lighting came straight down and there was secondary light coming from the front.
Once I had the idea in my head, I started thinking about the technical aspects of the image. I knew I wanted to include a hand and initially I wanted this to be my own. However, I also realised that that would make it quite difficult logistically to take the shot and I wanted to do as much as could in camera.
My props list was:
hand
stone
sand
a container for the sand
blue paper/cloth for the background
lighting (two speedlights, umbrella, honeycomb)
I went to the beach and picked a few stones off the beach I settled on one that was oval in shape and fitted nicely within the palm of the hand. It was also a sandstone colour to fit with my Egyptian sand theme. This ended up being a wooden anatomical model that I could make to look like it was holding the stone in a little cage.
We had some sand and found a dark wooden picture frame to be the base for the sand. I had this idea for a kind of zen garden in the sand, so that I could incorporate the grooves, but this element didn’t really work.
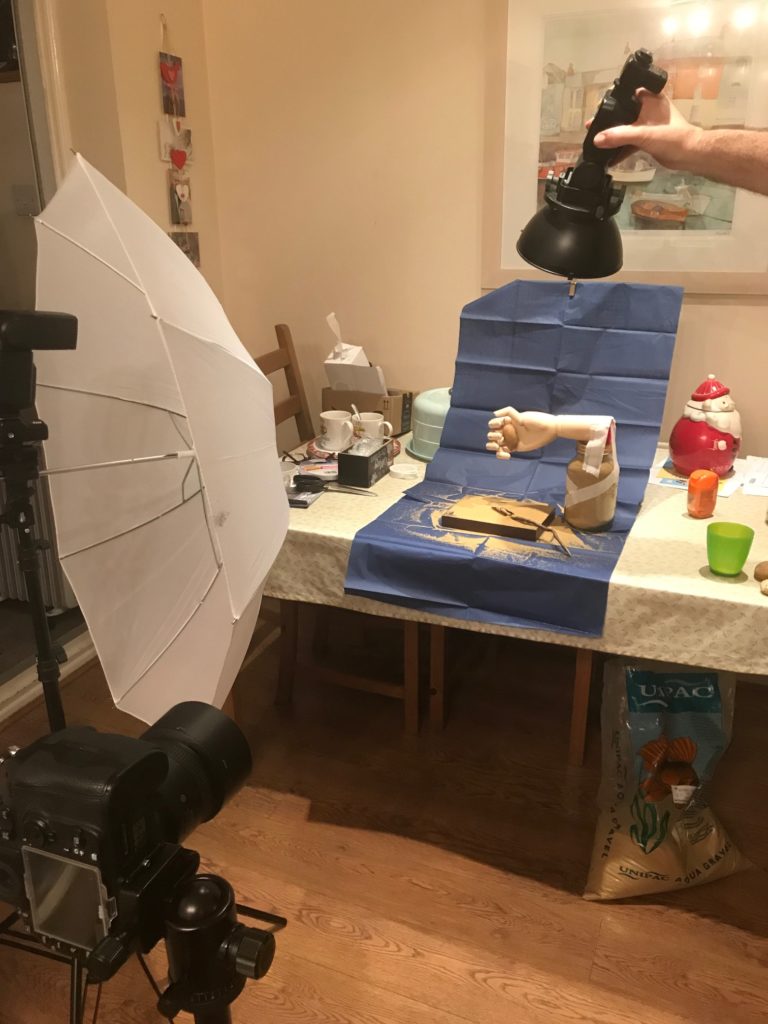
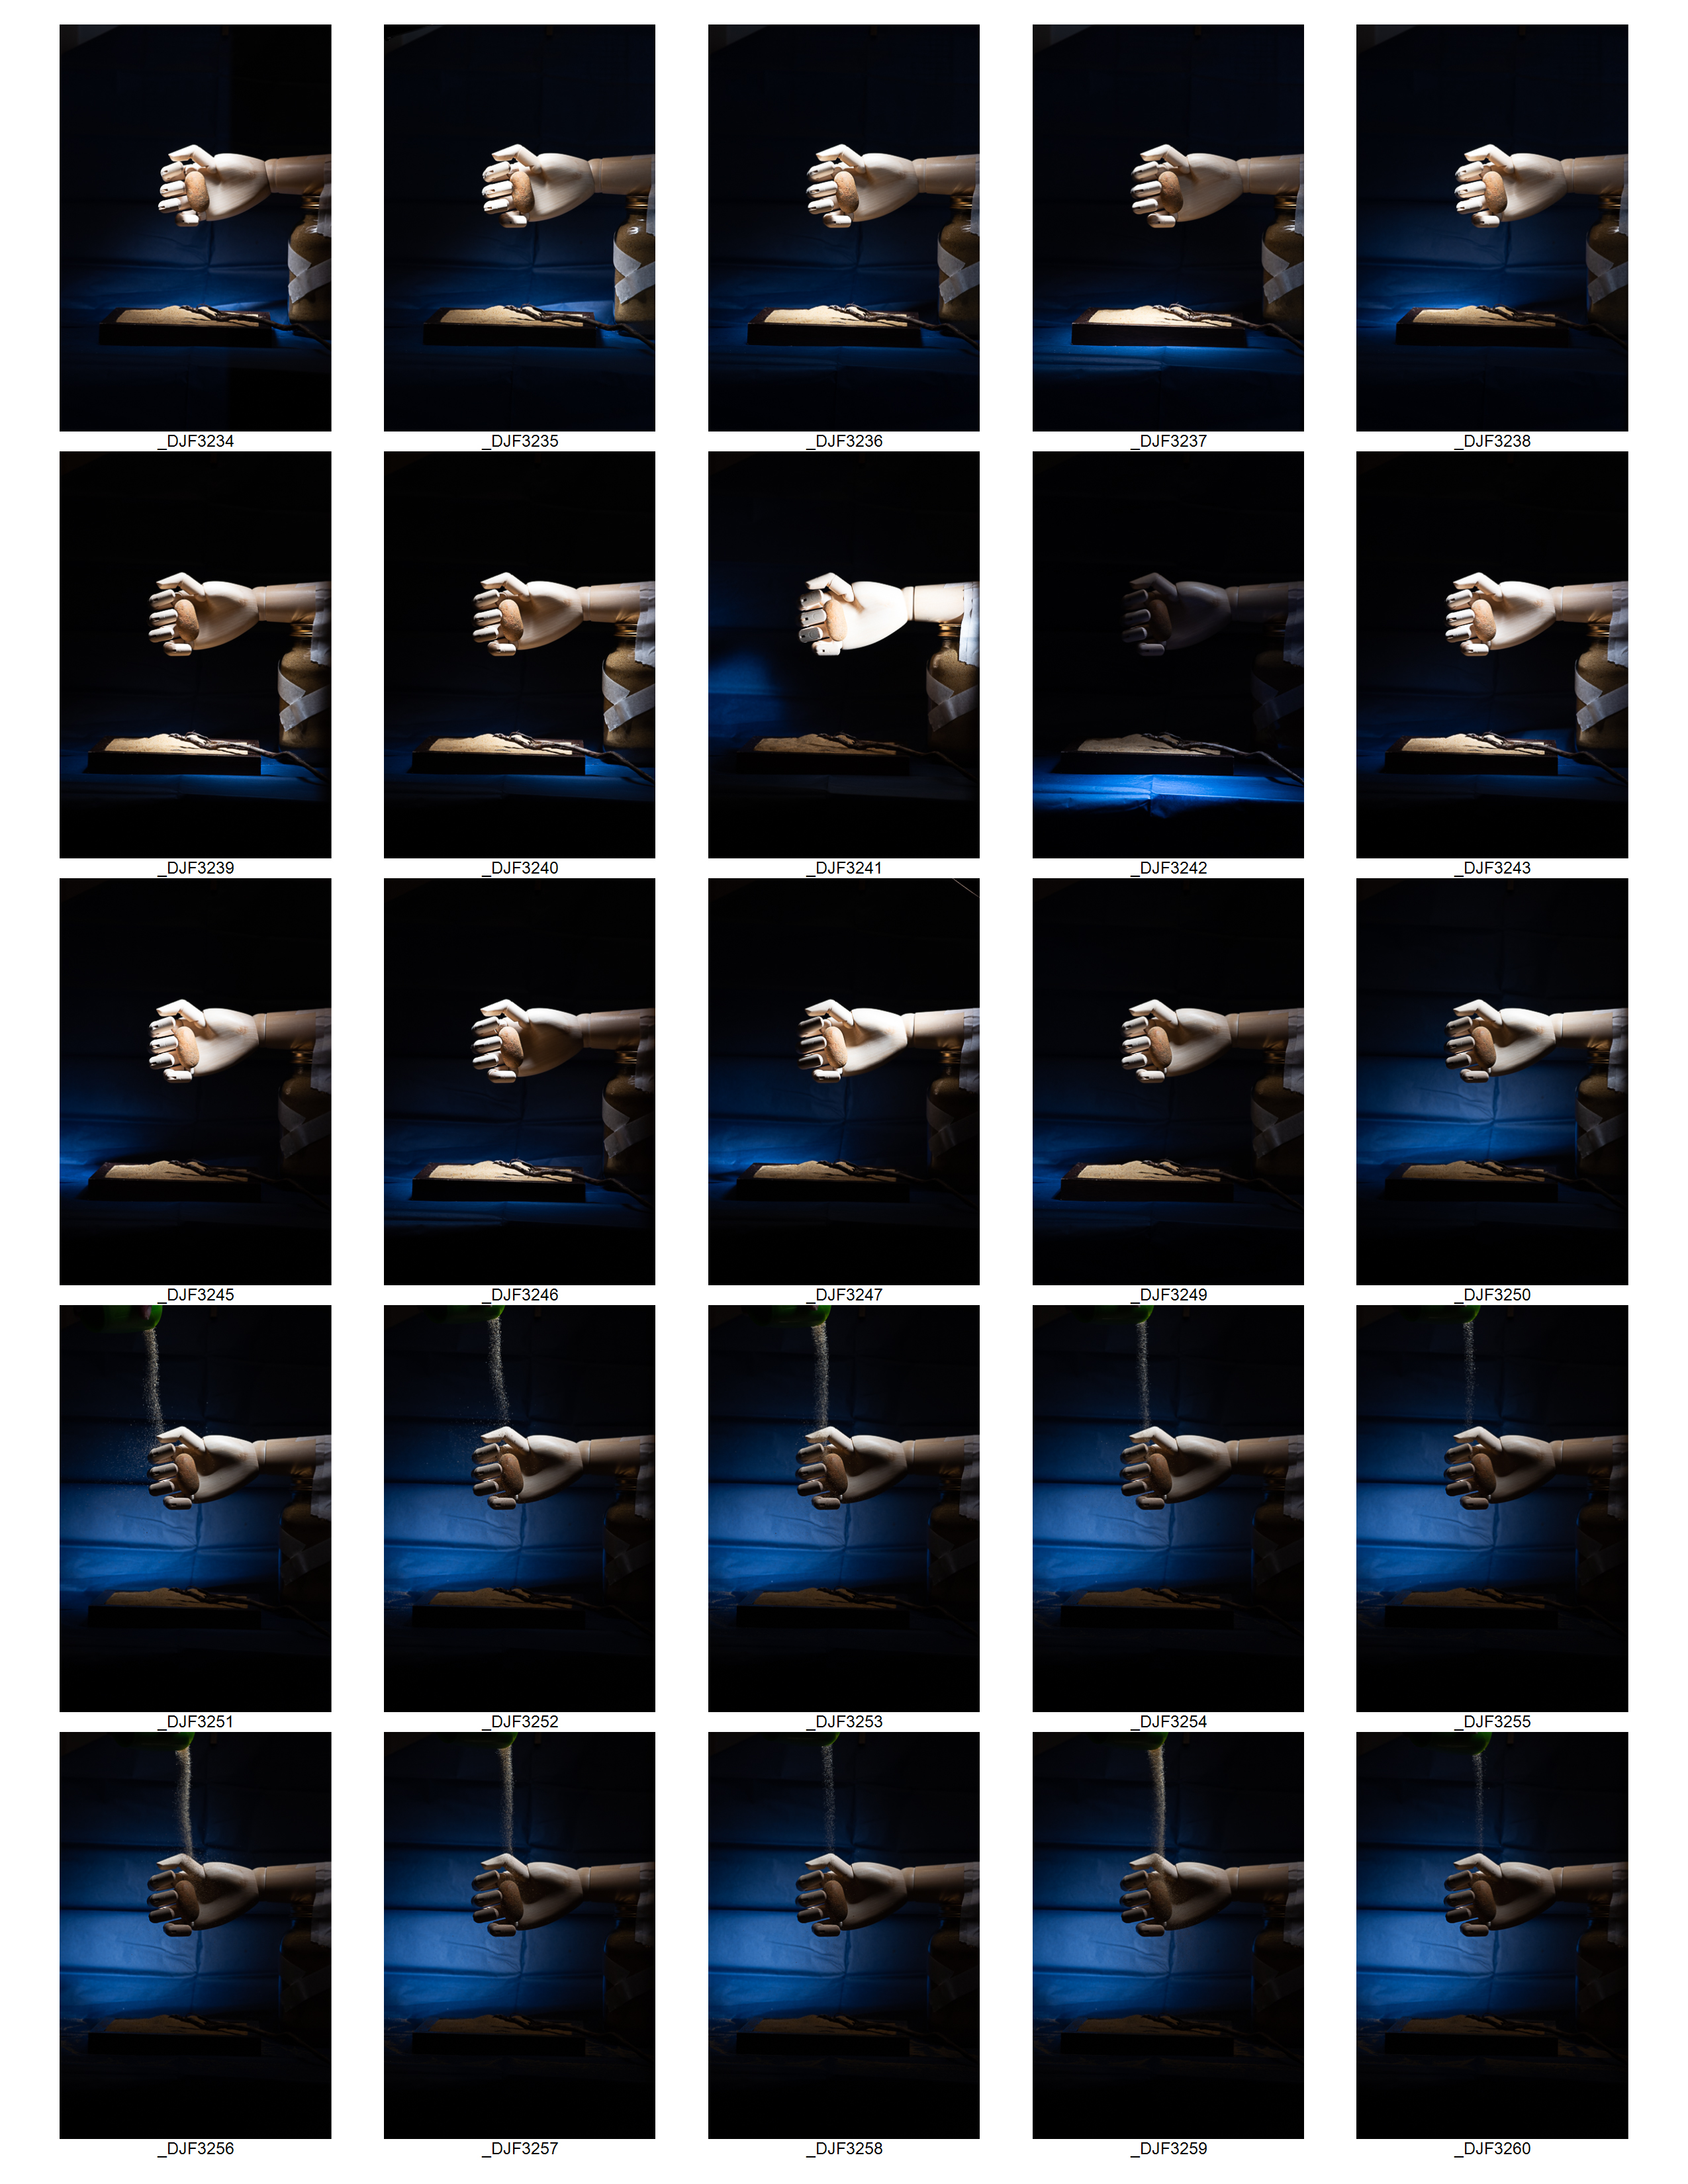
Once all the items were gathered, I set them up on the table in my kitchen with a one shoot through umbrella and a speedlight with a honeycomb dish held directly above this.
The set up and lighting for Image No 1
Technical Information
The images were taken with a Nikon D810 full frame camera with a 85 mm 1.8 lens. Two speedlights were used to provide a key light above the set up with a dish and honeycomb and a secondary light shot through an umbrella.
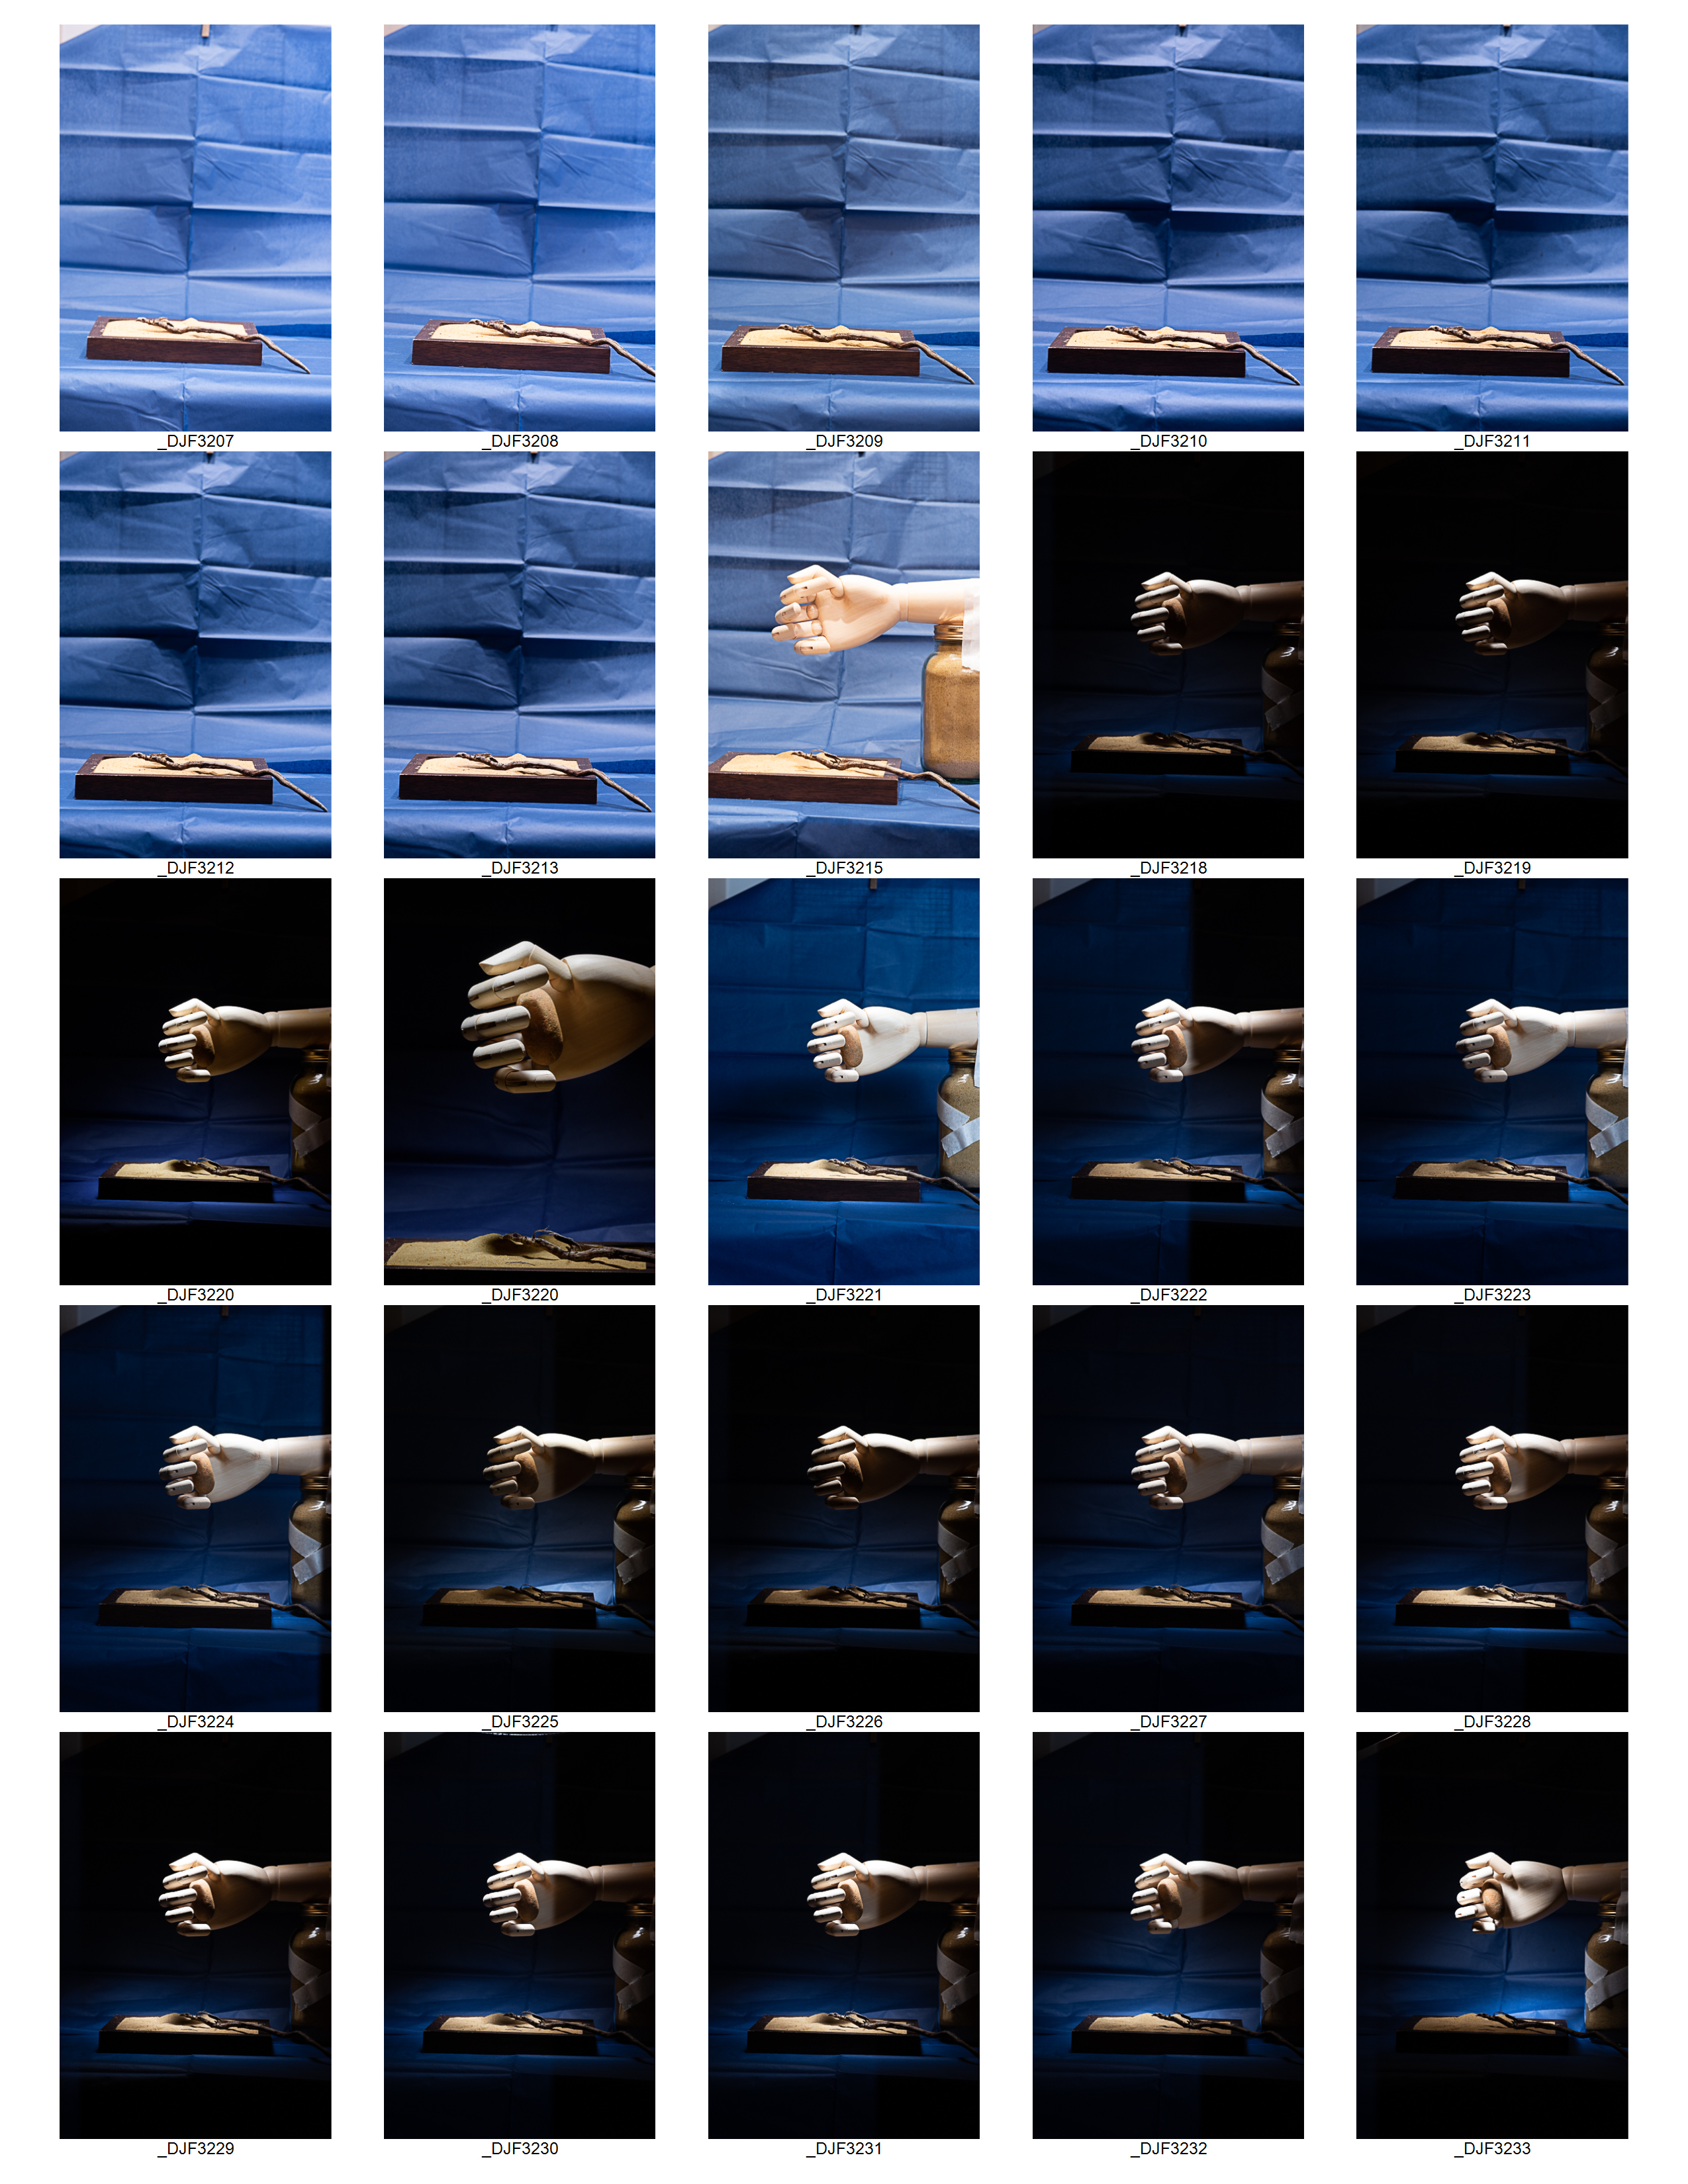
The contact images below demonstrate how the shot was set up and the lighting was adjusted to get the feel desired. It also shows how the set up progressed up until the the sane was poured over the stone.
Editing
The image chosen was one of the last taken. I chose this one because the sand wasn’t too heavy over the stone.
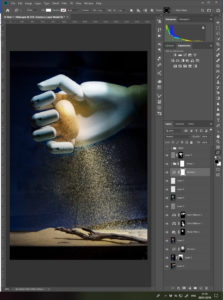
The image was edited using Adobe Lightroom and Photoshop. The sand above the thumb was removed by merging the image with another image where there was no sand.
printscreen of photoshop file
various tools were used including:
colour balance
curves
photofilters
high pass sharpening
layers and masks
displacement maps
added shapes and blending modes
overlay
I used a curves layer to make the hand look cooler and stone/sand yellower.
The Final Image
Helen’s Item – Image 1
The item was very small and could be completely enclosed in my hands which are themselves small. The object was smooth to touch and cold at first but warmed up as handled. There were distinct grooves carved around the base and a couple of spikes at the top which felt like cats’ ears.
The item reminded me of an Egyptian idol which led to the idea of the sand and the colours. I have added some ‘secret’ grooves to the stone and I added a metal overlay to the nails to emphasise the cold touch. The fingers represent the cage around the stone.
Item 1 – Helen Final Image (so far!)
Reflection
I really enjoyed this and am really looking forward to doing the next item. I have tried to be really strict and finish writing this up before moving on to the next one and I have decided not to view any of the actual items until I have finished them all.
For the next and subsequent items, I will try and make sure that it’s quiet and that I’ve got all of my equipment ready before we start. i.e. get my phone ready to record my comments.
I think I would like all of images to be portrait but of course it may depend on how the next ‘feeling’ session goes and what image I am compelled to make. It will be my aim to print these as A3 paper to be presented alongside images of the items. do I need to make such detailed notes for all of the rest of the images? I will ask my tutor about that.
I have decided to concentrate on the idea of exploring how to photograph how it feels to touch something. The idea is to create an image that is inspired by the item rather than the item itself.
In order to really experience the touch of the item, I feel that I need to eliminate sight from the reality. To that end I am going to work to the following methodology.
I will ask 7 – 10 people to participate in this assignment with me (the thinking behind this is that I will get objects that I don’t know and therefore won’t be influenced by what they look like)
I will be blindfolded and won’t see the item at all
The participant will be asked to take a photo of the item and a photo of me handling it, but won’t let me see the item. They will also write a paragraph about the item, and why they chose it.
I’ll handle the object for no more than 5 mins
I will record my comments during the touching sessions so I can make notes afterwards.
The object will be removed immediately, so I don’t see it.
Following this I will create an image based on my feelings of touching the object, which will include colour, state, feelings etc.
I won’t see any of the objects until after all images are complete. (my husband has agreed to collect the images of the items and me handling them and keep them save until the assignment is finished)
Each image must be finished before attempting the next item (I think this is necessary so that individual images aren’t influenced by other items)
I will use this methodology with the first item as a test, it may need to be amended based on my findings, but this feels like a good place to start
Photographing the unseen Start by doing some reflecting in your learning log. What kinds of subjects might be seen as un-photographable? How might you go about portraying them using photography? List a few examples of things you’re experiencing now or have recently been thinking about. This doesn’t have to be too in-depth or revealing, but it can be if you want. Equally, it might be something as apparently trivial as how you’re going to fit everything into your busy day. At first you may come up with literal examples, but the more you think about them the more those ideas will develop into specific and more original ones. Make a list of at least seven ideas. Try and keep to things you have a personal interest in or curiosity about. Keep a notebook with you at all times and make notes when ideas strike you as interesting. (This is good practice for all stages of the degree and beyond. Ideas books are something to be revisited time and again for ideas and hints for the photographer you’re becoming.) Now implement one of your ideas. Aim for a tightly edited and visually consistent series of 7–10 images.
So here’s the reflecting in my learning log 😉
I was immediately drawn to this one of the two options and did keep my notebook with me at all times. In fact it’s amazing how many times, I woke in the middle of the night and added something to it.
What kinds of subjects might be seen as un-photographable?
Connections (between people or environment) you can place a person within an environment or next to another person, but it’s very difficult actually capture the emotional connection between the two things.
time – you can photograph the effects of time on a person or object but how do you capture time or the concept of time itself.
Memories –
Emotions / feelings
thoughts
touch
dreams
ideologies – religion / politics
sound
absence
love
most of these things are things that are experienced by a person within by your senses.
Fraenkel Gallery 2013 – The unphotographable [accessed 02.01.2019] The Unphotographable, s an interesting article about an ambitious exhibition exploring the history of that which cannot be photographed. A lot of these images are abstracted and distorted, does this imply that to represent something unseen, it has to be unrecognisable. they are said to represent sound, absence and love.
Touch – this is the one that really interests me – I’m really drawn the idea of trying to capture how it feels to touch something. Not photographing the act of touching an item but trying to represent how it feels.
The video I found here about photographers trying to represent food they were eating blindfolded. The results were really different and very interesting.
using your senses to create an image
As photography is a visual medium and I want to create a visual representation of the feeling, it seems logical to remove the visual element of my senses and try to create an image that is inspired by touching something.
My idea is therefore to ask 10 different people to give me an object to touch whilst being blindfolded. I will write a brief and ask people to help me. I will expand on this more in a separate post.
Exercise • How does Briony Campbell’s The Dad Project compare with Country Doctor? • What do you think she means by ‘an ending without an ending’? Make some notes in your learning log.
At first you think that Briony’s project is personal and full of emotion, reading the story that goes alongside it, really engenders some of that raw emotion in the view as well. The soft tones and shades add to dreamy almost unreal aura they produce. Whereas, you when you view’s smith’s images they are following a stranger around doing his job and you would think they would be dispassionate. However, that’s not how they come across, the compositions and use of high contrast really give a sense of drama and factual.
However, having read Smith’s bio, it appears that these images were taken only a year after he himself had recovered from a major injury sustained whilst acting as a war correspondent during the 2nd World War. Putting them into the context of his own experiences and this may be why they are full of emotion and candour.
Briony Campbell says that the work is ‘an ending without an ending’? – I believe she means that because this is personal about her life that it can’t / won’t be packed away in box some place once the project is finished. It will always be with her and help her to remember her dad. Personally, I think once you’ve invested in a project it always very hard to draw a line under it and never think about again!
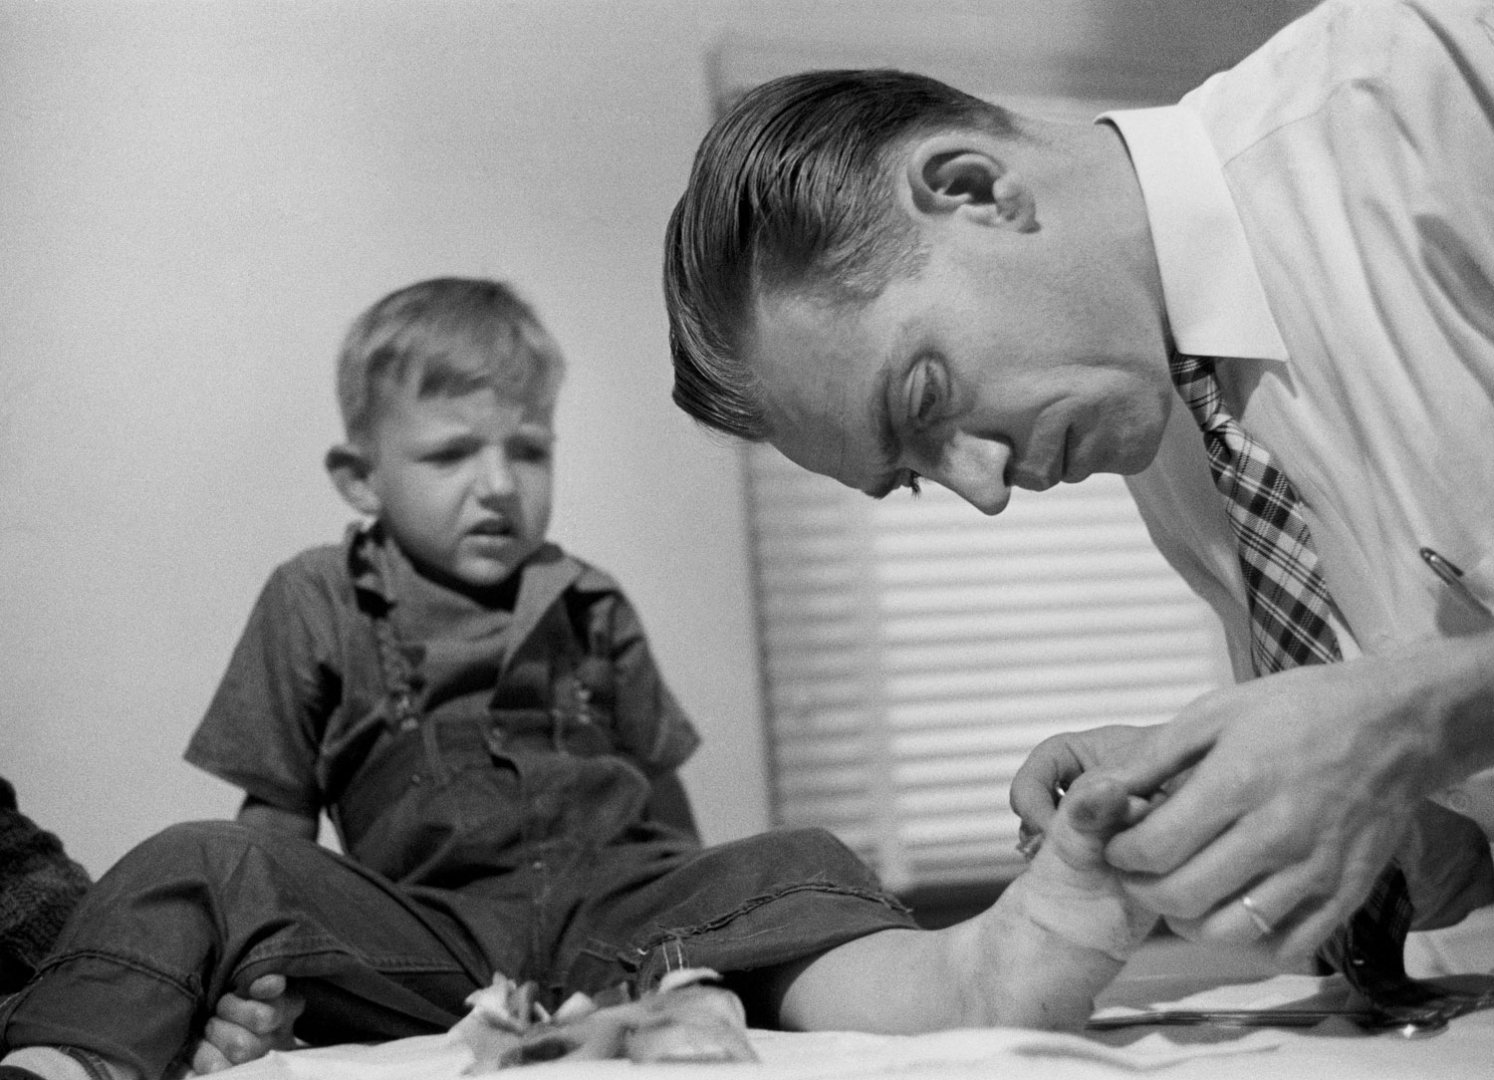
His work the ‘Country Doctor’ was a ‘fly on wall’ documentary of the day to day life and work of a general practitioner named Dr. Ernest Ceriani.
Doctor Ceriani checks 4-year-old Jimmy Free’s foot, cut when the boy stepped on broken glass.
Smith’s images although documentary also capture the emotion of the scene by his composition and angles. Taken in 1948, this is only a few years after being a war correspondent where he focused on taken images of the suffering of the people rather than the soldiers and battles. He himself was injured and had to undergo a lot of surgery so it is perhaps these to events that led him to concentrate on the life of a doctor.
Briony Campbell‘s Essay written in 2011, 2 years after her father’s death gives a more reflective and object view of her ‘Dad Project’, than her first draft.
The project is personal and emotional and although she found it difficult to do at the time, it has become very intrinsic to her and her work. She has been struck by how sharing her work has helped her grieve but also the impact it has on others.
But after the terminal diagnosis, it served to comfort my mourning. by Briony Campbell
I understand her comment about remembering that new viewers to the work are just experiencing this impact and she must remember this in responding to their reactions.
She says that the work is ‘an ending without an ending’? – I believe she means that because this is personal about her life that it can’t / won’t be packed away in box some place once the project is finished. It will always be with her and help her to remember her dad.
My own reaction was very raw, my own father passed away 4 years ago and this brought back many memories for me. I would love to have such images of him. It is a bit of a taboo in our country to photograph the dying process of our loved ones, but it is also a part of life, we photograph birth and weddings, why not death. Whilst I don’t like having my photo taken, I have come to realise that how important they become when someone is no longer here, but for me, like Briony, I want to capture the real person, not the person in wedding and christening photos.
Another photographer who has used grief for a body of work which I much admire is Kirsty Mitchell. The work and subsequent book is called Wonderland. She created this a tribute to her mother who had died from cancer. It took her six years. Her website here, tells the story
Google search for photographer Kirsty Mitchell’s Wonderland
For me both of these stories are personal and thought provoking. The accompanying narrative in both cases is well written and in some cases quite raw. I think this helps the viewer really engage, understand and relate to subject matter and set of images.